
How to Tarp a Roof: The Essential Guide to Protecting Your Home from Water Damage
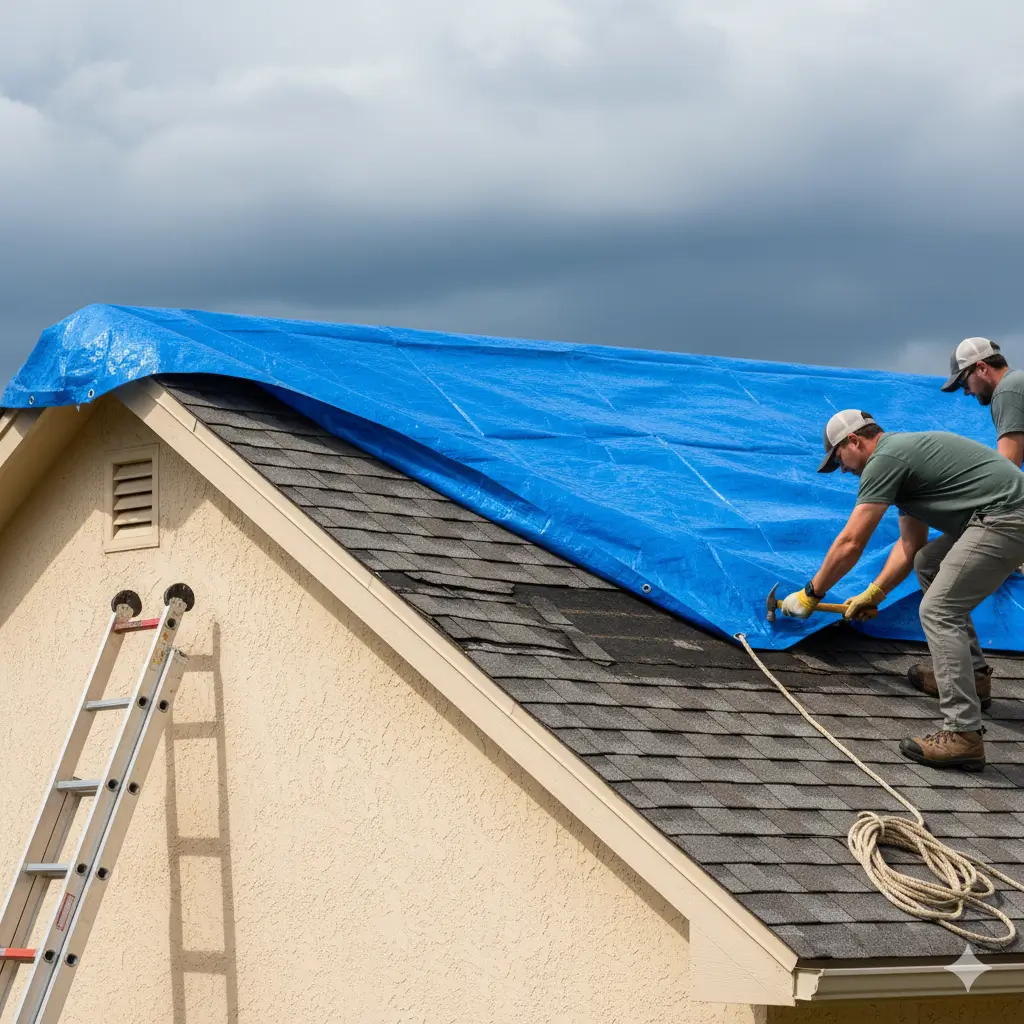
Table of Contents
Roof damage can strike unexpectedly, often during the worst possible times. Whether it’s after a storm, fallen tree branches, or a slow leak you never noticed, the consequences can be severe if not addressed quickly. The last thing you want is to be caught unprepared, watching helplessly as water pours into your home. However, don’t worry; this guide will empower you to take control—step by step.
Imagine you’re sipping your morning coffee, casually watching the rain outside, when suddenly, a loud drip breaks your peace. You rush to find the source, only to discover that the roof has a significant leak. In moments like these, knowing how to tarp a roof effectively can make all the difference. It’s a simple, temporary solution, but done right, it will prevent further damage and give you the time you need to plan for a permanent fix.
In this comprehensive guide, we’ll walk you through each critical step of tarping your roof properly—from choosing the right tarp and tools to securing it tightly and ensuring it stays in place. We’ll share expert tips, common mistakes to avoid, and the best practices that will help you minimize damage and protect your home while awaiting professional repairs. Think of this as your blueprint for staying one step ahead of the weather, ensuring that your roof is covered until you can make lasting repairs.
What You’ll Need: A Checklist of Essential Tools and Materials
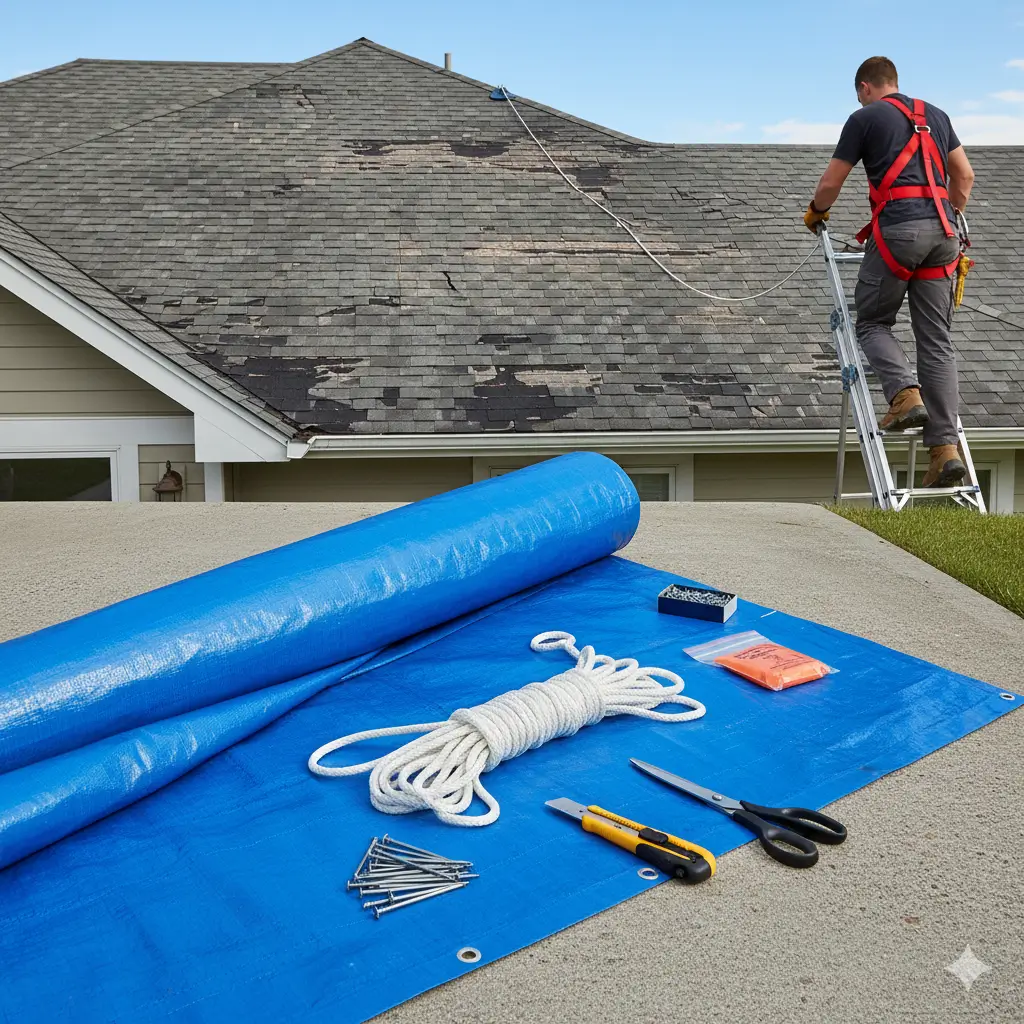
Before you climb onto the roof and begin the tarping process, it’s crucial to gather all the necessary tools and materials. Proper preparation ensures the task goes smoothly, and it will save you time and frustration while working. Here’s a breakdown of what you’ll need to get started:
Tarp Selection: Choosing the Right Size, Material, and Weight
The right tarp can make all the difference in how effectively you cover and protect your roof. Not all tarps are created equal, so it’s essential to select one that is durable, large enough, and designed for outdoor use. Here’s what to look for:
- Size: Choose a tarp that is larger than the damaged area by at least 3–4 feet on all sides. The more coverage, the better the protection. You don’t want the tarp to be too small, as water can seep under the edges. Measure the area of the roof you need to cover before purchasing.
- Material: Opt for heavy-duty polyethylene or canvas tarps. These materials are waterproof, UV-resistant, and can withstand various weather conditions like rain, wind, and sun exposure. Canvas is more breathable but can be heavier, while polyethylene is lighter and offers excellent waterproofing.
- Weight: Choose a tarp that is thick enough to withstand weather conditions but not so heavy that it’s difficult to manage. Heavy-duty tarps are a must for tarping a roof as they’re more likely to stay in place and resist tearing from wind and rain.
Tools: Ladder, Ropes, Bungee Cords, or Nails for Securing the Tarp
Once you have the right tarp, you’ll need some essential tools to help position and secure it to the roof. Here’s what you’ll need:
- Ladder: A sturdy ladder is a must for reaching the roof safely. Ensure the ladder is tall enough to comfortably reach the roof without overextending. Set it up on firm, level ground, and use the 3-point rule (keeping two hands and one foot, or two feet and one hand, in contact with the ladder at all times) to stay safe while climbing.
- Ropes or Bungee Cords: You’ll need ropes or bungee cords to tie the tarp securely to the roof. Ropes are ideal for a more adjustable solution, while bungee cords provide quick and easy adjustments. Ensure the ropes or cords are strong enough to hold the tarp in place, especially in windy conditions. If using ropes, make sure to tie them tightly and check for any slack after securing the tarp.
- Nails or Roofing Nails (Optional): If you want to secure the tarp more firmly, you can use nails or roofing nails to attach the tarp to the roof. This is especially useful for areas where the tarp might be exposed to more wind. However, be cautious, as placing nails directly into the roof can cause damage. It’s often safer to use ropes or bungee cords for a less permanent solution.
Safety Gear: Gloves, Sturdy Shoes, and a Harness (if Needed)
Safety is a top priority when working on a roof, especially if you’re not experienced. Before you start, make sure you have the proper safety gear:
- Gloves: Wear durable work gloves to protect your hands from cuts, scrapes, and the rough surface of the tarp or roof. Gloves will also help you get a better grip while handling tools and securing the tarp.
- Sturdy Shoes: You’ll need non-slip shoes with good tread to maintain balance while on the roof. A pair of work boots or steel-toed shoes is ideal for both comfort and protection.
- Harness (Optional but Recommended): If you’re working on a steep or high roof, a safety harness is strongly recommended. It will provide an added layer of security while you move around the roof. Attach the harness to a secure anchor point on the roof or use a roof safety rope system for extra protection.
Additional Supplies: Utility Knife, Scissors, and a Tarp Patch Kit
In addition to the primary tools, a few extra supplies will make the job easier and ensure the tarp is set up correctly:
- Utility Knife or Scissors: These will come in handy for cutting the tarp to the right size if necessary. A utility knife works well for cutting through heavy-duty tarps, while scissors may be better for lighter tarps. Be sure to make clean cuts to avoid uneven edges that could compromise the tarp’s effectiveness.
- Tarp Patch Kit: If the tarp gets a tear or small hole while you’re installing it, a tarp patch kit will allow you to quickly make repairs. These kits usually include adhesive patches that you can stick over the damaged area to prevent water from seeping through.
Ready to Tarp Your Roof?
Now that you have all the materials and tools you’ll need, you’re ready to get started. Remember, preparation is key, and having everything on hand before you start will make the job faster, safer, and more efficient. With the right tarp, tools, and safety gear, you can protect your home from further damage until you’re able to get a permanent repair.
Essential Steps for Safely and Effectively Tarping Your Damaged Roof
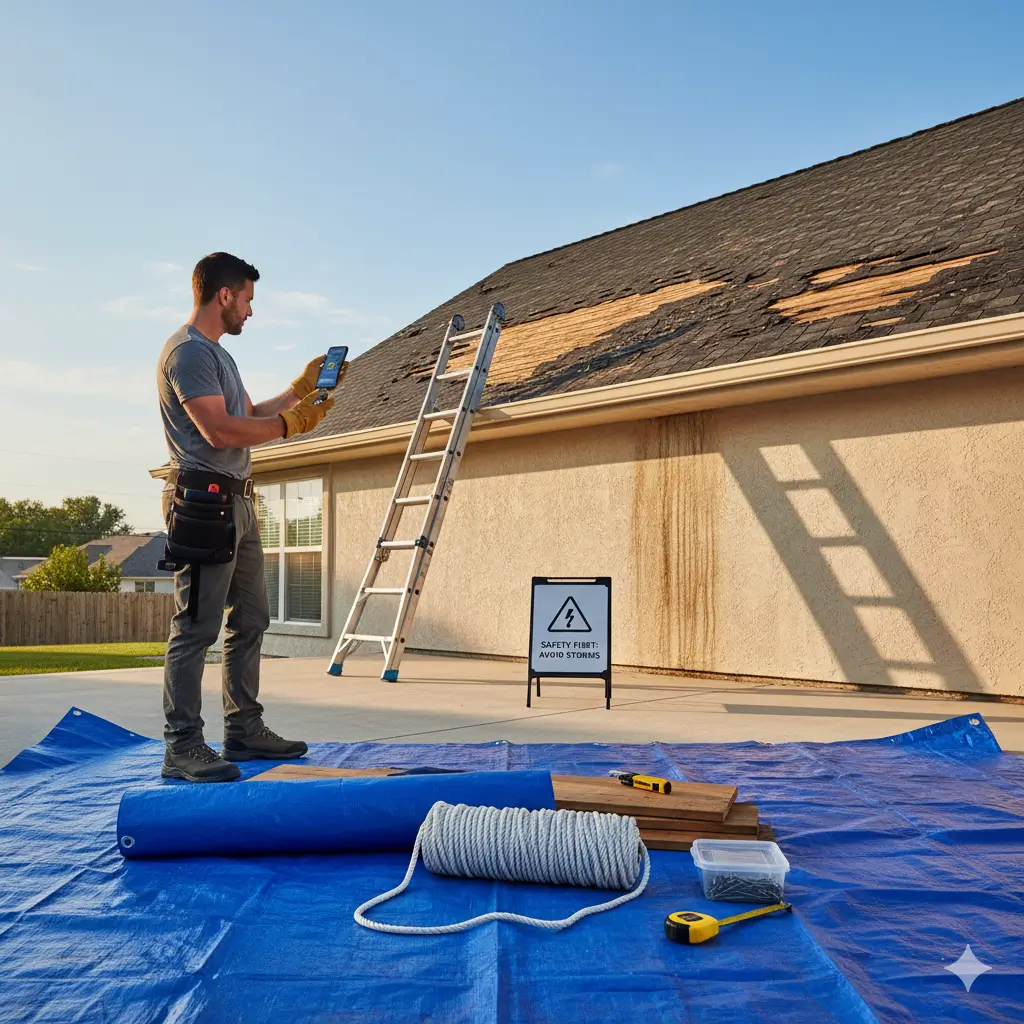
1. Inspect Roof Damage & Assess Safety
Before you even think about grabbing your ladder and heading up to the roof, it’s essential to inspect the damage from a safe distance. The safety of your roof should always be your top priority—if you see any signs of structural damage, such as deep cracks, warped decking, or sagging, it’s time to call in a professional roofing contractor. Attempting to tarp a roof with serious damage can be dangerous and potentially worsen the situation.
Here’s what to check for:
- Missing or damaged shingles: These are common signs of roof issues that may need immediate attention.
- Cracked or warped areas: These can indicate deeper issues with the roof’s structure. If you see these, it’s best to get a professional opinion before proceeding with any repairs or tarp placement.
- Hidden damage: Look out for areas that might hide underlying problems, such as water spots or mold along the roof edges or under shingles.
2. Check the Weather: Timing Is Key
Tarping your roof should never be rushed or done in unsafe conditions. Weather plays a crucial role, so ensure you’re working in ideal conditions to avoid accidents or ineffective tarp installations. Here’s what to consider:
- Choose a calm, dry day: Avoid windy days or days with high chances of rain or storms. High winds can make it difficult to manage the tarp, while rain can lead to further damage or unsafe working conditions.
- Check reliable weather forecasts: Stay informed using trusted sources like your local news or the National Weather Service. Avoid checking weather updates while you’re climbing the ladder!
Tip: If there’s even the slightest hint of a storm or wind on the horizon, postpone the job. It’s better to wait for the right weather conditions to ensure you can work safely and effectively.
Once you’re sure the weather is clear and it’s safe to proceed, get your tools and materials ready. A seamless tarp installation begins with proper preparation.
3. Gather the Essential Tools and Materials
Planning and having all the right materials ready will ensure you’re not scrambling halfway through. Here’s what you’ll need to complete the task:
- Heavy-duty tarp: Make sure the tarp is made of durable, waterproof material that can withstand harsh weather. Polyethylene is a great option for its waterproof properties.
- Roofing nails: These are critical for securing the tarp in place. Use nails designed for roofing to ensure they hold firmly.
- Wooden boards (optional): If you’re expecting high winds, use wooden boards to anchor the tarp and prevent it from shifting.
- Tape measure: Measuring the roof damage area is essential to ensure your tarp fits perfectly.
- Utility knife or scissors: You’ll need a tool to cut the tarp to size if necessary. Make sure it’s sharp and sturdy.
- Tarp patch kit (optional): If the tarp gets torn or damaged while you’re installing it, a patch kit will allow you to quickly fix it.
Having these materials within reach ensures that you won’t waste time looking for supplies when you’re up on the roof.
4. Measure the Damaged Area
Accurate measurements are key to ensuring the tarp provides full coverage and protection. A poorly measured tarp can lead to gaps where water can seep through, or a tarp that’s too big may create pooling or trapping of water.
Here’s how to measure correctly:
- Measure the length and width of the damaged area: This ensures that the tarp will cover the full space.
- Add extra coverage: Always measure an additional 3–4 feet around the damage to account for overlap. This is essential to ensure no water can get underneath the tarp.
- Check for multiple areas of damage: If the entire roof has issues, measure larger sections or consult a professional if necessary.
Once you’ve got accurate measurements, you’ll know exactly what size tarp to purchase, setting you up for a smoother and more efficient installation.
5. Select the Right Tarp Size
The size of the tarp you choose is crucial to ensuring that your roof remains protected. A tarp that’s too small will leave sections of the roof exposed, while one that’s too large can be cumbersome to manage.
Here’s how to select the right tarp:
- Double-check your measurements: Ensure the tarp is large enough to cover the entire damaged area, with some extra room on all sides.
- Consider storm severity: If your roof has been significantly damaged, you may need a larger, more durable tarp to provide a reliable barrier.
- Choose a tarp designed for emergency repairs: Look for a heavy-duty option that is built to last and can handle strong winds and heavy rain.
Having the right tarp size ensures that you won’t have to deal with extra hassle during the tarp installation, and it will stay in place without needing constant adjustment.
Position the Tarp Correctly: Teamwork Makes the Dream Work
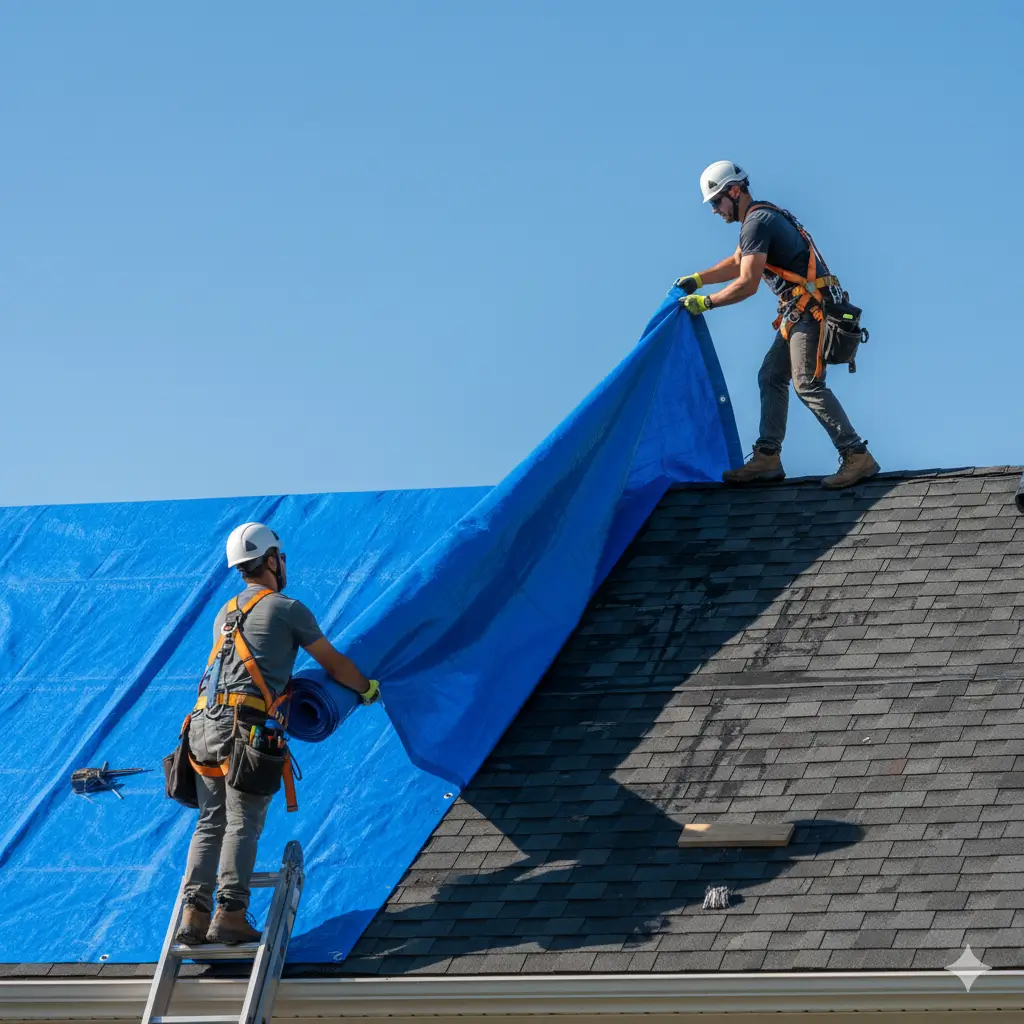
Tarping a roof isn’t a solo mission—at least not for the faint of heart. Even if you’re a DIY pro, trying to manage the tarp alone can be physically demanding, especially when working at heights. Having an extra set of hands will make the task quicker, safer, and more effective.
Here’s how you can organize your team:
- Align the Tarp Properly: One person should stand on the roof and align the top edge of the tarp over the damaged area. The tarp must extend beyond the edges of the damage to ensure full coverage.
- Feed the Tarp: Another person can stand below, pulling the tarp up slowly while making sure it doesn’t get caught on loose materials or debris. It’s key to keep the tarp evenly spread to avoid wrinkling or unnecessary tension.
- Work Together: Clear communication is essential. Ensure everyone knows when to pull or adjust the tarp, keeping it taut over the damaged area. The goal is to cover every spot that could potentially leak.
Lock It Down: Once the tarp is positioned correctly, secure it tightly to prevent it from being blown away by the wind. The last thing you want is for your hard work to be undone by a gust of wind.
How to Secure the Tarp: Choosing the Right Method for Stability
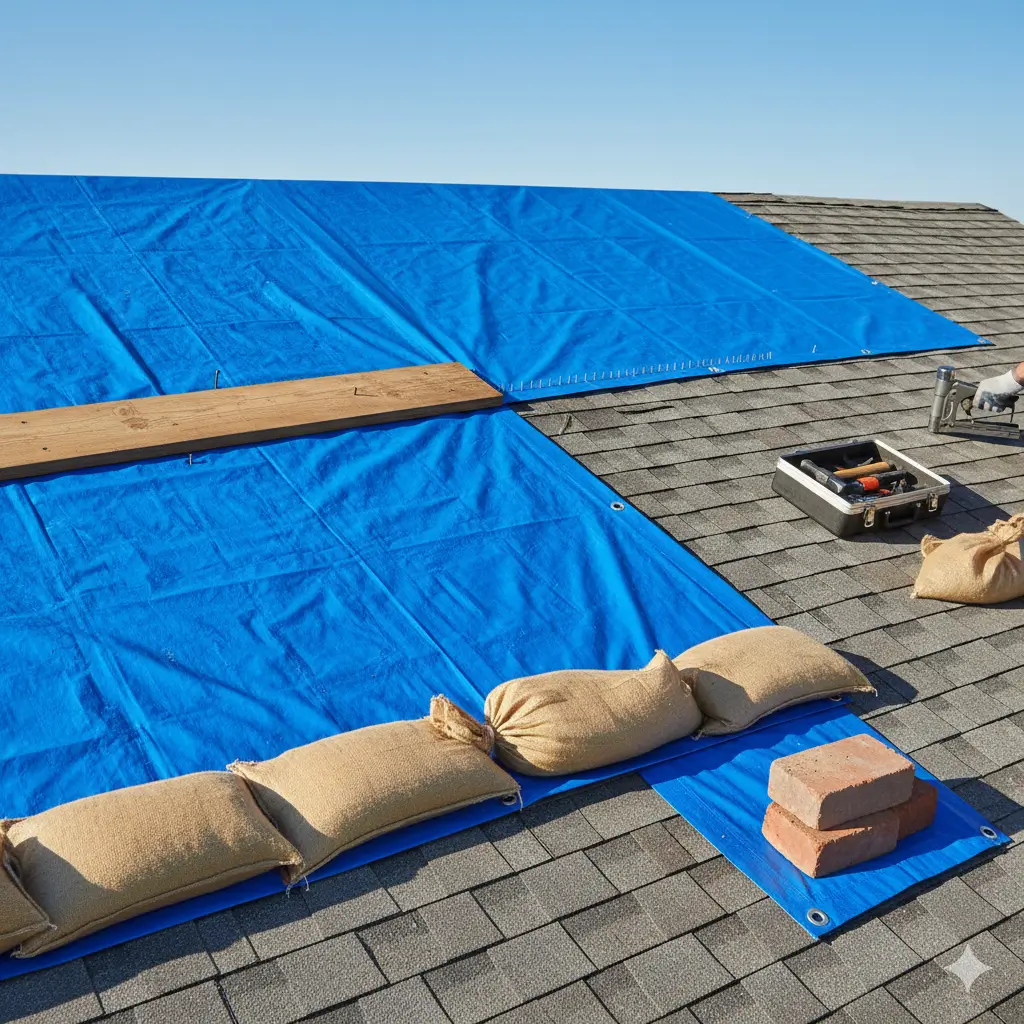
Securing the tarp to your roof is all about finding the balance between ease of use and the level of stability needed to withstand weather conditions. The method you choose will depend on the environment and the severity of the damage.
Here are the most common methods of securing a tarp, along with their pros, cons, and best-use scenarios:
Method | Pros | Cons | Best for Weather Type |
Wooden Boards & Nails | – Simple to align, cost-effective | – Leaves holes in the roof, which can cause further damage | – Mild to moderate weather (not too windy) |
Staples | – Fast and easy to apply | – Can tear the tarp in high winds | – Dry, calm conditions |
Sandbags | – Doesn’t damage the roof, reusable | – May shift in extreme winds | – Low wind, stable weather |
Bricks | – Easy to find, provides decent hold | – Heavy, may cause roof damage, can be hazardous | – Very mild conditions, short-term use |
Recommended Methods:
- Wooden Boards & Nails: This is a solid choice for mild to moderate weather, especially if you’re working in dry conditions. The nails will secure the tarp firmly, but be cautious about causing additional holes in your roof. Make sure to cover the nails with the tarp to prevent further damage.
- Staples: For calm, dry days, staples work well as they’re quick to apply. However, they’re not ideal for windy conditions, as the tarp can tear easily.
- Sandbags: If you’re dealing with low winds, sandbags are a fantastic option. They’re reusable and don’t damage the roof, but in high winds, they may shift, so keep an eye on them.
- Bricks: While easy to find, bricks should only be used in very mild conditions or for temporary fixes. They provide a quick solution but can damage delicate surfaces or be dangerous if they fall.
Rethink Your Roof: The Bold Path to Better Protection

Now that you know the basics of how to tarp your roof, it’s time to think bigger. This process isn’t just about slapping a tarp over a hole; it’s about taking control of your home’s protection and ensuring that you’re prepared for anything.
At the core, roofing repairs are about being proactive and prepared. Once you’ve learned how to properly tarp a roof, you can start asking yourself: Are you satisfied with temporary fixes, or do you want to be among the homeowners who demand long-lasting, high-quality solutions? Don’t settle for “good enough” when it comes to protecting your home.
Common Questions About Tarping a Roof
Not necessarily. Tarping a roof can be done with just a couple of people. However, having a team of two or three people will definitely make the process smoother and faster. One person can help position the tarp, while the others can manage securing it in place. That said, if your roof has serious structural damage, it’s best to call in a professional or have a roofing contractor assess the situation before proceeding.
A roof tarp is a temporary fix. It’s designed to shield your home from water until a professional repair can be completed. While the tarp can hold up for several weeks or even a few months in mild conditions, it’s important to schedule permanent repairs as soon as possible. Prolonged use of a tarp without professional repair can cause additional damage to the roof and structure of your home.
Absolutely. Properly positioned and secured tarps can effectively prevent water leaks and further damage. The key to success lies in tightening the tarp to create a solid seal. Make sure the tarp covers all areas that could potentially leak, and secure it with care to avoid any gaps where water could seep through.
Safety is always a priority. If your roof is too steep or you feel unsafe climbing up, don’t hesitate to call in a professional roofing contractor. They have the right safety equipment, training, and experience to handle steep angles and work in challenging conditions. Remember, no tarp job is worth risking your safety.
No, the tarp is a temporary solution only. While it can protect your home from further water damage until permanent repairs can be made, it’s not a substitute for full roof repairs. Think of the tarp as a protective bandage that buys you time, but you’ll need a long-term solution once the weather clears.