
What is Roof Flashing? A Complete Guide for Homeowners
Understanding Roof Flashing
Definition of Roof Flashing
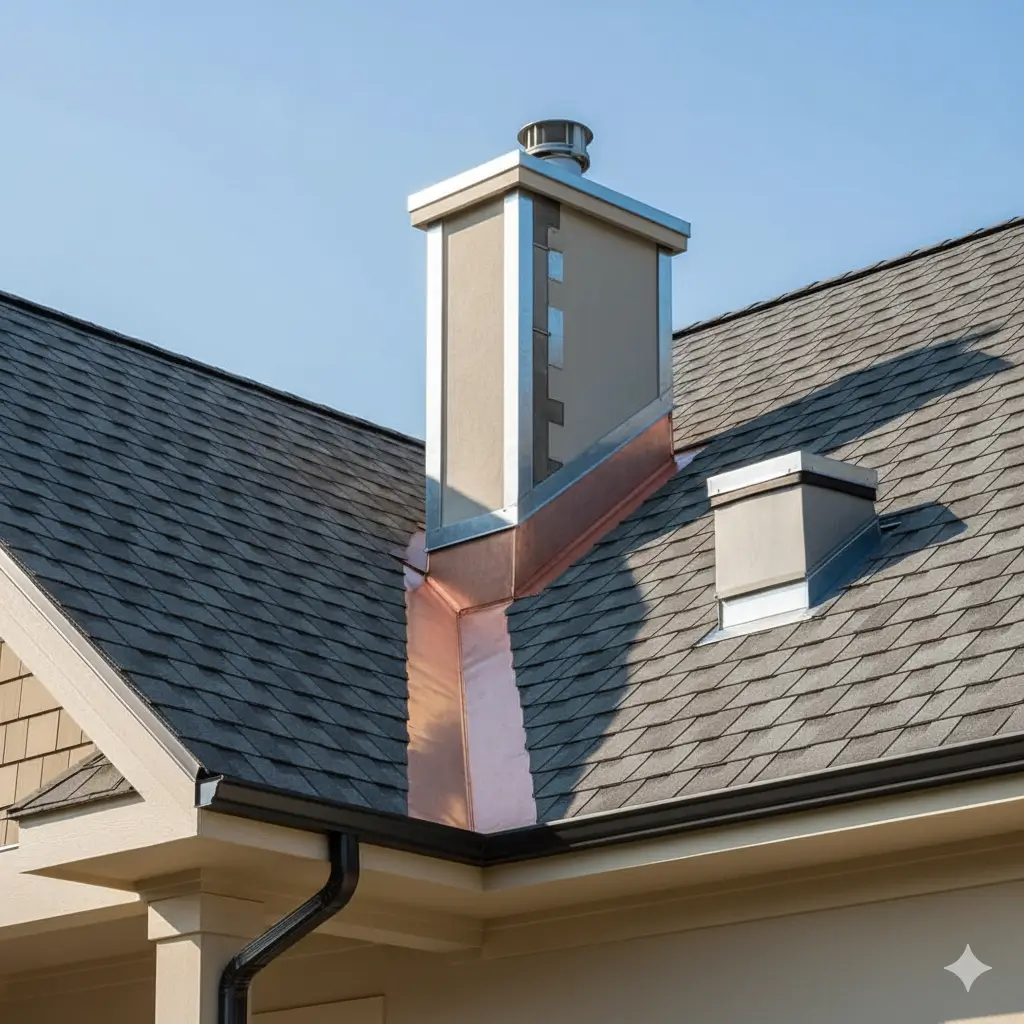
Roof flashing is a thin, durable material—commonly made of metal such as galvanized steel, aluminum, or copper—designed to prevent water from penetrating critical areas of your roof. It is strategically installed where the roof plane meets vertical surfaces, such as walls, chimneys, dormers, skylights, and vents. Unlike shingles, flashing is placed underneath roofing materials to create a watertight barrier that directs water safely toward the roof’s drainage system.
Flashing serves as a shield against water infiltration, protecting your home from leaks, structural damage, and costly repairs.
Purpose and Importance of Flashing in Roof Protection
The primary purpose of roof flashing is to divert water away from vulnerable roof intersections and penetrations, preventing moisture from seeping into your roof deck or walls. Without proper flashing, water can slowly infiltrate the gaps where your roof meets vertical surfaces, leading to:
- Roof leaks and water stains
- Wood rot and structural weakening
- Mold growth and indoor air quality issues
- Potential collapse of weakened roof sections
Properly installed and maintained flashing is one of the most critical elements for a long-lasting, leak-free roof. It not only protects your home from immediate water damage but also prolongs the life of shingles and other roofing materials.
For homeowners, understanding roof flashing is essential—not only to identify potential issues but also to ensure that any repair or replacement work is done correctly. Regular inspections, timely repairs, and proper installation can save thousands in costly roofing problems and provide peace of mind during heavy rains or snow.
Types of Roof Flashing
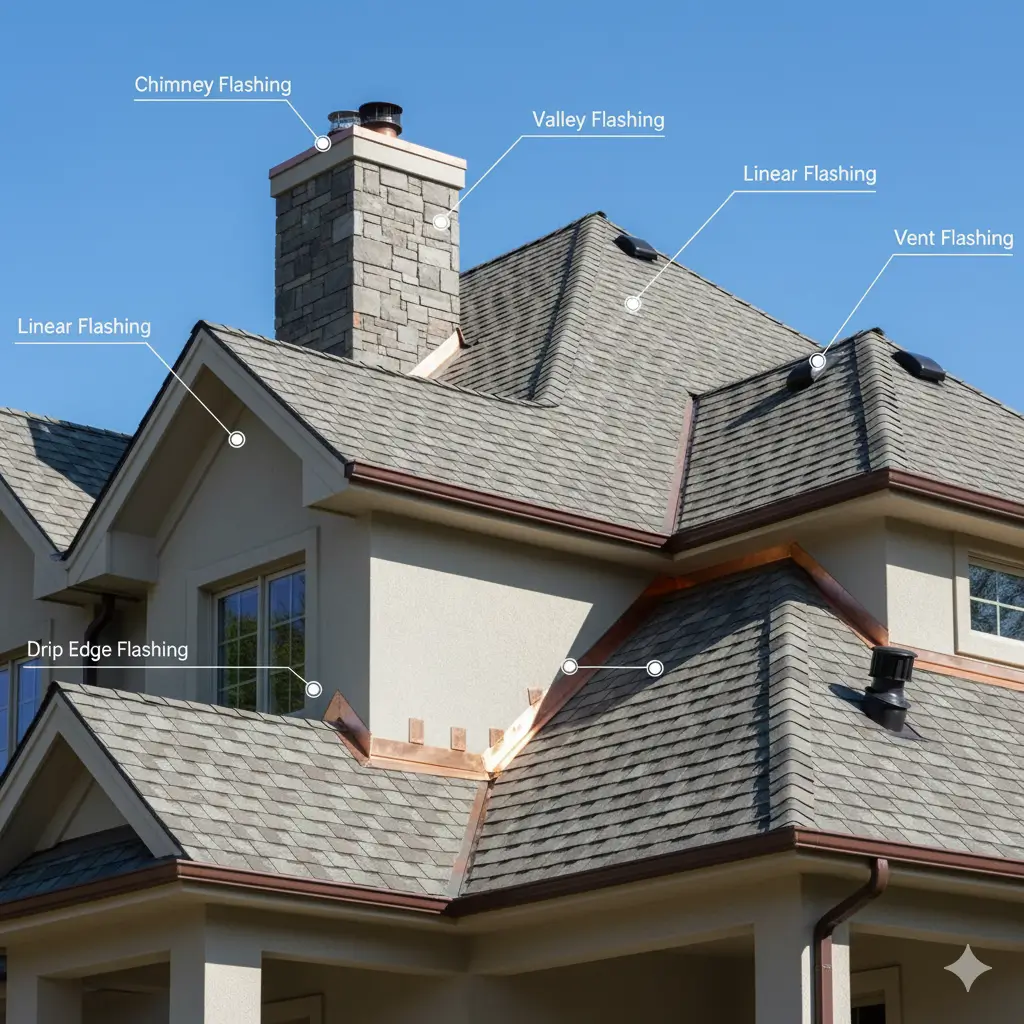
Roof flashing comes in several forms, each designed to protect specific areas of your roof from water infiltration. Understanding the different types of flashing is essential for proper installation and maintenance, ensuring your home remains dry and structurally sound.
1. Step Flashing
Step flashing is commonly used along roof-to-wall intersections, such as where a roof meets a vertical sidewall or dormer. Each piece of step flashing is installed with a shingle, creating overlapping layers that guide water down the roof without letting it seep into the walls. This type of flashing is highly effective for preventing leaks in areas with complex roof geometry.
2. Continuous (Linear) Flashing
Continuous or linear flashing is a long, unbroken strip of metal installed along horizontal surfaces, such as the top of a wall or at roof edges. Unlike step flashing, continuous flashing forms a seamless barrier against water, often used to cover entire sections where water flow is consistent. This type is particularly useful for long stretches of roof-wall intersections.
3. Vent and Chimney Flashing
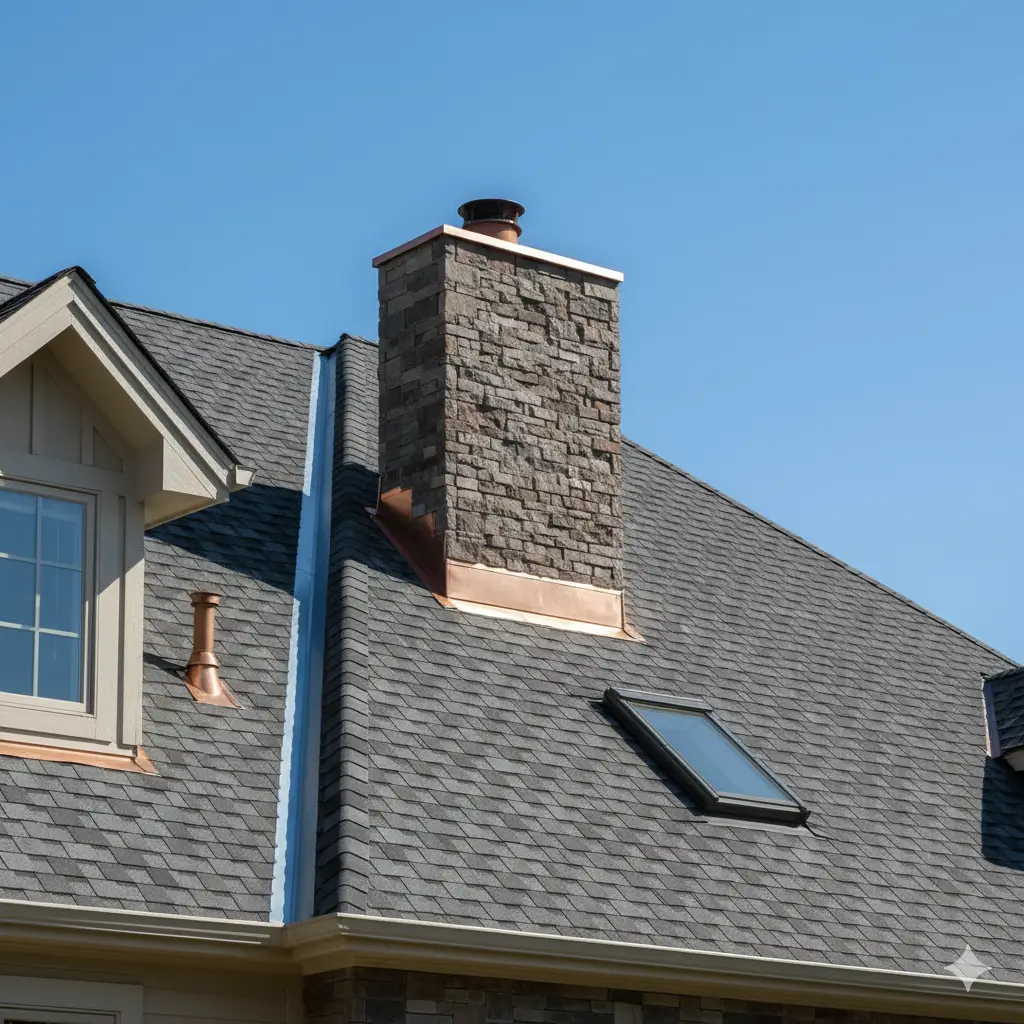
Vent and chimney flashing protects roof penetrations like exhaust vents, plumbing stacks, and chimneys. Custom-shaped flashing pieces are fitted around these structures to prevent leaks where the roof is most vulnerable. Proper installation ensures that water is directed away from the penetration points and onto the roof shingles.
4. Drip Edge Flashing
Drip edge flashing is installed along the eaves and rakes of the roof. It extends slightly beyond the roof edge, allowing water to drip directly into the gutters instead of running down the fascia board or walls. This simple yet essential type of flashing prevents water damage at the edges of your roof.
5. Valley Flashing
Valley flashing is installed in the valleys where two roof planes meet, creating a channel for water to flow down without seeping into the roofing materials. Open valleys use metal flashing to handle high water volumes, while closed valleys may integrate flashing beneath shingles. Proper valley flashing is crucial for preventing leaks in these high-risk areas.
Materials Used in Roof Flashing

Choosing the right material for roof flashing is crucial for durability, effectiveness, and compliance with local building codes. Each material has unique properties, advantages, and potential drawbacks, making it important to select the most suitable option for your home and climate.
1. Aluminum
Aluminum flashing is lightweight, easy to shape, and resistant to rust, making it a popular choice for many roofing projects. It is particularly well-suited for areas where flexibility and easy installation are important. However, aluminum reacts with alkaline materials like concrete or masonry, so it must be coated if used in such applications. In coastal regions, a protective coating is also recommended to prevent corrosion caused by salty air.
2. Copper
Copper flashing is highly durable and malleable, allowing roofing professionals to create precise custom shapes. It can be soldered easily for seamless joints and offers exceptional longevity. Over time, copper naturally develops a greenish patina, which some homeowners appreciate for its aesthetic appeal, while others may find it less visually appealing. Copper is often used around chimneys and other prominent roof features.
3. Galvanized Steel
Galvanized steel is one of the most common and cost-effective materials for roof flashing. It is strong, corrosion-resistant, and relatively easy to install. Galvanized steel is widely preferred for its combination of durability and affordability. Most building codes specify a minimum thickness, typically 26-gauge, to ensure long-term performance.
Lead and Other Materials
Lead was historically used for flashing due to its flexibility and longevity, but it has largely been replaced by safer, more modern alternatives. Other materials, like modified bitumen roofing tape, are sometimes used in specific applications, particularly where building codes require watertight, adhesive-backed solutions. Always check local regulations before selecting these materials to ensure compliance and safety.
Sizes and Shapes of Roof Flashing
The size and shape of roof flashing are essential factors in ensuring its effectiveness in preventing water damage. Whether you’re installing flashing around a plumbing vent, chimney, or skylight, choosing the correct size is crucial to ensuring water is properly directed away from critical areas.
Standard Sizes of Roof Flashing
When it comes to roof flashing, size matters. The dimensions of flashing pieces should be selected based on the roof’s design, the type of roofing material being used, and the features it surrounds (such as vents, chimneys, and skylights).
For instance, step flashing, which is commonly used around chimneys and walls, typically comes in pre-made sizes like:
- Standard Step Flashing Size:
A typical step flashing piece for residential roofs is 10 inches long and 8 inches wide (253 mm x 203 mm). This size works well with most standard roofing materials, such as 3-tab shingles, which usually have a 5 5/8-inch exposure.- For example, if you’re using shingles with a 5 5/8-inch exposure, a 10×8-inch flashing is sufficient to cover the exposure and ensure proper water diversion.
- For example, if you’re using shingles with a 5 5/8-inch exposure, a 10×8-inch flashing is sufficient to cover the exposure and ensure proper water diversion.
- Flashing for Larger Shingles or Roof Features:
For shingles with a larger exposure (like Cambridge™ shingles or IKO Crowne Slate™ shingles, which have a 10-inch exposure), you’ll need larger flashing pieces to ensure full coverage and effective protection.
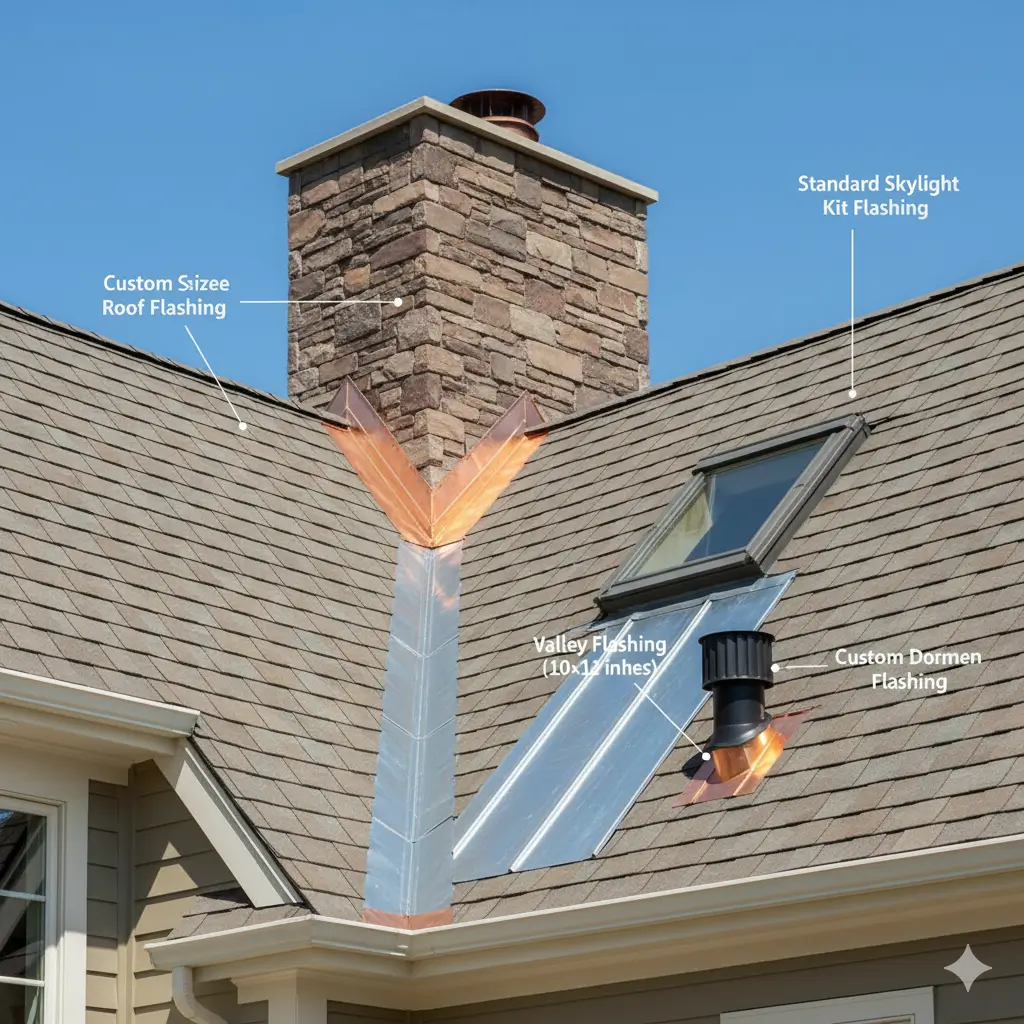
In these cases, flashing pieces may need to be 10×12 inches (254 mm x 304 mm) to cover the exposure adequately.
Custom Flashing Options
While standard flashing sizes are widely used, some roofing projects may require custom flashing to fit unique architectural features or meet specific design needs. Custom flashing is often fabricated by roofing professionals or purchased in specific sizes to accommodate larger roof features, irregular angles, or unconventional rooflines.
Some common scenarios for custom flashing include:
- Flashing for Skylights: Custom flashing is often needed for skylights, as the flashing must be designed to fit the specific dimensions and angles of the skylight’s frame.
- Chimney Flashing: Chimneys may require custom flashing to ensure a tight seal around the base and walls of the chimney, especially if the chimney has irregular dimensions.
- Complex Roof Valleys: In complex roof valleys, where two roof slopes meet at sharp angles, custom-cut flashing may be required to ensure the flashing fits securely and properly diverts water.
Custom flashing is typically made from metal sheets (like galvanised steel or copper) that are cut and bent to the required size and shape. Roofing professionals often use tools like tinning snips or bending brakes to create custom flashing on-site.
Key Considerations When Choosing Flashing Size and Shape:
- Roof Material and Exposure: The exposure of your roofing shingles will determine the width of the flashing needed. Make sure to choose flashing that’s at least 2 inches wider than the exposure of the shingles.
- Roof Penetrations: Roof features like vents, chimneys, skylights, and dormers may require special flashing pieces with customized dimensions to ensure a proper fit and secure seal.
- Building Codes: Be sure to follow local building codes, which may specify minimum sizes or require certain types of flashing for specific applications.
Why Choosing the Right Flashing Size Is Crucial
Correctly sized flashing is essential for a durable and leak-free roof. Under-sized flashing won’t adequately cover roof intersections and penetrations, potentially allowing water to seep through and cause damage. On the other hand, oversized flashing may interfere with the proper installation of shingles or roofing materials.
Ultimately, ensuring you have the right size and shape of flashing will protect your home from water damage, extend the lifespan of your roof, and reduce the need for costly repairs.
How Roof Flashing is Installed
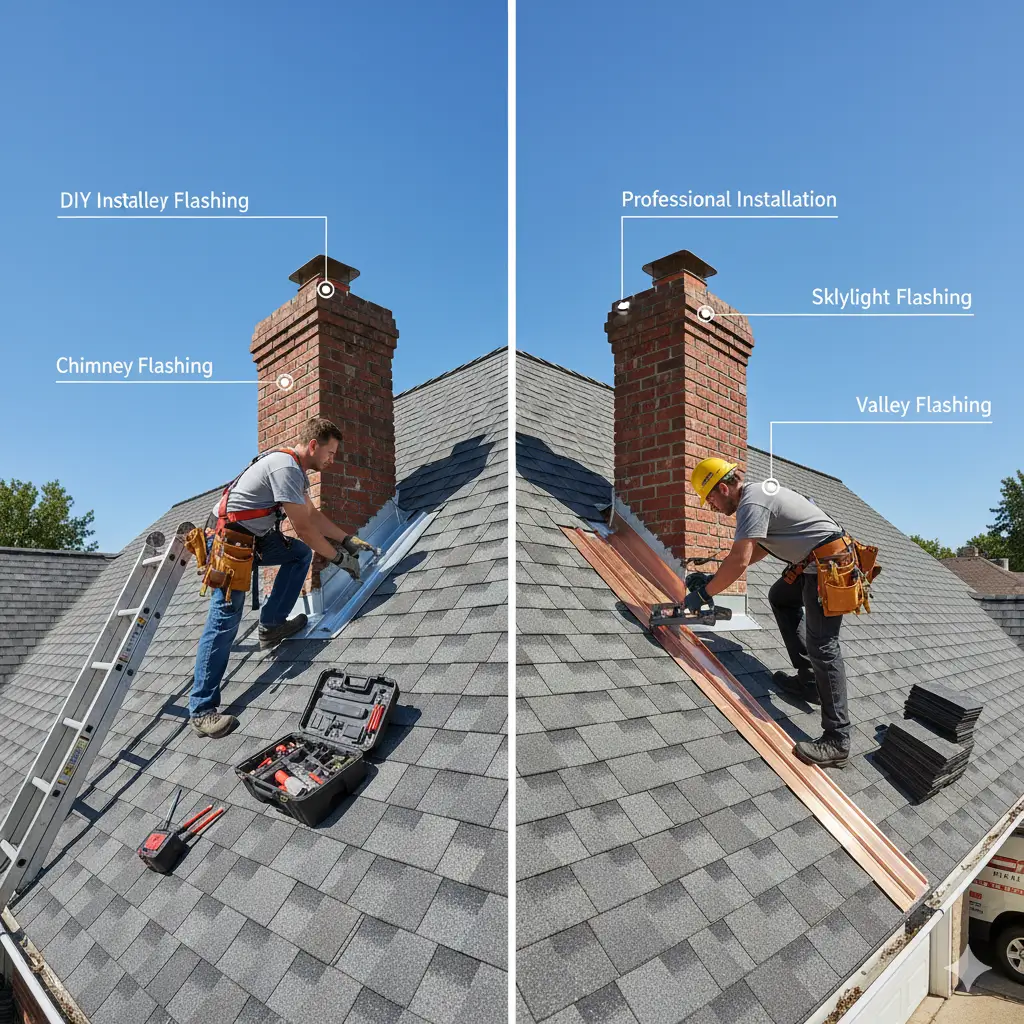
Proper installation of roof flashing is crucial to its effectiveness in preventing water leaks and structural damage. Whether you choose to install flashing as a DIY project or hire a professional roofer, understanding the process is essential for ensuring a long-lasting, leak-free roof.
In this section, we’ll walk through the process of installing roof flashing, compare DIY vs professional installation, and highlight common mistakes to avoid for a successful flashing installation.
DIY vs Professional Installation
Pros of DIY Installation:
- Cost savings: By skipping the cost of hiring a roofing professional, you can save significantly on labor costs.
- Learning experience: Installing flashing yourself gives you a hands-on understanding of your roof and its components, which can be useful for future repairs.
- Control over the project: You have full control over the materials used and the installation process.
Cons of DIY Installation:
- Risk of improper installation: Without proper training and experience, it’s easy to make mistakes that could lead to water infiltration and roof damage.
- Safety concerns: Working on a roof, especially at height, can be dangerous if you lack the right safety equipment and precautions.
- Time-consuming: Installing flashing, especially on a large roof with multiple penetrations, can be time-consuming, especially if you’re unfamiliar with the process.
- Lack of warranty: Many roofing material warranties are voided if the flashing is not installed by a professional.
If you choose the DIY route, ensure you have the right tools, flashing materials, and safety equipment. It’s also essential to thoroughly research the flashing installation process or watch instructional videos from reliable sources before starting.
Professional Roof Flashing Installation
Pros of Professional Installation:
- Expertise and experience: Professional roofers have the necessary training, experience, and knowledge to install flashing correctly, reducing the risk of errors.
- High-quality materials: Roofing contractors typically use high-grade flashing materials and sealants that are less likely to degrade over time.
- Guaranteed results: A professional installation usually comes with a warranty, ensuring that the work is done correctly and that you’re covered if anything goes wrong.
- Efficiency: Professionals can complete the job faster and more efficiently than a DIYer, often finishing the project in just a few hours or days, depending on the scope.
Cons of Professional Installation:
- Cost: Hiring a professional roofer can be expensive, especially if you have a complex roof or multiple roof penetrations.
- Less control: You may have less control over the materials and the overall process, as the roofer will be handling everything from start to finish.
In most cases, hiring a professional roofer is a safer, faster, and more reliable choice, particularly for complex roofs or if you’re dealing with multiple roof penetrations (e.g., vents, chimneys, skylights). However, if you’re confident in your DIY skills and have a relatively simple roof, you might consider installing the flashing yourself.
Common Mistakes to Avoid in Roof Flashing Installation
Whether you’re taking the DIY route or working with a professional, there are common mistakes that can compromise the effectiveness of your roof flashing. Here’s a list of errors to avoid to ensure your flashing is installed correctly:
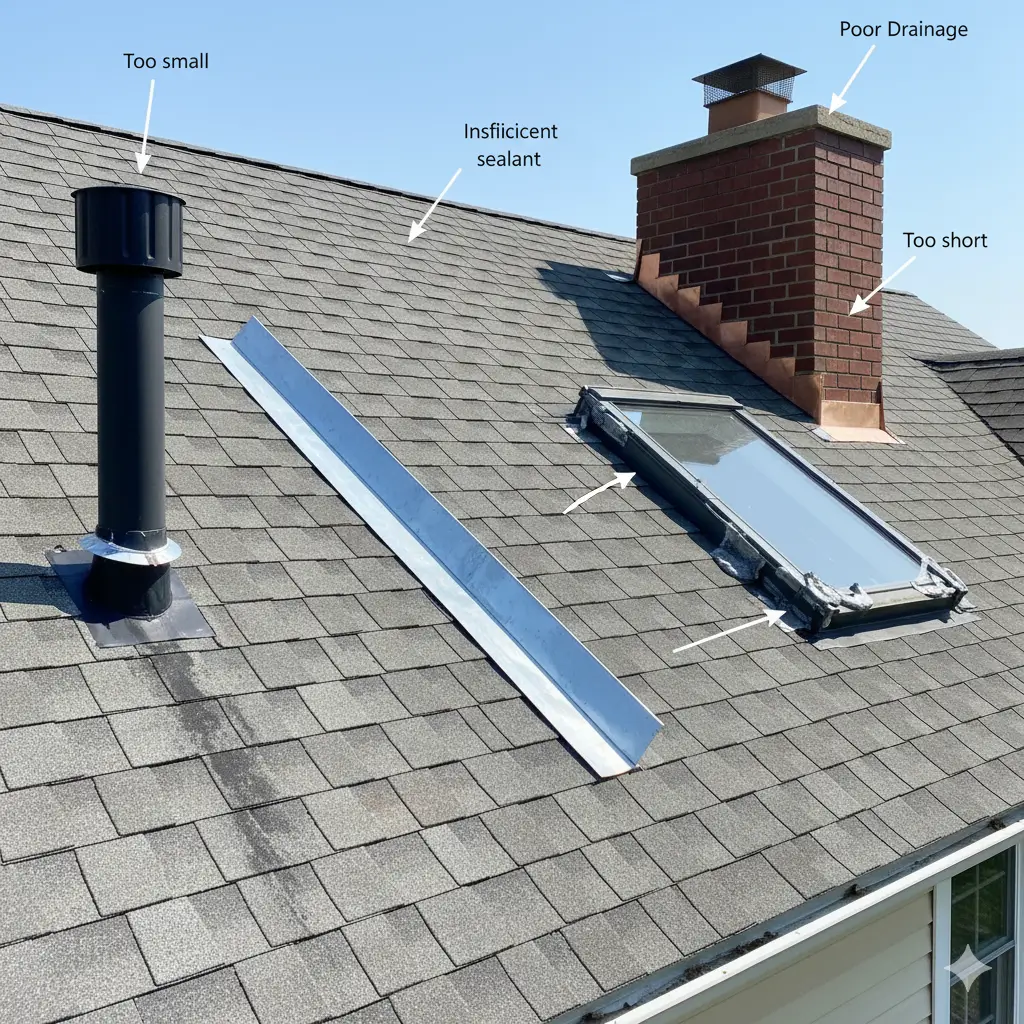
1. Incorrect Flashing Size and Shape
Using the wrong size or shape of flashing is one of the most common mistakes homeowners make. Flashing that’s too small won’t adequately cover the roof penetration, leaving gaps that allow water to seep in. On the other hand, overly large flashing can interfere with shingles and cause aesthetic issues.
Tip: Always choose flashing that’s at least 2 inches wider than the exposure of your roofing material. In case of custom roofing features, like skylights or chimneys, ensure that the flashing fits the exact dimensions required.
2. Not Installing Flashing Under the Shingles
Flashing must always be installed under the shingles, not over them. This is essential for directing water away from the roof and preventing leaks. If flashing is installed over the shingles, water can pool beneath it, leading to water damage and rotting.
Tip: For step flashing, make sure each piece is positioned under the shingle above it, overlapping the previous piece in the sequence to create a tight seal.
3. Skipping the Use of Proper Sealants
Flashing must be sealed to ensure a waterproof barrier. Using the wrong type of sealant or failing to apply it properly can lead to leaks down the line. Silicone sealants are often used in roof flashing installations due to their water-resistant properties, but it’s important to use a sealant that’s compatible with the flashing material (e.g., copper, galvanized steel, or aluminum).
Tip: Apply a high-quality roofing sealant around the edges of the flashing to ensure a watertight seal. Always check your flashing manufacturer’s guidelines for recommended sealants.
4. Not Using Enough Flashing Around Roof Penetrations
Penetrations such as vents, skylights, and chimneys require ample flashing to ensure no water can get through the roof. Failing to properly flash these areas can cause significant water damage, especially during heavy rain.
Tip: Around roof penetrations, ensure that the flashing extends several inches beyond the edge of the penetration to guarantee full coverage.
5. Ignoring Roof Slope and Ventilation Needs
The slope of your roof affects how water flows and is directed by the flashing. A flat or low-slope roof may require specialized flashing techniques, such as continuous flashing or additional sealing, to ensure water drains properly. Additionally, poor roof ventilation can cause moisture to build up, leading to mold and mildew growth under the flashing.
Tip: For low-slope roofs, consider using continuous flashing or modified bitumen flashing to prevent water buildup.
6. Failing to Inspect and Maintain Flashing
Even after a flashing installation is complete, regular inspections and maintenance are necessary to ensure the flashing stays in good condition. Look for signs of wear, such as rusting, cracking, or lifting edges, and address these issues immediately.
Tip: Inspect roof flashing at least once a year, or after significant weather events, to check for damage and make repairs as needed.
Maintenance and Lifespan of Roof Flashing
Roof flashing is designed to be durable, often outlasting your shingles and other roofing materials. However, even the most resilient flashing can deteriorate over time if it’s not properly maintained. Regular inspection and maintenance are essential to prolong the life of your flashing and prevent costly roof repairs.
Signs Your Flashing Needs Repair or Replacement
Identifying potential issues early is key to protecting your home from water damage. Keep an eye out for these warning signs:
- Loose or Shifted Flashing
Over time, the screws or nails securing flashing can loosen, or the metal itself may warp. Loose flashing can create gaps where water may seep into the roof deck, leading to leaks and structural damage. - Rust or Corrosion
Even weather-resistant metals like aluminum, galvanized steel, or copper can show signs of corrosion after prolonged exposure to harsh weather. Corrosion can weaken the flashing, making it prone to leaks. - Cracks, Holes, or Gaps
Flashing can develop cracks or holes due to extreme weather, physical damage, or aging. Any gaps between flashing and roofing materials provide a direct pathway for water. - Water Stains or Leaks Inside the Home
Visible water stains on ceilings or walls, or active leaks, are often a clear sign that roof flashing is failing and needs immediate attention.
Tip: If you notice any of these issues, it’s best to contact a professional roofer to assess whether repair or replacement is necessary.
Routine Maintenance Tips
Routine maintenance can extend the lifespan of your roof flashing and keep your roof leak-free. Here’s what homeowners should do:
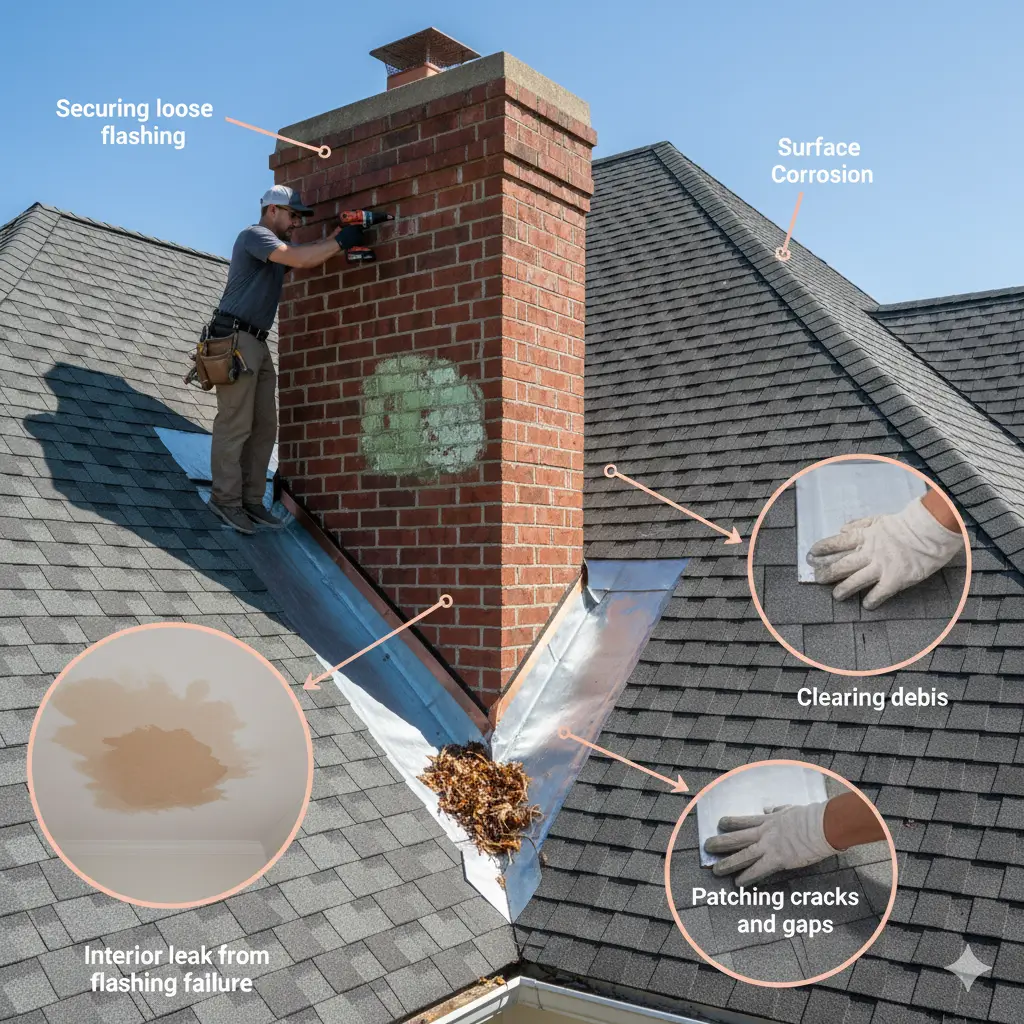
- Inspect Flashing Annually
At least once a year, inspect your roof flashing for loose fasteners, rust, or signs of wear. Spring and fall are ideal times, before or after harsh weather seasons. - Secure Loose Flashing
If flashing is loose, it can often be resecured with screws and roofing cement. Cover each screw or nail head with cement to prevent water infiltration. - Patch Small Holes or Cracks
Small holes or minor corrosion can be patched using roofing cement and a piece of replacement flashing. Ensure the patch fully covers the damaged area and is sealed properly to prevent leaks. - Clean Debris Around Flashing
Leaves, dirt, and other debris can trap water around flashing, accelerating corrosion and causing leaks. Regularly clear debris from valleys, gutters, and around roof penetrations. - Check After Extreme Weather
After storms, heavy rain, or snow, inspect the flashing for damage. High winds and ice can loosen flashing or create gaps that allow water to enter.
Professional Roof Inspections
Even if your roof looks fine, hiring a professional for an annual inspection can catch subtle issues before they turn into major problems. A roofer will check flashing, shingles, and other roofing elements for damage.
Lifespan of Roof Flashing
The lifespan of roof flashing depends on the material and environmental conditions:
- Aluminum Flashing: 15–30 years
- Galvanized Steel: 20–40 years
- Copper: 50+ years
- Lead and Other Materials: Varies, often 30–50 years
Proper maintenance, regular inspections, and timely repairs can extend the life of your flashing, ensuring your roof remains leak-free and structurally sound for decades.
Common Problems and How to Fix Them
Even well-installed roof flashing can run into issues over time due to weather exposure, aging materials, or improper installation. Identifying common flashing problems early—and knowing how to fix them—can prevent costly roof repairs and major water damage inside your home.
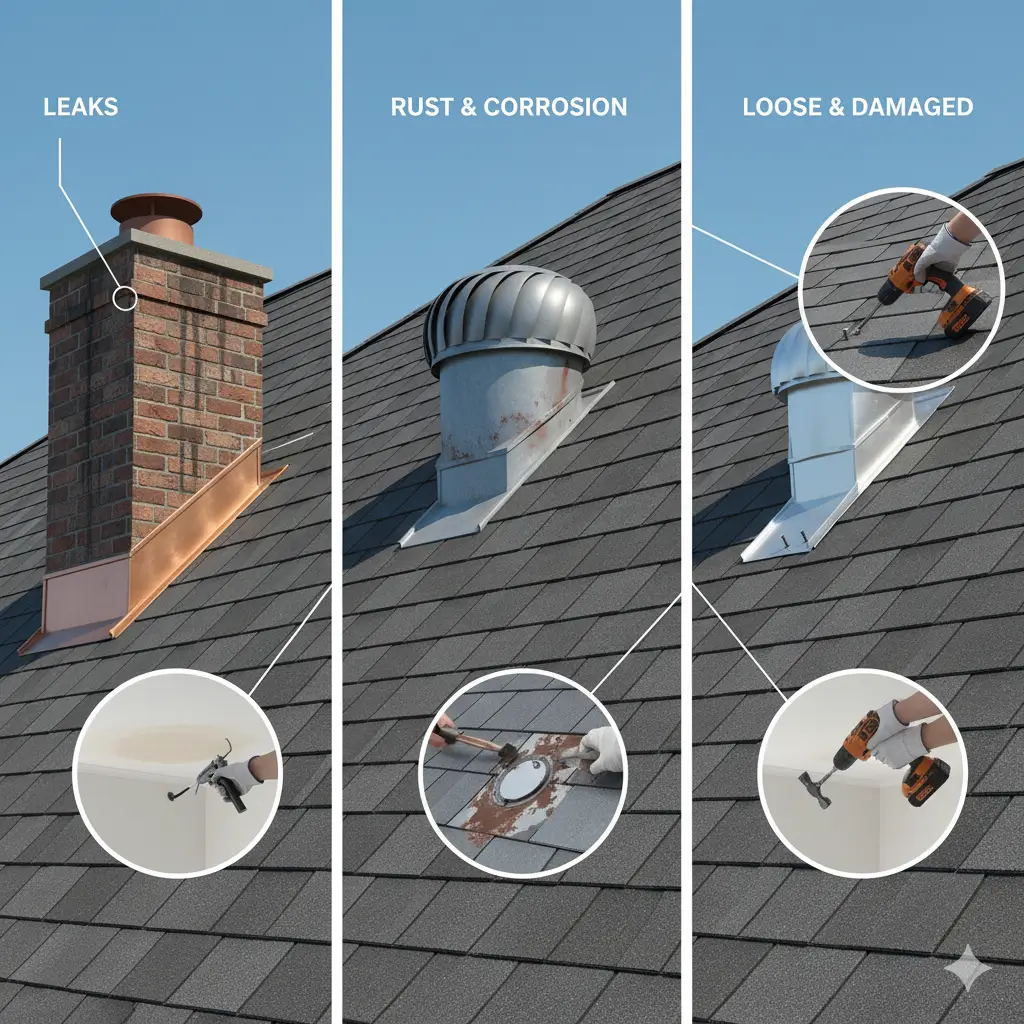
Below are the three most common flashing issues homeowners face, along with effective solutions.
Leaks Around Flashing
Leaks are the most frequent sign that flashing has failed. These leaks typically appear where the roof meets structures like chimneys, vents, skylights, or dormers.
Causes of Leaks
- Gaps created by loose flashing
- Cracks in sealant or caulking
- Deteriorated shingles around the flashing
- Poor installation that leaves gaps or improper overlap
How to Fix It
Minor Leaks:
- Apply a high-quality roofing sealant around exposed gaps.
- Replace any cracked or dried-out caulk.
- Patch small holes using a piece of flashing and roofing cement.
Major Leaks:
- Replace the damaged section of flashing entirely.
- Re-secure the flashing under the shingles using proper overlap techniques.
- If the leak is near a chimney or skylight, a professional may be needed for a precise fit.
⚠️ Important:
If you notice water stains on walls or ceilings, the leak may be severe. Contact a professional roofer immediately to prevent structural damage.
Rust or Corrosion
Metal flashing, especially steel and aluminum, can corrode over time due to moisture, humidity, snow, and coastal air.
Signs of Corrosion
- Visible rust spots
- Flaking or thinning metal
- Discoloration
- Small holes are forming in the flashing.
How to Fix It
- For minor corrosion:
- Scrub off rust and apply a rust-inhibiting primer or sealant.
- Patch the area with roofing cement or a metal repair patch.
- Scrub off rust and apply a rust-inhibiting primer or sealant.
- For advanced corrosion:
- Replace the entire piece of flashing—patching won’t stop leaks for long.
- Consider upgrading to copper flashing in high-moisture environments, as it offers superior corrosion resistance.
- Replace the entire piece of flashing—patching won’t stop leaks for long.
💡 Pro Tip:
Routine roof inspections—especially after winter—can catch corrosion early before it turns into a leak.
Loose or Damaged Flashing
Loose flashing is a major risk because even small gaps allow water to penetrate the roof deck.
Common Causes
- Weather lifting the edges of flashing
- Nails or screws pulling out over time
- Improper installation
- Settling of the roof structure
- Impact from falling debris
How to Fix It
Re-secure Loose Flashing:
- Tighten or replace old screws/nails.
- Apply roofing cement over all fasteners to seal them.
- Ensure the flashing is properly tucked under shingles and overlaps the roofing materials correctly.
Replace Damaged Flashing:
- Remove old flashing carefully to avoid shingle damage.
- Install a new piece with the proper angle and size.
- Seal all seams and edges with roofing cement.
If flashing repeatedly becomes loose, your roof may have underlying structural issues, making a professional evaluation necessary.
Homeowner Tip: Prevent Problems Before They Start
Performing simple annual maintenance tasks—clearing debris, checking fasteners, inspecting valleys, and re-caulking joints—can prevent 90% of flashing issues from developing.
Cost of Roof Flashing
Roof flashing plays a critical role in waterproofing your home, and understanding the cost involved can help you plan repairs or replacements more effectively. The total cost of roof flashing depends primarily on two factors: the material you choose and the labor required for installation. Below is a detailed breakdown to help homeowners set realistic expectations.
Material Costs
Roof flashing materials vary widely in price based on durability, lifespan, and environmental resistance. Here’s what you can expect to pay for the most common flashing materials:
1. Aluminum Flashing
- Cost: $3–$8 per linear foot
- Why it’s affordable: Aluminum is lightweight and easy to work with, making it one of the most cost-effective options.
- Best for: Standard roofs in non-coastal areas.
2. Galvanized Steel Flashing
- Cost: $4–$10 per linear foot
- Benefits: Strong, corrosion-resistant, and widely used in residential roofing.
- Important: Many building codes require a minimum thickness (often 26-gauge).
3. Copper Flashing
- Cost: $15–$30 per linear foot
- Premium option: Extremely durable and long-lasting, often lasting 50+ years.
- Aesthetic factor: Develops a patina over time—some homeowners love it, others don’t.
4. Lead Flashing
- Cost: $10–$20 per linear foot
- Pros: Flexible, durable, and easy to shape.
- Cons: Less commonly used today due to safety and environmental concerns.
5. Specialty Materials (e.g., Modified Bitumen Tape)
- Cost: $20–$40 per roll (depending on width and brand)
- Usage: Often required by building codes in certain regions, especially high-moisture climates.
Material Cost Summary
- Most affordable: Aluminum
- Best overall value: Galvanized steel
- Longest lifespan: Copper
- Special-purpose: Lead & modified bitumen tape
Knowing the pros and cons of each material helps you choose an option that fits your budget and long-term roofing needs.
Labor Costs
Labor typically makes up the larger portion of roof flashing installation or repair expenses. Professional installation ensures the flashing is properly integrated under shingles and sealed against leaks.
Average Labor Costs
- Simple repair: $150–$400
- Full flashing replacement: $300–$1,000
- Chimney or skylight flashing: $500–$1,800 (more complex and time-intensive)
- Emergency or same-day service: Additional $100–$300 surcharge
What Influences Labor Pricing?
- Deep roofs, multiple penetrations, or multi-layered flashing areas increase installation time.
- Location of the Flashing
- Chimneys, skylights, and valleys require precision work.
- Drip edge or step flashing is typically faster and cheaper to install.
- Chimneys, skylights, and valleys require precision work.
- Extent of Damage
If the roof deck beneath the flashing is damaged, repair costs can increase significantly. - Local Roofing Rates
Labor pricing varies by region, roof accessibility, and contractor expertise.
DIY vs Professional Costs
- DIY materials: $20–$100
- Professional installation: $300–$1,500+
While DIY can save you money, improper flashing installation can lead to long-term leaks and expensive repairs—making professional work the safer choice for most homeowners.
Final Cost Overview
Service Type | Cost Range |
Material Only | $3–$30 per linear foot |
Minor Repair | $150–$400 |
Full Replacement | $300–$1,000 |
Chimney/Skylight Flashing | $500–$1,800 |
FAQs About Roof Flashing
Roof flashing is a thin, weather-resistant material—usually metal—installed around vulnerable areas of a roof, such as chimneys, walls, vents, skylights, and valleys. Its primary job is to redirect water away from openings and joints to prevent leaks and structural damage. Without flashing, even minor rain can infiltrate your roof system and cause major problems over time.
The lifespan depends on the material:
- Aluminum: 15–30 years
- Galvanized steel: 20–40 years
- Copper: 50+ years
- Lead: 30–50 years
Proper installation and regular maintenance can extend the lifespan significantly.
Common signs include:
- Water stains on ceilings or walls
- Visible rust or corrosion
- Loose or lifted flashing
- Cracked sealant or gaps
- Shingles around flashing are becoming loose.
If you notice any of these signs, get your flashing inspected as soon as possible.
Minor issues like small holes, loose fasteners, or cracked sealant can often be repaired. However, severe corrosion, large gaps, or structural damage typically require full replacement to prevent future leaks.
On average:
- Minor repairs: $150–$400
- Full replacement: $300–$1,000
- Chimney or skylight flashing: $500–$1,800
Costs vary based on material, roof complexity, and labor rates in your area.
DIY flashing repair is possible for small, accessible areas—like drip edge or simple step flashing. However, areas around chimneys, skylights, or roof valleys require professional skill. Improper installation can lead to leaks that cost far more to fix than the flashing itself.
Galvanized steel is the most commonly recommended material for durability and cost-effectiveness.
Copper is best for long-term performance, though more expensive.
Aluminum is easy to work with but may corrode in coastal regions.
The “best” material depends on your home’s location, climate, and budget.
Improper installation can lead to:
- Persistent leaks
- Rotting roof decking
- Mold growth
- Interior water damage
- Shingle deterioration
- Structural issues over time
Correct installation is essential for long-term roof performance.
Yes. Most building codes require flashing around chimneys, walls, skylights, and penetrations. They also specify minimum material thickness, often 26-gauge galvanized steel. Always verify local requirements before installation or replacement.
Professionals recommend inspecting flashing at least once a year, and after severe weather—especially heavy rain, hailstorms, or high winds. Consistent inspections prevent minor issues from becoming expensive repairs.
Proper flashing is usually installed under shingles to guide water down and over the roofing materials. Exceptions exist for specific systems, but incorrect placement can cause leaks.
Flashing is water-resistant, not 100% waterproof on its own. It must be installed correctly with proper overlap, sealant, and integration into the roof system to create a fully watertight barrier.
Yes, most types of metal flashing can be painted to match the roof or trim. Use a high-quality exterior metal paint and ensure the surface is clean and primed before painting.
- Step flashing: Used along walls; small overlapping pieces that move with expansion.
- Continuous flashing: A long single piece used to protect long roof-to-wall connections.
Step flashing is more flexible and durable, while continuous flashing is faster to install.
Roofers:
- Overlap flashing correctly
- Use high-quality sealants
- Secure it with corrosion-resistant fasteners.
- Integrate flashing under shingles.
- Test for gaps or loose edges
Proper installation prevents 95% of flashing-related leaks.