
What is the Rake of a Roof?
When most people think about a roof, they picture shingles, tiles, or maybe the overall shape of a home. But there’s more happening at the edges than meets the eye—especially at the roof’s rakes.
The rake of a roof is the sloped edge that runs along the gable ends, playing a crucial role in both the structure and protection of your home. Not only does it contribute to your roof’s overall appearance, but it also helps channel water away, preventing leaks and potential damage to the underlying structure.
Understanding roof rakes is essential for homeowners planning maintenance, repairs, or even a full roof replacement. While they’re visible from the outside, the components installed on a rake—like drip edges and starter shingles—work silently to safeguard your home from weather damage.
In this article, we’ll break down everything you need to know about roof rakes:
- What exactly a roof rake is and why it matters
- Common materials and installation essentials
- Maintenance tips and how to protect your roof edge effectively
By the end, you’ll have a clear understanding of this often-overlooked roof component and how it keeps your home safe, functional, and visually appealing.
Understanding the Roof Rake
What is a roof rack?
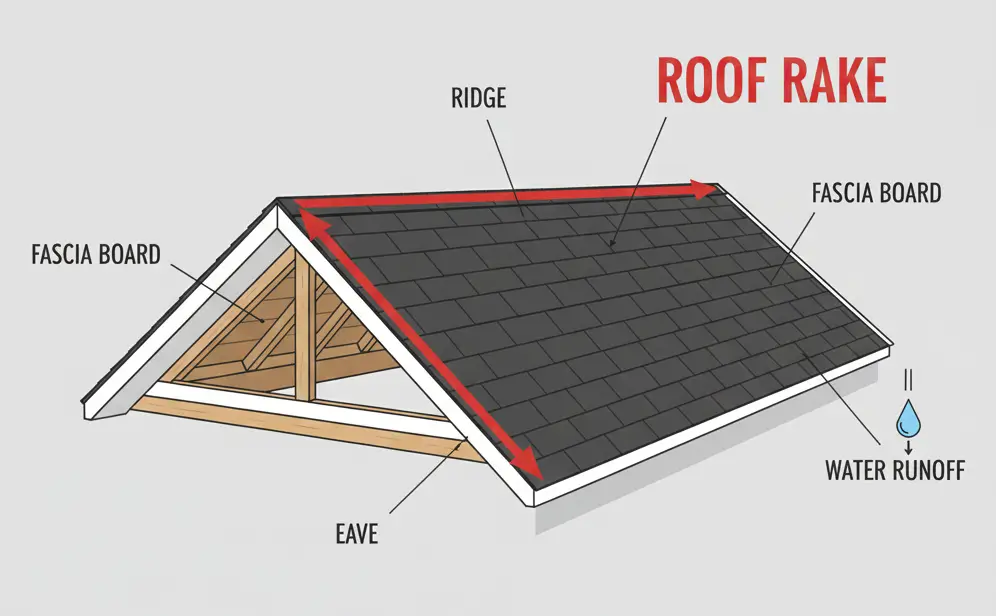
The rake of a roof is the sloped edge that extends from the eave up to the ridge on a pitched or gable roof. It’s the part of the roof you can see along the sides where shingles or roofing material meet the roof’s edge. While it’s a visible architectural feature, it also plays a critical role in protecting your home from the elements.
Roof rakes are more than decorative trim—they cover the ends of rafters, safeguard roof decking, and help direct water away from vulnerable areas. Depending on the design, a rake can enhance both the structural integrity and visual appeal of a home.
Key Components and Parts of a Rake
A roof rake isn’t just a simple sloped edge; it’s made up of several components that work together to protect and finish the roof:
- Rake Boards: The main horizontal or angled boards that form the visible edge of the roof.
- Drip Edge: Metal flashing is installed along the rake to guide water away from the roof and fascia.
- Starter Shingles: The first row of shingles along the rake, providing a secure base and preventing water infiltration.
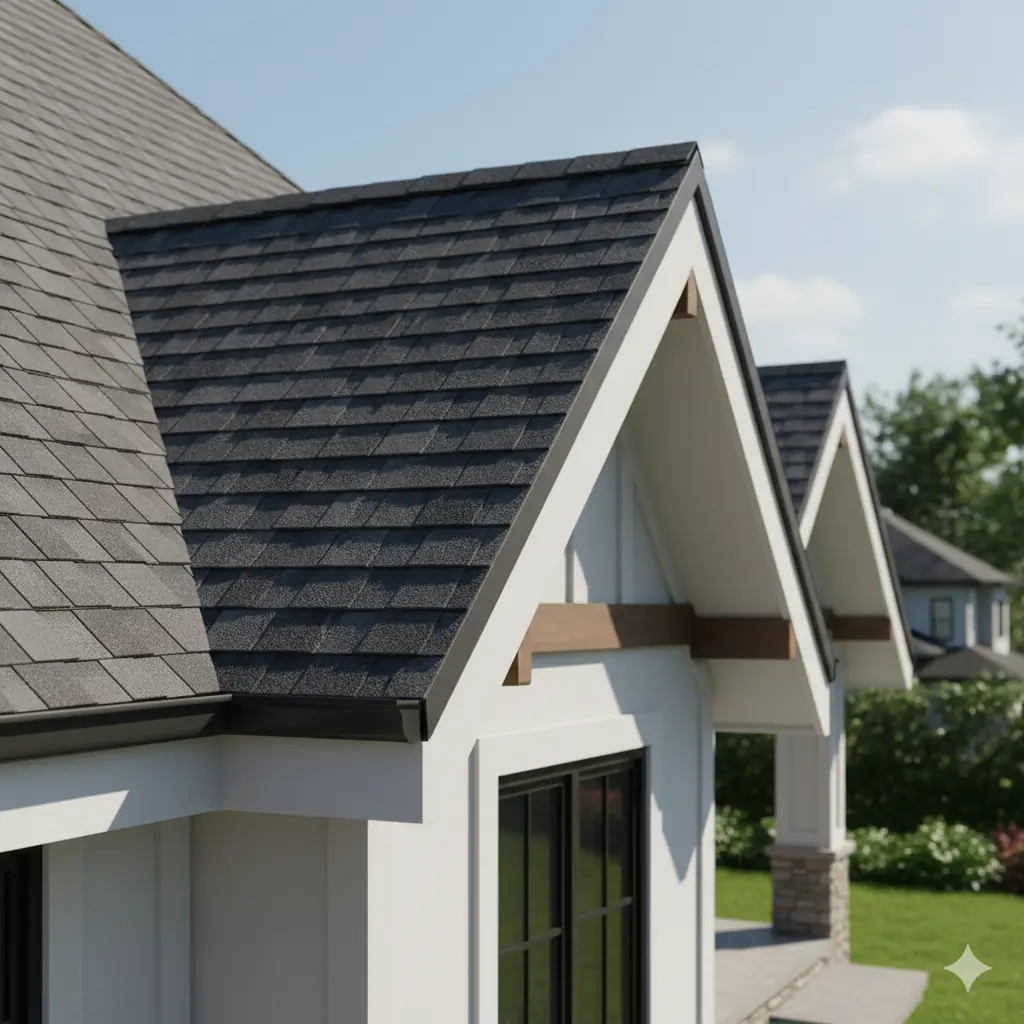
- Decorative Elements (optional): Brackets, exposed beams, or trim used on overhanging rakes for both function and style.
These components can vary depending on whether the rake is overhanging—extending beyond the wall for extra protection and a pronounced look—or flush, sitting level with the wall for a simpler, cleaner appearance.
How a Roof Rake Differs from Eaves and Fascia
It’s common to confuse roof rakes with eaves or fascia boards, but they serve distinct purposes:
- Rakes: Sloped edges along the gable ends, primarily protecting vertical edges and enhancing architectural lines.
- Eaves: Horizontal edges that extend beyond exterior walls, protecting the foundation and siding from water runoff.
- Fascia Boards: Horizontal boards attached to the ends of rafters or trusses, providing structural support for gutters and finishing the roof edge.
Understanding these differences is key to proper roof design, maintenance, and repair, ensuring that each component effectively protects your home while complementing its aesthetic appeal.
Purpose and Function of Roof Rakes
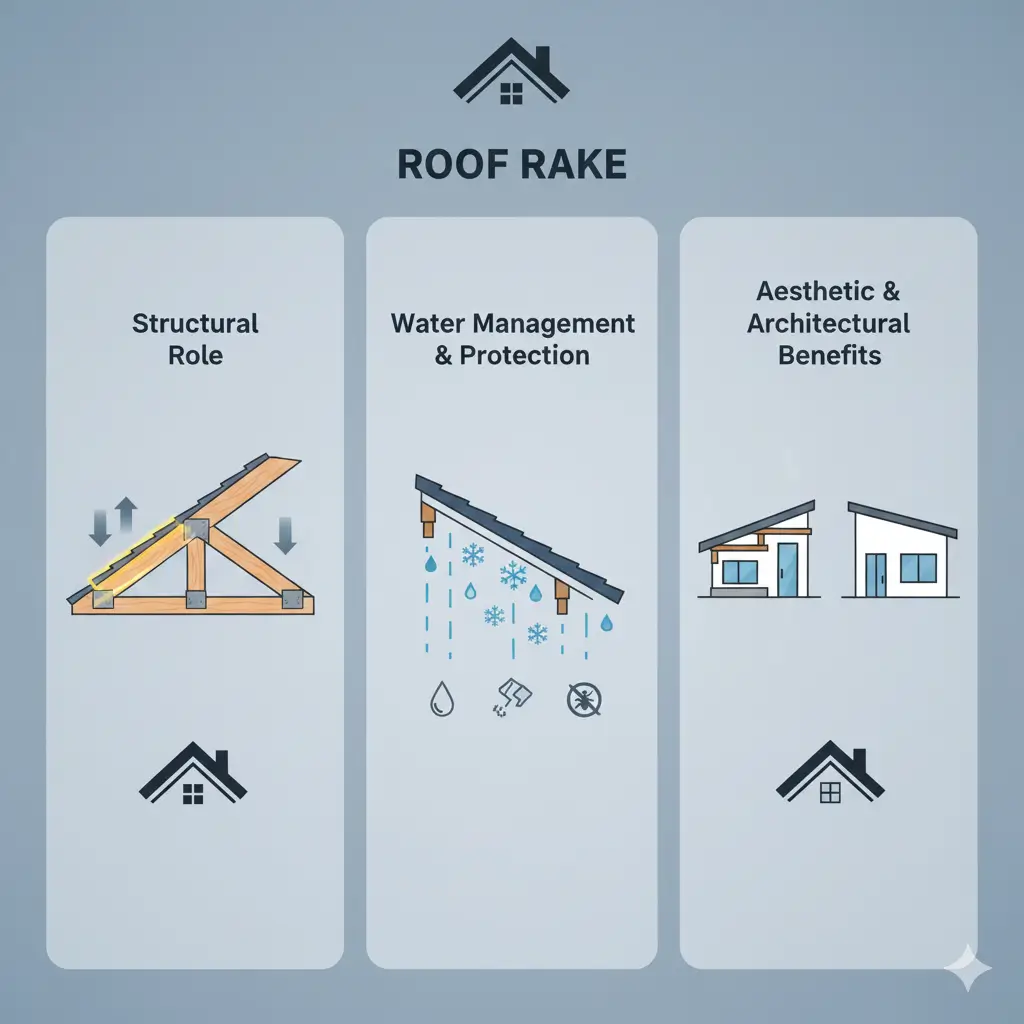
Structural Role in Roof Design
Roof rakes are more than just decorative edges—they play a critical structural role in your roofing system. By covering the ends of rafters and the roof decking at gable ends, rakes help distribute weight evenly across the roof. This reduces stress on the underlying structure, minimising the risk of warping or damage over time. Whether your home features a traditional gable roof or a modern design, properly designed rakes enhance the stability and longevity of the roof.
Water Management and Protection
One of the most important functions of a roof rake is to protect your home from water and moisture damage. Rakes act as a barrier, directing rain, snow, and debris away from the roof edges and walls. This helps prevent leaks, ice dams, and rot that can compromise both the roof and the interior of your home. Overhanging rakes provide extra coverage by extending past the exterior walls, while flush rakes can be reinforced with fascia or trim for added protection.
Additionally, roof rakes help deter pests by covering exposed edges, reducing the chances of animals or insects entering attics or crawlspaces. This combination of moisture and pest protection ensures your roofing system remains secure and functional for years to come.
Aesthetic and Architectural Benefits
Beyond functionality, roof rakes contribute significantly to a home’s visual appeal. They define the roofline and enhance the architectural character of a property, giving the roof a polished and complete appearance. Overhanging rakes can incorporate decorative elements such as exposed beams or brackets, creating a striking design feature. Flush rakes, on the other hand, provide a clean, minimalist look suitable for contemporary homes.
By carefully choosing the type and style of rake, homeowners can improve curb appeal, complement exterior design, and add value to the property, all while ensuring the roof remains well-protected.
Types of Roof Rakes
Common Rake Styles (Gable, Hip, Gambrel, etc.)
Roof rakes come in several styles, each complementing different roof designs and architectural aesthetics:
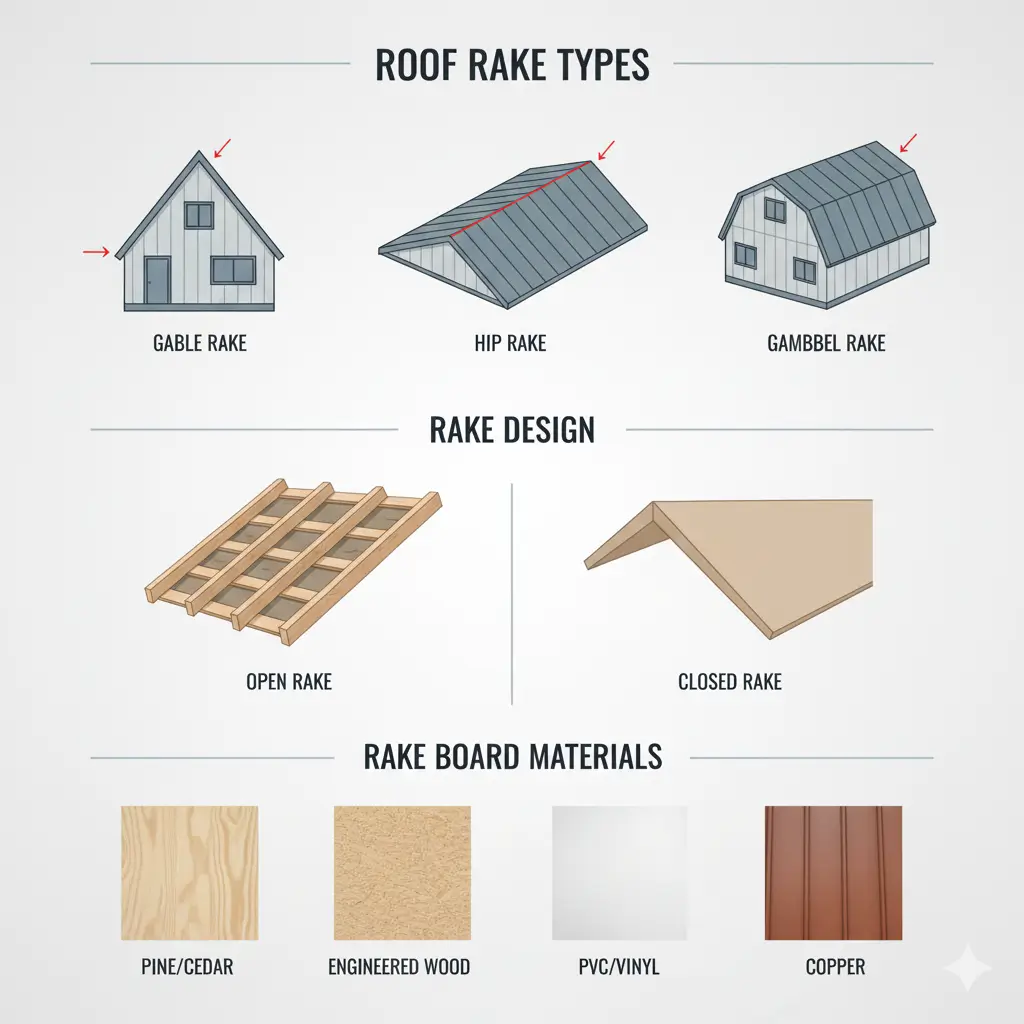
- Gable Rakes: Found on classic gable roofs, these rakes form the triangular edges extending from the eave to the ridge. They provide excellent protection and a visually defined roofline.
- Hip Rakes: On hip roofs, rakes are less prominent but still define the slope edges at the roof’s ends, blending seamlessly with the angled hip planes.
- Gambrel Rakes: Typical in barn-style or Dutch-inspired homes, these rakes follow the dual-slope profile, adding both style and functional coverage.
Each style is designed to balance structural support, water management, and visual appeal, so selecting the right type depends on the roof’s architecture and the homeowner’s aesthetic goals.
Differences Between Open and Closed Rakes
Roof rakes are generally categorised into open (exposed) and closed (boxed-in or enclosed) designs:
- Open/Exposed Rakes: The framing of the roof edge remains visible, showcasing rafters or beams. This style is popular in contemporary and modern homes for its clean, airy lines. However, exposed rakes are more vulnerable to weather and require careful installation and ongoing maintenance to prevent damage.
- Closed/Boxed-In Rakes: These rakes are covered with protective materials, fully concealing the framing. They offer superior protection against rain, snow, wind, and pests, and integrate smoothly with the roofline. While they may appear less “lightweight” than open rakes, they are durable, low-maintenance, and suitable for most architectural styles.
Understanding the differences helps homeowners choose a rake that balances aesthetic preferences, weather protection, and longevity.
Materials Used for Rake Boards
Rake boards are essential components that cover and protect the roof’s edge. A variety of materials is available, each with unique benefits:
- Traditional Wood: Pine and cedar are classic choices. Cedar, in particular, resists rot and insects, providing long-lasting durability while enhancing the natural look of the roof. These woods require periodic maintenance, such as staining or sealing.
- Engineered Wood (Smart Board): Offers increased resistance to fungal decay and warping, combining durability with the aesthetic of real wood.
- PVC or Vinyl: Fully rot- and insect-resistant, these materials require minimal maintenance and retain their appearance for years. They are ideal for homeowners seeking long-term protection without frequent upkeep.
Selecting the right material depends on climate, roof style, desired appearance, and maintenance preferences, ensuring your roof rake remains both functional and visually appealing.
Installation Essentials for Roof Rakes
Necessary Components (Drip Edge, Starter Shingles, etc.)
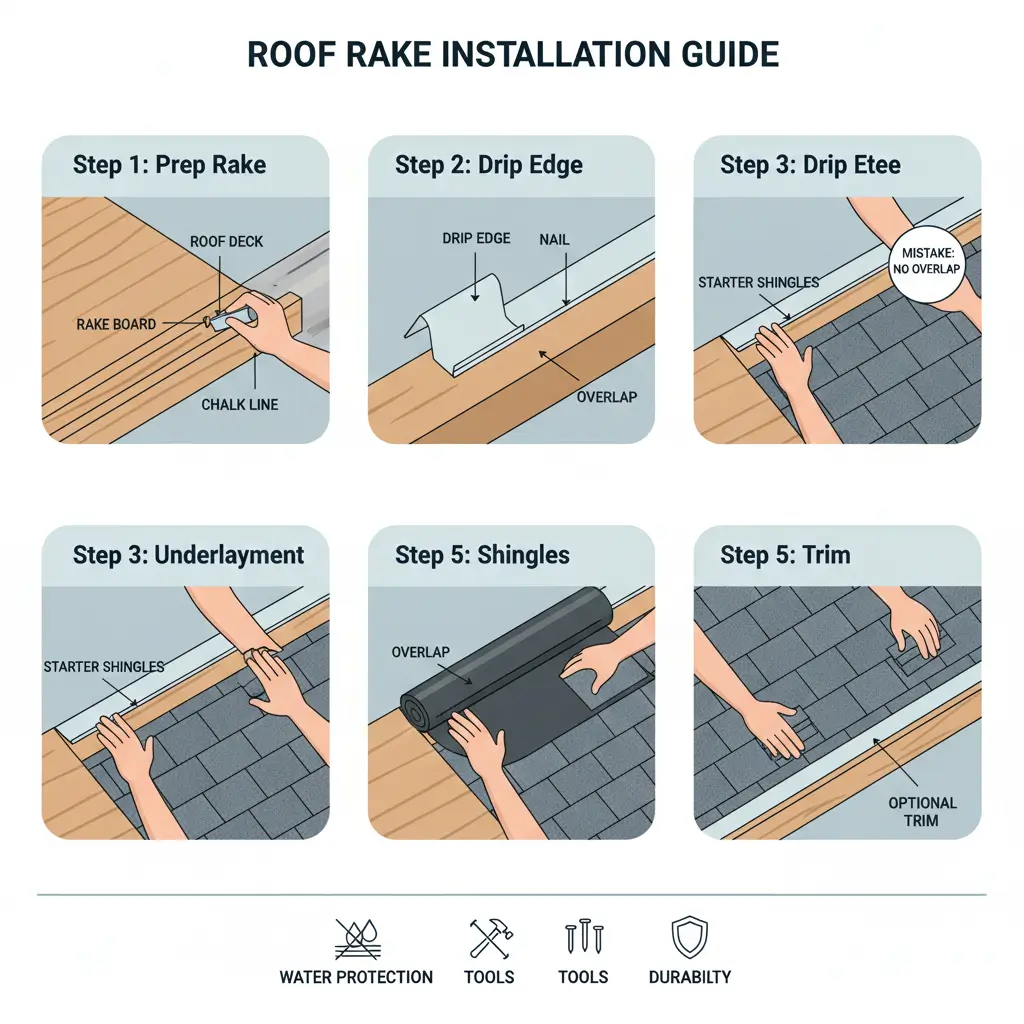
Proper installation of a roof rake goes beyond just laying shingles. Certain components are crucial to protect the roof edge, prevent leaks, and ensure long-term durability:
- Drip Edge: A metal flashing installed along the rake and eaves, the drip edge directs water away from the roof deck and fascia boards. It prevents moisture from seeping under shingles, reducing the risk of wood rot, water damage, and structural issues.
- Starter Shingles: These are pre-cut shingles installed directly over the drip edge before the first full course of shingles. Starter shingles provide a secure base and help seal the edges against wind uplift. Many starter shingles come with an adhesive strip that bonds to the first row of shingles when warmed by sunlight, improving wind resistance.
- Optional Trim or Fascia: In some cases, pre-bent aluminium fascia specialised rake moulding can substitute for the drip edge, providing both protection and aesthetic appeal.
These components work together to form a watertight, durable, and visually polished roof edge.
Step-by-Step Installation Overview
Installing a roof rake correctly is critical to prevent leaks and comply with building codes. A general overview of the process includes:
- Prepare the Rake Edge: Ensure the roof deck and rafters are clean, level, and free of debris.
- Install the Drip Edge: Align it along the rake edge, overlapping pieces by at least 2 inches, and extending it slightly beyond the roof deck per code requirements.
- Lay Starter Shingles: Place starter shingles over the drip edge, ensuring they are properly aligned and bonded to form a secure seal.
- Install Main Shingles: Proceed with the first row of shingles, pressing them onto the starter shingles’ adhesive strip.
- Optional Trim or Fascia: Install any decorative or protective trim as needed, ensuring a flush and neat finish.
Following these steps ensures your roof rake is weatherproof, durable, and code-compliant.
Common Mistakes to Avoid
Even minor errors can compromise the function of a roof rake. Common mistakes include:
- Skipping the drip edge or improperly overlapping sections
- Installing starter shingles without adhesive or misaligning them
- Failing to seal joints and edges correctly, leaving gaps for wind or water to enter
- Using incompatible materials or low-quality flashing that deteriorates quickly
Avoiding these mistakes ensures your roof rake performs its protective role effectively, safeguards your home, and avoids costly repairs down the line.
Maintenance and Care for Roof Rakes
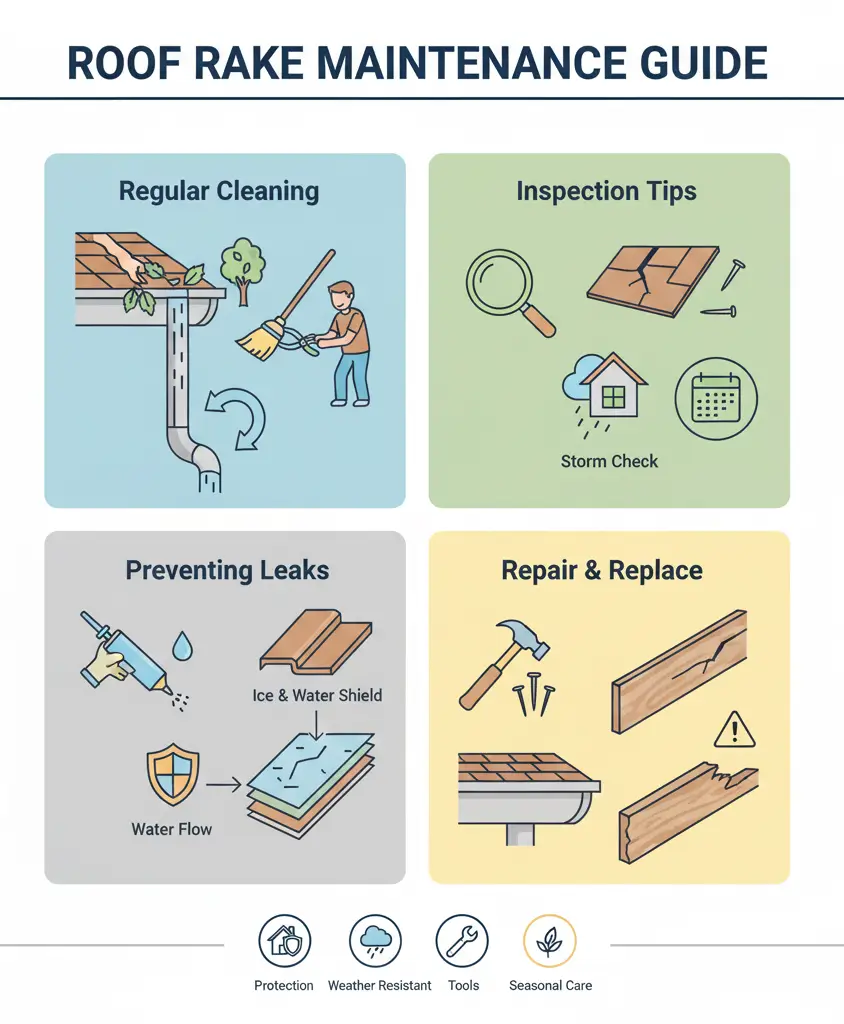
Proper care of roof rakes ensures your roofing system remains durable, functional, and visually appealing. Regular maintenance prevents costly damage, enhances the roof’s lifespan, and protects your home from weather-related issues.
Regular Cleaning and Inspection Tips
Keeping the roof rake clean is the first step in maintenance:
- Remove debris: Regularly clear leaves, sticks, and other debris from the rake area. Accumulated debris can trap moisture, leading to rot and mould growth.
- Inspect after storms: Check for damage after heavy rain, snow, or wind. Look for loose shingles, bent drip edges, or cracks in the rake boards. Early detection prevents minor issues from turning into expensive repairs.
- Trim nearby trees: Overhanging branches can scrape or damage the rake during windy conditions. Keeping trees at a safe distance reduces this risk.
Apply protective sealants: A waterproof sealant on rake boards can prolong their life and maintain the roof’s watertight integrity.
Preventing Leaks and Water Damage
The roof rake plays a critical role in keeping water out of your home. Maintenance strategies include:
- Check drip edges and seals: Ensure drip edges are properly installed and overlapping as needed. Replace any sections that are bent or deteriorated.
- Waterproofing: Ensure starter shingles, underlayment, and flashing are intact to prevent water from seeping under shingles.
- Prompt repairs: Address any signs of moisture or leaks immediately to avoid structural damage to the roof decking and interior spaces.
Repairing or Replacing Damaged Rakes
Over time, rake boards may warp, crack, or deteriorate due to weather exposure. Proper repair or replacement is essential:
- Inspect for damage: Look for rotting wood, cracked PVC, or loose boards.
- Material choice: Durable materials like PVC or treated cedar resist rot and insects, reducing future maintenance needs.
- Professional help: For extensive damage, steep roofs, or high-risk repairs, hire a licensed roofing contractor. Proper installation prevents further structural issues and ensures safety.
Frequently Asked Questions
The eave is the horizontal edge of a roof that extends beyond the exterior wall, directing water away from your home’s foundation. The rake, on the other hand, is the sloped edge that runs from the roof ridge down to the eave at the gable end, protecting the roof’s sides and enhancing its architectural appearance.
A rake board covers and reinforces the roof’s sloped edges. It prevents water from seeping under shingles, blocks pests, and shields the roof deck and fascia from wind, snow, and rain. Essentially, it extends the roof’s lifespan while keeping your home structurally secure.
While minor repairs or small installations may be possible for experienced DIYers, professional installation is recommended. Rake boards must be properly aligned, sealed, and fastened to avoid leaks, structural damage, or code violations. Incorrect installation can lead to costly repairs over time.
To measure a roof’s rake:
- Start at the intersection of the roof and the exterior wall (the eave).
- Measure along the slope up to the roof ridge.
This distance represents the rake length, which is important for material planning, installation, and repairs.
Most pitched or gable roofs benefit from rake boards, especially for weather protection and aesthetics. Some flat or specialised roofs may not require them, but proper edge protection is always essential to prevent water damage.