
Why a Shingling Hammer Is Ideal for Roofing Work (Complete Guide)
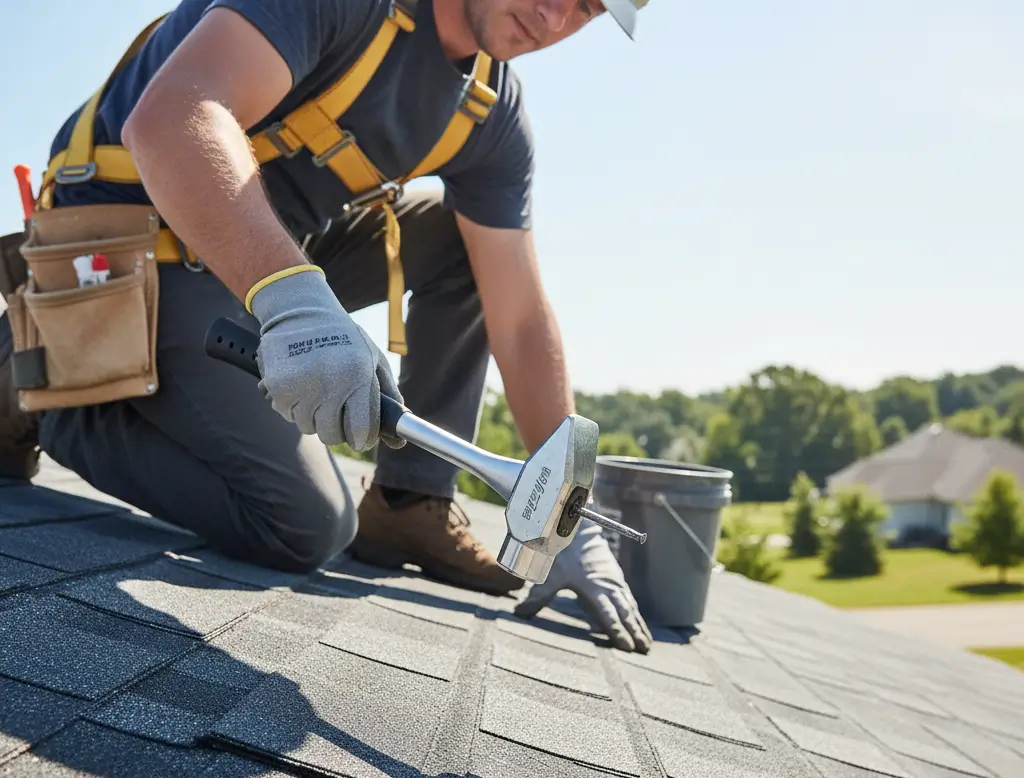
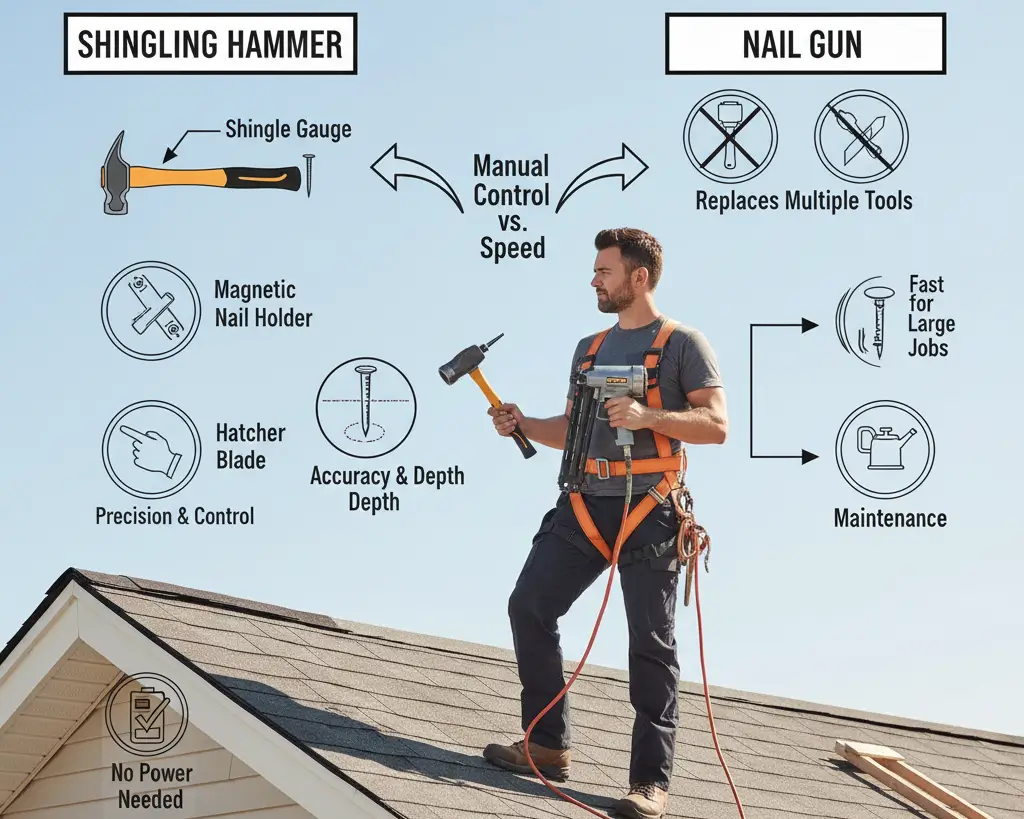
When it comes to roofing, having the right tools isn’t just helpful—it’s essential. Precision, safety, and speed all depend on the equipment you bring onto the roof, and few tools are as purpose-built for the job as a shingling hammer. Unlike a standard hammer, a shingling hammer is engineered specifically for roofing tasks, offering features such as a built-in shingle gauge, magnetic nail holder, hatchet edge, and perfectly balanced weight to make installation smoother and more accurate.
Whether you’re a professional roofer striving for efficiency or a homeowner tackling repairs, understanding the value of a shingling hammer can dramatically improve your results. In this complete guide, we’ll break down what makes this specialized tool so effective, why roofers rely on it, and how it outperforms traditional hammers in both speed and precision.
Get ready to learn why the shingling hammer remains one of the most trusted and versatile tools in the roofing industry—and how it can elevate your roofing work from average to exceptional.
Introduction
Roofing may look straightforward from the ground, but once you’re on the roof, the challenges become very real. Every strike of the hammer, every shingle placement, and every nail driven must be precise, or the roof’s integrity can suffer. Slipping shingles, misaligned rows, and poorly driven nails aren’t just cosmetic issues—they can lead to leaks, structural damage, and expensive repairs later on.
Brief Overview of Roofing Work Challenges
Roofers work in conditions that require balance, accuracy, and efficiency—all while standing on a sloped surface. Common challenges include:
- Maintaining consistent shingle spacing
- Driving nails flush without damaging the shingle.
- Working quickly without sacrificing precision
- Handling shingles and nails safely in elevated positions
These challenges make it clear: roofing isn’t the kind of job where “any old tool” will do.
Why Specialized Tools Matter for Efficiency and Safety
Because roofing requires such precision, specialized tools are essential. A shingling hammer is designed specifically to solve roofing-specific problems that a standard hammer simply cannot. From helping roofers align shingles correctly to speeding up nail placement, the right tool increases both accuracy and safety. Roofers can work faster, make fewer mistakes, and reduce the risk of accidental slips, mis-hits, or shingle damage.
This is why professional roofers rely on shingling hammers—they’re engineered to make roofing work smoother, safer, and far more efficient than using a regular hammer.
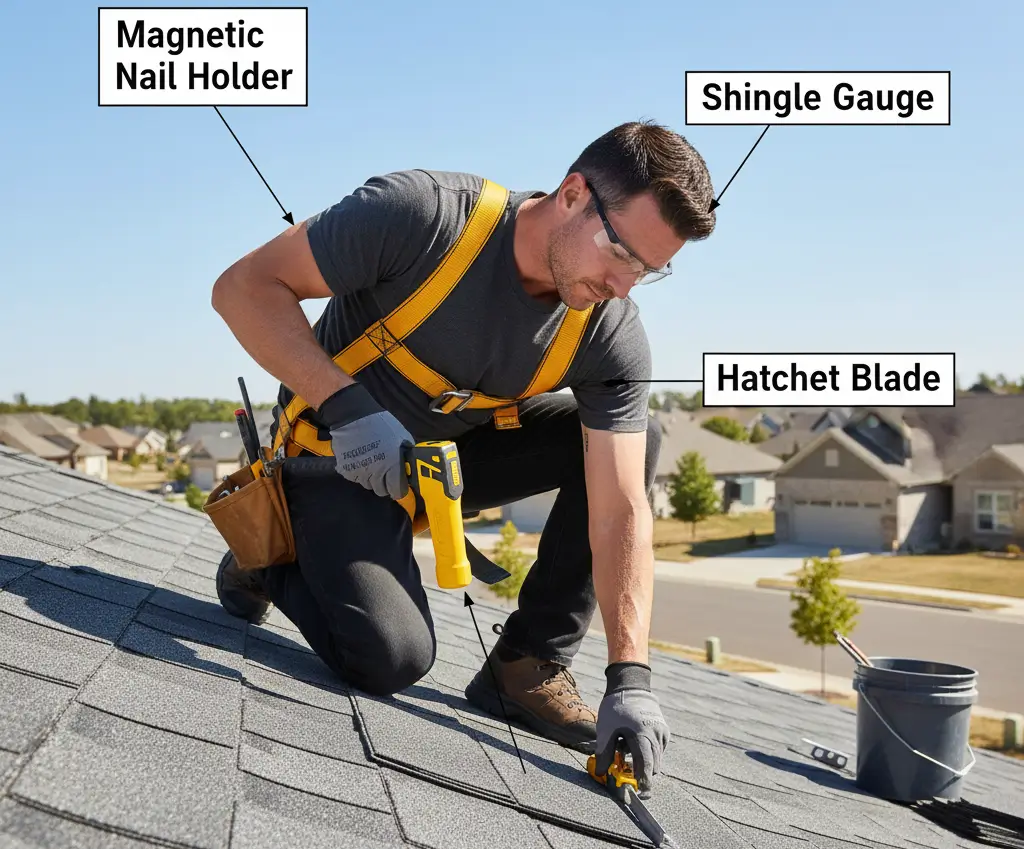
What Makes a Shingling Hammer Unique
A shingling hammer isn’t just a modified version of a regular hammer—it’s a multi-purpose roofing tool engineered specifically for shingle installation, repair, and precision alignment. What makes it stand out is how many critical roofing functions it combines into a single, efficient tool.
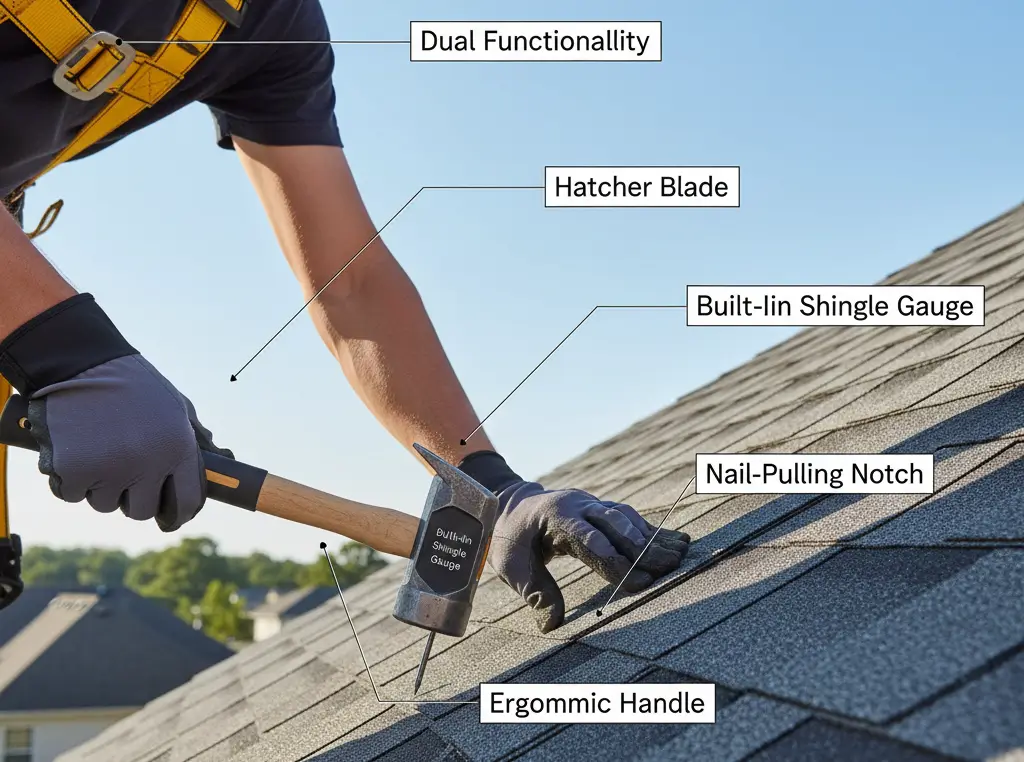
Dual Functionality: Hammer + Hatchet Blade
One of the biggest advantages of a shingling hammer is its two-in-one design. On one end is the striking face for driving nails, and on the other is a hatchet-style blade or cutting edge.
This dual-purpose setup allows roofers to:
- Trim shingles on the spot
- Notch or shape shingles without additional tools
- Remove damaged shingle sections quickly.
- Alternate between cutting and hammering without switching tools.
This feature alone speeds up installation significantly, especially during fast-paced roofing projects where efficiency matters.
Built-In Features for Precision and Productivity
Shingling hammers include several integrated features designed to replace multiple tools and enhance accuracy:
Built-In Shingle Gauge
The gauge helps roofers maintain consistent shingle exposure and spacing—critical for proper water shedding and a clean, professional appearance.
Magnetic Nail Holder
A magnetized slot holds the nail in place so roofers can start nailing with one hand, which improves:
- Safety on steep slopes
- Speed of installation
- Accuracy when working in hard-to-reach areas
Nail-Pulling Notch
A specialized notch or claw allows roofers to remove misplaced nails or old fasteners without damaging the surrounding shingles, making repairs and adjustments quick and clean.
These built-in features not only reduce the need to carry extra tools but also help roofers maintain precision throughout the entire installation process.
Ergonomic Design for Comfort and Precision
Roofing requires repetitive motion, and the right tool can significantly reduce fatigue. Shingling hammers are engineered with:
- Balanced weight distribution for smoother, more controlled swings
- Shock-absorbing handles to reduce vibration and arm strain
- Rubberized or non-slip grips for better control in wet or hot conditions
- Angled striking faces that allow proper nail placement on sloped surfaces
These ergonomic features help roofers maintain consistent accuracy throughout long workdays while minimizing physical stress and improving overall safety.
Key Benefits of Using a Shingling Hammer
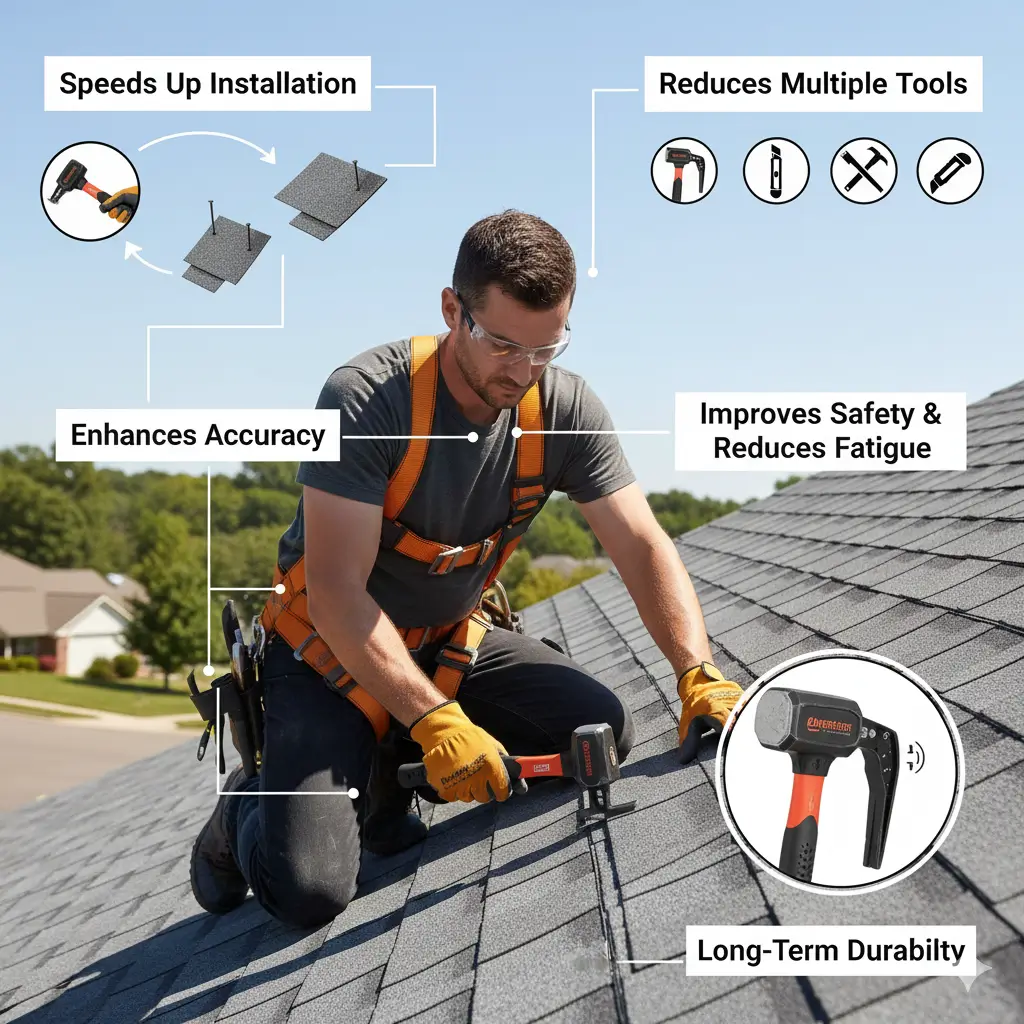
A shingling hammer is more than a convenience—it’s a tool that directly improves the speed, safety, and overall quality of roofing work. Thanks to its specialized design and built-in features, it delivers several advantages that standard hammers simply can’t match.
Speeds Up Installation
Because a shingling hammer combines multiple functions—nail driving, shingle cutting, nail pulling, and measurement—it allows roofers to work significantly faster. Roofers can switch between placing shingles, trimming them, and fastening nails without stopping to grab additional tools. This smooth workflow dramatically reduces installation time on both small repairs and full roof replacements.
Reduces the Need for Multiple Tools
With its hatchet blade, built-in gauge, and nail-pulling notch, a shingling hammer eliminates the need to carry:
- A separate utility knife
- A pry bar or nail puller
- A measuring tool for shingle exposure
This is especially valuable when working on steep slopes, where minimizing equipment makes movement safer and more efficient.
Enhances Accuracy and Alignment of Shingles
Precision is critical in roofing, and shingling hammers help roofers achieve consistent, professional-grade results. The built-in gauge ensures shingles are aligned evenly, while the magnetic nail holder helps with accurate nail placement. Combined with an angled striking face, these features ensure a secure installation and a uniform, polished finish.
Improves Safety and Reduces Fatigue
Roofing involves working at heights, often under tough conditions. A shingling hammer is engineered to reduce risks, offering:
- Non-slip, ergonomic grips for better control
- Balanced weight distribution to reduce arm strain
- Shock-absorbing handles that minimize vibration
- Hands-free nail holding through the magnetic slot, preventing the risky habit of holding nails with fingers on steep surfaces.
These safety-focused features help roofers work longer with less fatigue and fewer chances of accidents.
Long-Term Durability and Reliability
Shingling hammers are built using hardened steel, forged alloys, or high-strength composites designed for rugged jobsite environments. Their durability ensures:
- Long service life
- Consistent performance under heavy use
- Resistance to bending, chipping, or cracking
Roofers benefit from a tool that can handle daily wear without losing accuracy or functionality.
Comparing Shingling Hammers to Other Roofing Tools
While a shingling hammer is one of the most trusted tools in the roofing industry, it’s not the only option roofers use. Understanding how it compares to a standard hammer or a nail gun helps you choose the right tool for the job.
Shingling Hammer vs. Standard Hammer
A standard hammer is a versatile tool useful for everyday carpentry, but it simply isn’t built for the demands of roofing. A shingling hammer, on the other hand, is specifically engineered for shingle installation.
Why a shingling hammer comes out ahead:
- Built-in shingle gauge ensures consistent spacing and proper exposure
- A magnetic nail holder allows hands-free nail placement, especially on steep roofs.
- Hatchet blade and nail-pulling notch replace the need for extra tools.
An angled striking face improves accuracy on sloped surfaces. - Ergonomic balance reduces arm fatigue and improves control.
A standard hammer can drive nails, but without these roofing-specific features, the process is slower, less precise, and more physically taxing.
Shingling Hammer vs. Nail Gun
Nail guns are popular for speeding up large-scale installations, but they come with drawbacks. While they excel in speed, they lack the precision and versatility of a shingling hammer.
Shingling hammer advantages:
- Greater control over nail depth and placement
- No risk of overdriven or underdriven nails
- Works well in tight or awkward spaces
- Requires no electricity, batteries, or air compressors
- Also functions as a cutter and pry tool.
Nail gun advantages:
- Extremely fast for large roofing projects
- Helpful for production crews or tight deadlines
Drawbacks of nail guns:
- Require regular maintenance
- Can misfire or overdrive nails, voiding shingle warranties
- Less precise, especially for repairs or detail work
When to Choose Each Tool
Choose a shingling hammer when:
- You need high accuracy for shingle alignment
- You’re performing repairs, detail work, or working around vents, chimneys, or edges.
- You want a lightweight tool that replaces multiple others.
- You prefer better control on steep or uneven roofs.
Choose a nail gun when:
- You’re installing shingles on a large, open roof
- Speed is the priority.
- You have the proper equipment and experience to use it safely.
Best practice:
Most professional roofers use both—a nail gun for fast installation and a shingling hammer for precision and finishing.
Types of Shingling Hammers and Their Applications
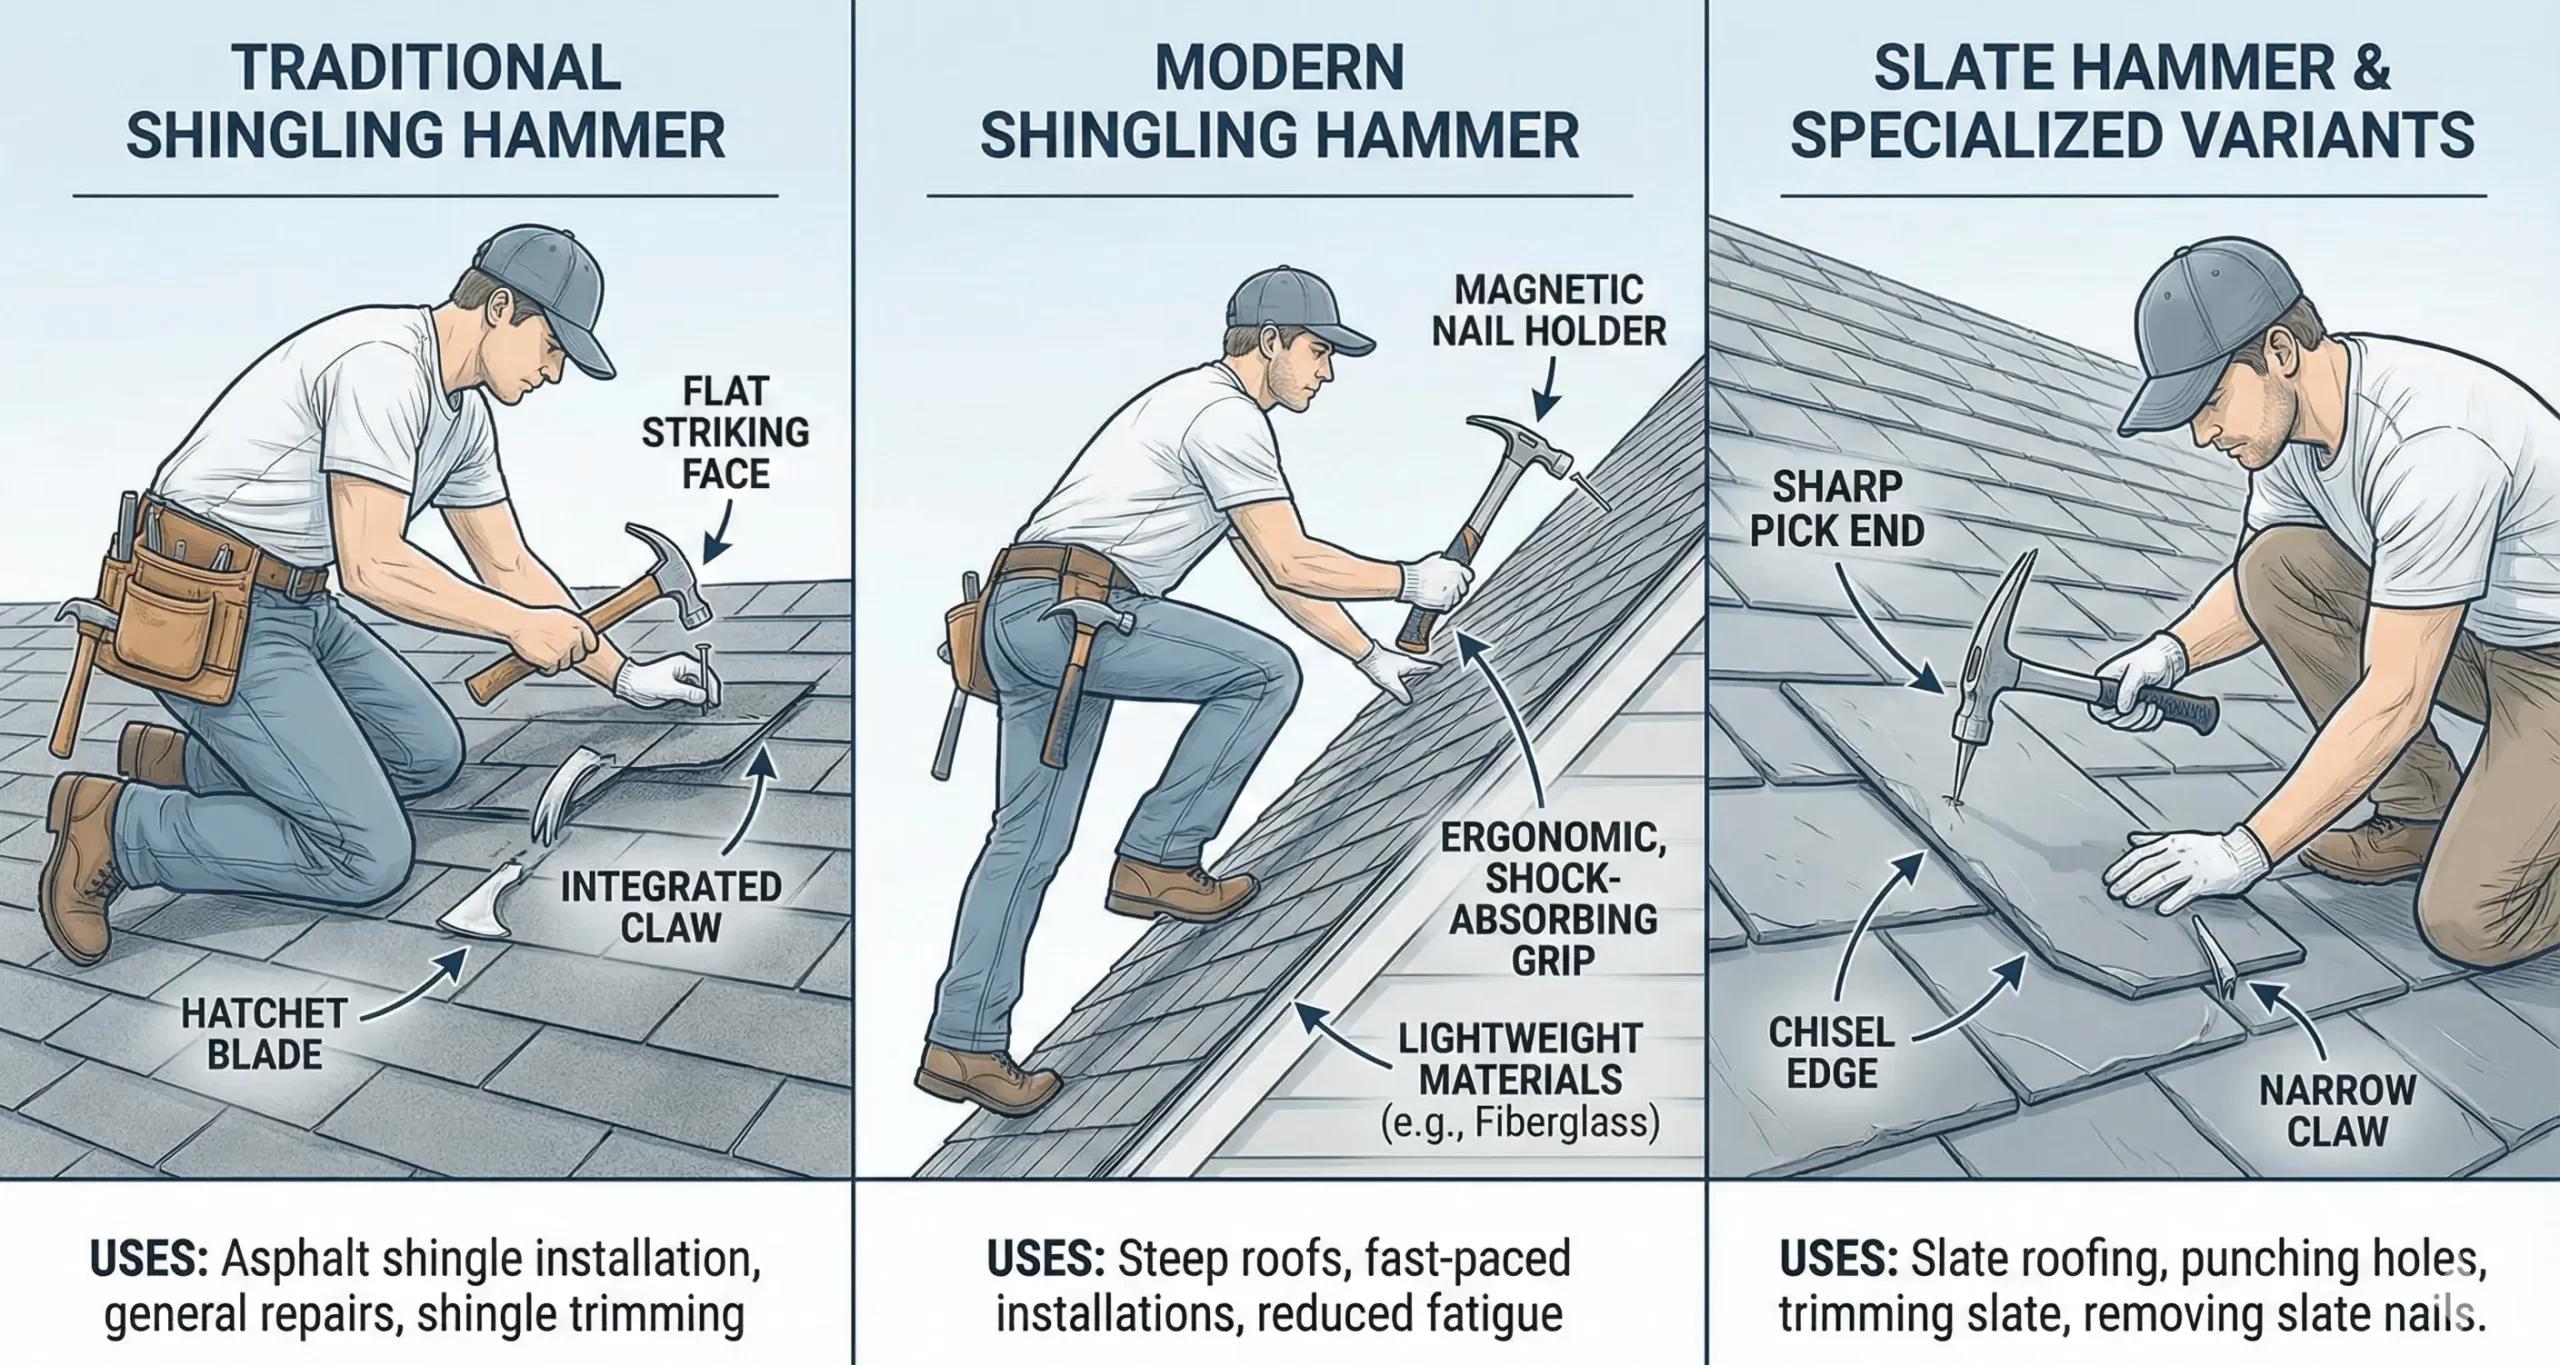
Shingling hammers come in several variations, each designed to meet the needs of different roofing styles, materials, and job conditions. Choosing the right type ensures better precision, improved efficiency, and a smoother workflow. Below are the most common types and how they’re used in real roofing scenarios.
Traditional Shingling Hammer
A traditional shingling hammer is the classic, all-purpose option used by many professional roofers.
Key characteristics:
- Flat striking face for driving roofing nails
- Integrated claw or notch for removing nails
- Hatchet-style blade for trimming asphalt shingles
- Balanced design suitable for most standard roofing tasks
Best applications:
- Asphalt shingle installation
- General roof repairs
- Projects that require frequent cutting and prying
This type is ideal for roofers who prefer a reliable, no-frills tool that performs well across most roof types.
Modern Shingling Hammer
Modern shingling hammers incorporate updated features that make roofing faster, safer, and more efficient.
Typical upgrades include:
- Magnetic nail holder for hands-free nail placement
- Ergonomic, non-slip grip to reduce fatigue
- Shock-absorbing design to minimize vibration
- Lightweight materials like fiberglass or high-strength alloys
Best applications:
- Fast-paced installation of composition or architectural shingles
- Work on steep roofs where secure nail handling is crucial.
- Roofers who want maximum efficiency with minimal strain
These hammers are built for modern roofing demands and offer the best balance of comfort and precision.
Slate Hammer and Specialized Variants
Roofing with slate or similar heavy materials requires a completely different kind of tool.
Slate hammers typically include:
- Sharp pick end for punching nail holes in slate
- Beveled or chisel-like edge for cutting slate tiles
- Narrow claw for removing slate nails without cracking tiles
Best applications:
- Slate roofing installation and repairs
- Clay tile, shake, or specialty roofing where precision cutting is needed
- Jobs requiring delicate material handling
Other specialized variants include:
- Magnetic roofing hammers for reduced nail drops
- Adjustable-gauge hammers for custom shingle exposure settings
- Extra-sturdy steel hammers for heavy-duty or high-impact roofing tasks
These specialty tools ensure roofers can adapt to different materials and installation requirements with greater accuracy.
How to Use a Shingling Hammer Effectively
Mastering a shingling hammer doesn’t just improve the speed of your roofing work—it dramatically enhances the quality and longevity of the installation. With the right technique, you can drive nails cleanly, cut shingles accurately, and work more safely on steep surfaces. Below are the core techniques every roofer should know.
Proper Gripping and Swinging Technique
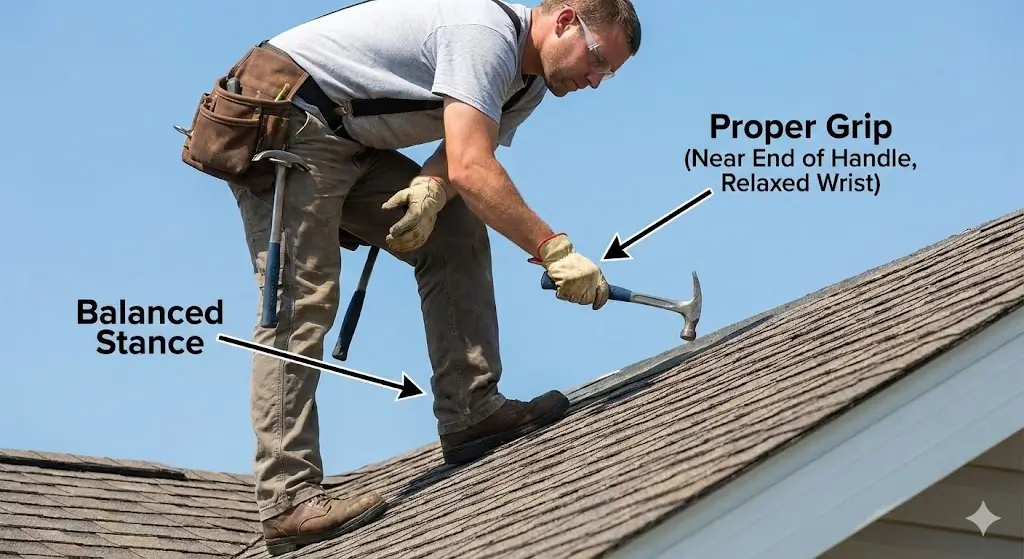
A secure and comfortable grip is the foundation of accurate hammering.
Tips for proper handling:
- Grip the hammer near the end of the handle to maximize leverage and reduce the number of swings needed.
- Keep your wrist relaxed and let the hammer’s weight do most of the work—this minimizes strain and helps maintain a smooth rhythm.
- Maintain a balanced stance, especially on pitched roofs, to avoid overreaching or twisting your body.
- Swing in a controlled arc, not with excessive force. Controlled movements result in cleaner strikes and fewer mistakes.
This approach ensures accuracy while reducing fatigue during long roofing sessions.
Nail Driving Tips for Precision
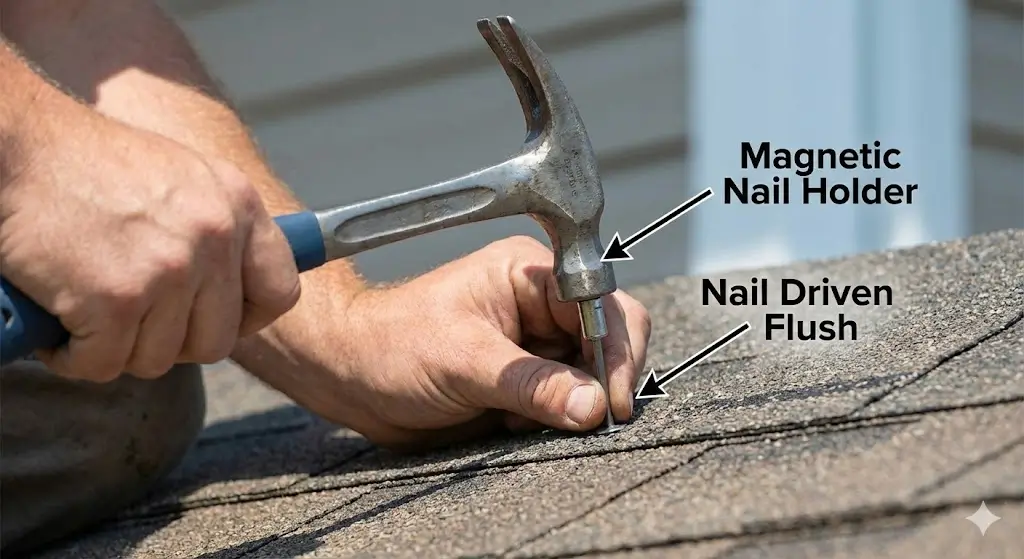
Driving roofing nails correctly is essential to preventing premature shingle failure, leaks, or wind lifting.
Key steps for precise nail placement:
- Use the magnetic nail holder (if your hammer includes one) to position nails without risking your fingers—especially useful on steep roofs.
- Place nails exactly within the manufacturer’s nailing zone, usually just above the adhesive strip.
- Drive nails flush with the shingle—not sunk too deep, not sticking out. Overdriven nails can tear shingles; underdriven nails prevent proper sealing.
- Strike straight and steady, keeping the hammer face aligned with the nail to avoid bending or misdriving it.
- Verify spacing to ensure consistent alignment and shingle exposure across each row.
Correct nail placement is one of the biggest contributors to roof durability and professional-looking results.
Cutting and Shaping Shingles Safely
Many shingling hammers include a hatchet blade or sharp edge designed for on-the-spot shingle trimming. Using it properly increases efficiency and accuracy.
Safe cutting techniques:
- Support the shingle on a firm surface before cutting to avoid cracks or uneven edges.
- Use smooth, controlled chopping motions with the hatchet blade rather than forceful swings.
- Trim shingles from the backside whenever possible for a cleaner edge and reduced granule shedding.
- Keep your opposite hand and body clear of the cutting path to prevent injuries.
- Check fit before nailing, ensuring the trimmed shingle aligns correctly with the exposure pattern.
Proper cutting technique ensures tight, weather-resistant joints and clean lines throughout the roof.
Features to Look For When Buying a Shingling Hammer
Choosing the right shingling hammer is essential if you want reliable performance, long-term comfort, and professional-level results. Not all roofing hammers are built the same, and the best ones blend strength, precision, and safety into a single tool. Here are the most important features to evaluate before buying.
Material and Build Quality
The durability and feel of a shingling hammer depend heavily on the materials used.
Common material options include:
- Forged steel heads – Extremely durable and resistant to wear, making them ideal for heavy-duty roofing tasks.
- Fiberglass handles – Lightweight and excellent at absorbing impact vibrations, helping reduce fatigue during long workdays.
- Hickory or hardwood handles – Great natural shock absorption and comfortable in hand, though they may require more care in harsh weather conditions.
A quality hammer should balance longevity with comfort—solid construction ensures it holds up to repetitive impact and demanding job-site environments
Grip Comfort and Shock Absorption
A shingling hammer is used thousands of times per day on a roofing job, so grip and vibration control play a major role in overall performance.
Look for:
- Anti-slip rubberized grips to maintain control even in hot, humid, or rainy conditions.
- Ergonomic handle shaping that supports a natural hand position.
- Shock-absorbing cores or reinforced materials that reduce hand, wrist, and elbow strain over time.
A comfortable, vibration-dampening handle keeps you efficient and safer throughout long installations or repairs.
Head Design and Added Functionalities
The head of the hammer is where most of the performance differences show up. A good shingling hammer offers multifunctional features that streamline your workflow.
Key features to look for:
- Flat, wide striking face for accurate nail placement and fewer bent nails.
- Integrated claw or nail-pulling notch for removing old shingles or correcting mistakes quickly.
- Hatchet blade or beveled edge (on select models) for cutting shingles without needing a separate knife.
- Built-in shingle gauge to ensure consistent shingle exposure and faster installation.
- Magnetic nail holder for easy one-handed nail positioning—especially valuable on steep roof pitches.
These additional functionalities reduce tool switching, improve precision, and help you work faster and more safely.
Maintaining Your Shingling Hammer for Longevity
A well-maintained shingling hammer not only performs better on the roof but also lasts significantly longer, saving you from unnecessary replacements. Because this tool is primarily mechanical—without motors, hoses, or batteries—its upkeep is simple, but consistency is key. Here’s how to keep your hammer in top condition year after year.
Cleaning and Storage Tips
Regular cleaning prevents buildup that can affect grip, accuracy, and safety.
- Wipe off tar, adhesives, and shingle debris after every job to prevent long-term buildup on the striking face or hatchet blade.
- Use a wire brush to clean stubborn material from the head without damaging the metal.
- Dry the hammer thoroughly after exposure to rain or moisture to avoid rust—especially important for hammers with magnetic features or steel heads.
- Store it in a dry toolbox or hang it on a wall mount, away from humidity or extreme temperatures.
Proper cleaning and storage alone can extend the life of your hammer by several years.
Checking for Damage and Wear
Roofing is demanding, and your hammer absorbs thousands of impacts over time. Inspect it regularly to ensure safe, consistent performance.
- Examine the handle for cracks, chips, or looseness. Even small fractures can lead to slips or breakage.
- Check the striking face for dents or burrs, which can damage shingles or lead to inaccurate nail strikes.
- Inspect the hatchet blade or claw edge for dulling or deformation if your hammer includes cutting features.
- Confirm that all magnetic or gauge components remain secure and functional.
Routine inspections help prevent accidents and maintain the tool’s precision.
Replacing Handles or Heads When Needed
Even the best hammers eventually experience wear. Knowing when to replace components ensures continued performance and safety.
- Wood or fiberglass handles may need replacement if they loosen, crack, or lose structural integrity.
- Hammer heads that are excessively worn, rusted, or damaged should be replaced rather than repaired to avoid unsafe operation.
- Re-tighten or replace hardware if your hammer uses bolts or fasteners to connect the head and handle.
A small maintenance effort can extend the life of your hammer for many years—making it one of the most cost-effective tools in a roofer’s kit.
Recommended Shingling Hammers
Choosing the right shingling hammer can make a significant difference in efficiency, safety, and precision on the roof. Based on durability, user comfort, and specialized features, here are the top recommended hammers for professional and DIY roofers.
1. Crescent Shingler Hammer – Best for Professional Precision
- Key Features: Built-in adjustable shingle gauge, retractable utility blade, solid steel head, and shock-absorbing grip.
- Why It Stands Out: Ideal for roofers who need accuracy in every cut and nail placement, the ergonomic design reduces fatigue during long workdays, while the adjustable gauge ensures consistent shingle exposure.
- Best For: Professional asphalt and laminate shingle installation, custom roofing projects, and long-term heavy-duty use.
2. Estwing Shingler’s Hammer – Best for Durability and Comfort
- Key Features: Forged steel construction, non-slip shock-reducing handle, built-in nail puller, and versatile cutting edge.
- Why It Stands Out: Estwing hammers are known for longevity and reliability. The vibration-dampening handle protects hands and wrists, making it easier to work for extended periods without fatigue.
- Best For: Roofers seeking a durable, all-in-one hammer that balances cutting, nailing, and precision in one tool.
3. Budget-Friendly Options
- Husky Shingling Hammer: Affordable, lightweight, and functional for basic roofing tasks. Features a standard nail-driving face and claw for shingle removal.
- Great for: DIY homeowners and small roofing projects where professional-level features aren’t required but reliability is still important.
4. Specialty Hammers for Unique Roofing Needs
- Slate Hammer: Designed specifically for slate shingles with a sharp pick and beveled head for precision cutting.
- Magnetic Roofing Hammer: Includes strong magnets to hold nails, reducing drops and improving efficiency on steep or high roofs.
- Best For: Specialized roofing materials or challenging installation environments where standard hammers are less effective.
Pro Tip: Always match your shingling hammer to your roofing type, project scale, and personal comfort. Investing in the right hammer saves time, improves accuracy, and reduces fatigue over years of roofing work.