
Can You Paint Roof Shingles? Everything You Need to Know
Your roof is one of the most visible parts of your home, and its appearance can make or break your home’s overall curb appeal. If you’ve recently updated your home’s exterior or simply want a fresh look without the expense of a full roof replacement, painting your roof shingles can be a smart and budget-friendly solution.
But can you really paint roof shingles? The short answer is yes — most asphalt shingles can be painted if they are in good condition. Painting your shingles not only refreshes your roof’s appearance but can also provide some added protection against sun and weather damage when done correctly.
Before grabbing a paintbrush, however, it’s important to understand the process, what materials work best, and the key factors that affect whether painting your roof is a good idea for your home. From safety tips to a step-by-step painting guide, this article will give you everything you need to know to transform your roof safely and effectively — whether you’re tackling it as a DIY project or hiring professionals.
Understanding Roof Shingles and Painting
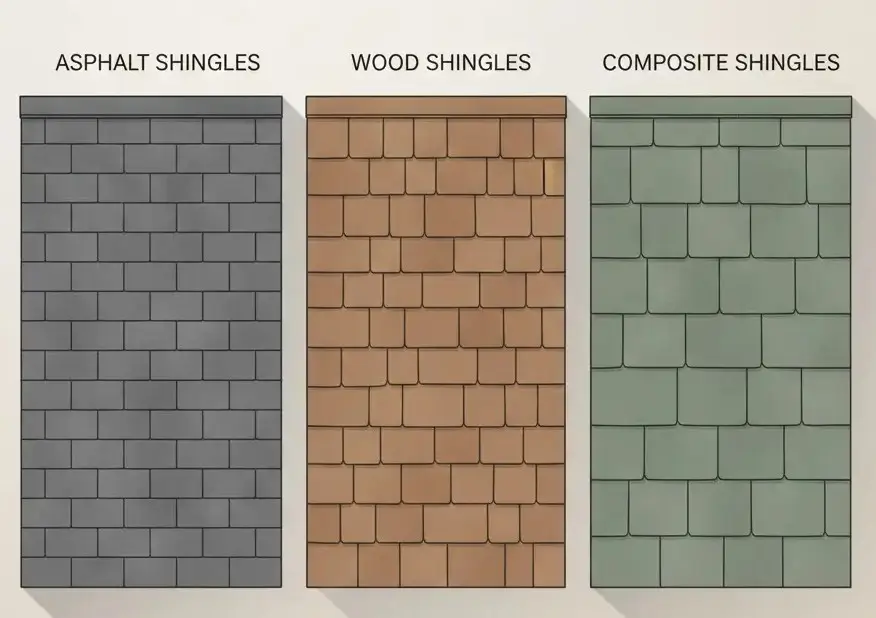
Types of Roof Shingles (Asphalt, Wood, Composite, etc.)
When it comes to roofing materials, shingles come in several varieties, each with its own characteristics and suitability for painting. The most common types include:
- Asphalt Shingles: The most widely used roofing material in residential homes. Asphalt shingles are generally the easiest to paint, provided they are in good condition. They also respond well to primers and roof paints specifically formulated for asphalt.
- Wood Shingles: Cedar or redwood shingles can be painted or stained, but they require careful preparation, sealing, and maintenance to prevent moisture damage or warping. Painting wood shingles is more labor-intensive and may require more frequent touch-ups.
- Composite or Synthetic Shingles: Made from rubber, plastic, or a blend of materials, composite shingles may accept paint if manufacturers’ instructions are followed. Using the right primer is critical for proper adhesion and durability.
- Other Materials (Slate, Metal, Concrete): These materials are generally not recommended for DIY painting. They require specialized paints, primers, and professional expertise to avoid damage or peeling over time.
Can All Shingle Types Be Painted?
Not every shingle is suitable for painting. Asphalt shingles are the safest and most practical option, especially for homeowners looking for a budget-friendly makeover. However, before you start painting, it’s essential to evaluate your roof’s condition:
- Inspect for cracked, curling, or blistered shingles
- Check for leaks or water damage.
- Ensure the roof is structurally sound and free from mold or algae.
If your shingles are damaged or near the end of their lifespan, painting is not recommended. Painting over compromised shingles can lead to peeling, uneven coverage, and further roof deterioration. In such cases, a professional inspection is crucial, and a roof replacement may be the smarter long-term solution.
How Painting Affects Your Roof’s Lifespan
When done correctly, painting asphalt shingles can enhance the roof’s appearance and even provide minor protective benefits, such as:
- UV protection: Certain roof paints can reflect sunlight, reducing heat absorption and potentially extending shingle life.
- Water resistance: High-quality roof paints and primers can add a protective layer, though they do not replace proper waterproofing or repairs.
- Energy efficiency: Lighter-colored paints can reflect sunlight, helping to keep your home cooler in hot climates.
However, painting does not restore structurally damaged shingles or replace normal maintenance. A well-prepared and properly painted roof can last several years before needing touch-ups, but painting should complement, not replace, roof care.
Pros and Cons of Painting Roof Shingles
Benefits of Painting Your Roof (Curb Appeal, UV Protection, Energy Efficiency)
Painting your roof shingles can offer several meaningful benefits, especially if your roof is still in good structural condition. Done correctly, it can enhance your home’s appearance while adding a layer of practical protection.
✔ Improved Curb Appeal
Painting is one of the quickest ways to refresh your home’s exterior without the cost of a full roof replacement. Whether you’re updating your color scheme after repainting your house or simply want a cleaner, more modern look, a fresh coat of roof paint can transform the appearance of your entire property.
✔ Added UV and Weather Protection
High-quality roof paints contain UV-resistant ingredients that help shield shingles from sun exposure, fading, and heat damage. This extra layer can slow down surface deterioration and help your shingles maintain their structure longer.
✔ Better Energy Efficiency
In warmer climates, switching to lighter-colored paint — especially white — can help reflect sunlight rather than absorb it. This makes your home cooler in the summer, reduces the strain on your HVAC system, and may even lower energy bills. Reflective roof coatings are a popular choice for homeowners who want a more energy-efficient upgrade without replacing their roof.
✔ A Cost-Effective Improvement
Painting shingles is usually far cheaper than installing new ones. If your roof is still in good condition but doesn’t look the way you want, painting offers a budget-friendly way to improve aesthetics and extend usefulness.
Risks and Drawbacks (Damage, Warranty Issues, Cost)
While painting your roof can be beneficial, it’s important to understand the potential downsides. Painting is not suitable for every home or every climate.
✘ May Void Roof Warranties
Many shingle manufacturers do not allow painting or coating their products. Painting your shingles may void the warranty, leaving you without coverage if issues arise later. Always check your warranty before starting.
✘ Risk of Trapping Moisture or Damaging Shingles
If your roof is older, damaged, or not properly cleaned before painting, the paint can trap moisture underneath the shingles. This can lead to blistering, peeling, mold growth, and premature deterioration. Painting over a roof that is already lifting, cracked, or leaking can make the problems worse.
✘ Requires Regular Maintenance
Painted shingles tend to fade, crack, or wear faster in extreme temperatures, high humidity, and harsh weather conditions. Unlike natural shingles that are designed to age gradually, painted roofs often require touch-ups or repainting every few years to maintain appearance and protection.
✘ Time-Consuming and Physically Demanding
Painting a roof is not a quick afternoon project — it involves cleaning, repairing, priming, painting, and waiting for proper drying times. It can take several days and requires climbing, moving equipment, and taking significant safety precautions.
✘ Not a Long-Term Fix for an Aging Roof
Painting can enhance appearance and provide minor protection, but it cannot repair structural damage or extend the life of severely worn shingles. For older roofs nearing the end of their lifespan, painting is only a temporary improvement — a full replacement will still be necessary.
Factors to Consider Before Painting
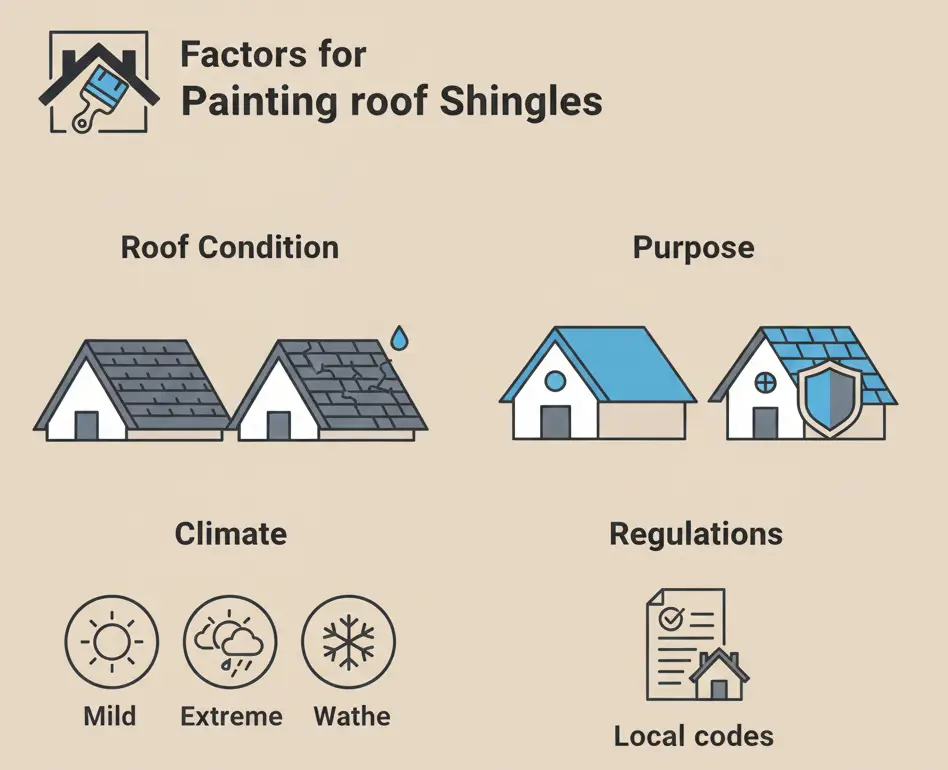
Before committing to painting your roof shingles, it’s essential to evaluate several important factors. Painting can be a great way to refresh your home, but only when the roof and environment are suitable for the project. The following considerations will help you determine whether painting is the right choice — or if repairs or replacement would be more effective.
Age and Condition of Your Roof
The current state of your roof is the number one factor in deciding whether painting is appropriate. Painting can refresh the appearance of a roof in good condition, but it cannot fix structural problems or mask serious damage.
You should not paint your roof if you notice:
- Cracked, curling, or blistered shingles
- Loose, missing, or lifting shingles
- Active leaks or water stains inside the home
- Soft spots, mold, or rot
Painting over damaged shingles can trap moisture, accelerate deterioration, and create more expensive problems down the line.
When painting is a good choice:
- The roof is relatively new or mid-life (typically under 10–15 years)
- Shingles are intact with no water damage.
- You want a cosmetic refresh or improved energy efficienc.y
Older roofs nearing the end of their lifespan should be replaced rather than painted, as paint will only offer a temporary improvement.
Climate and Weather Considerations
Your local climate plays a major role in how well painted shingles perform. Roof paint is highly sensitive to temperature, humidity, and sun exposure.
Painting tends to work best in:
- Mild or stable climates
- Areas with low humidity
- Homes without extreme seasonal temperature swings
Painting may not last as long in:
- Very hot regions (paint can expand, crack, or fade)
- Very cold climates (freeze-thaw cycles can cause peeling)
- Rainy or humid environments (longer drying times, higher risk of mold)
- Areas with heavy snowfall (snow can wear down painted surfaces faster)
Homeowners in extreme climates should weigh the long-term maintenance costs before choosing paint over replacement.
Why You’re Painting (Aesthetic vs Protection)
Understanding your goal helps you decide if painting is the right solution.
Painting for appearance:
If you’re simply updating the color to match a remodel or improve curb appeal, painting can be an affordable, quick fix — as long as the roof is still in good shape.
Painting for protection:
Some homeowners paint shingles hoping to extend their lifespan or add UV resistance. While roof paints can offer light protection, they cannot restore failing shingles or stop underlying problems.
If your intention is to “buy a few more years” before replacement, painting may work — but it should be viewed as a short-term solution, not a long-term fix.
Local Building Codes or HOA Regulations
Before you start painting, check whether your local authorities or HOA allow painted roofs. Some communities enforce strict guidelines about roofing materials and colors to maintain a consistent neighborhood appearance.
Things to review:
- HOA-approved color palettes
- Rules against altering shingle appearance
- Local building codes require specific materials or finishes
- Restrictions on reflective or high-gloss roof coatings
Failing to get approval can lead to fines or being forced to remove the paint — an expensive mistake.
Materials, Tools, and Paint Types You’ll Need
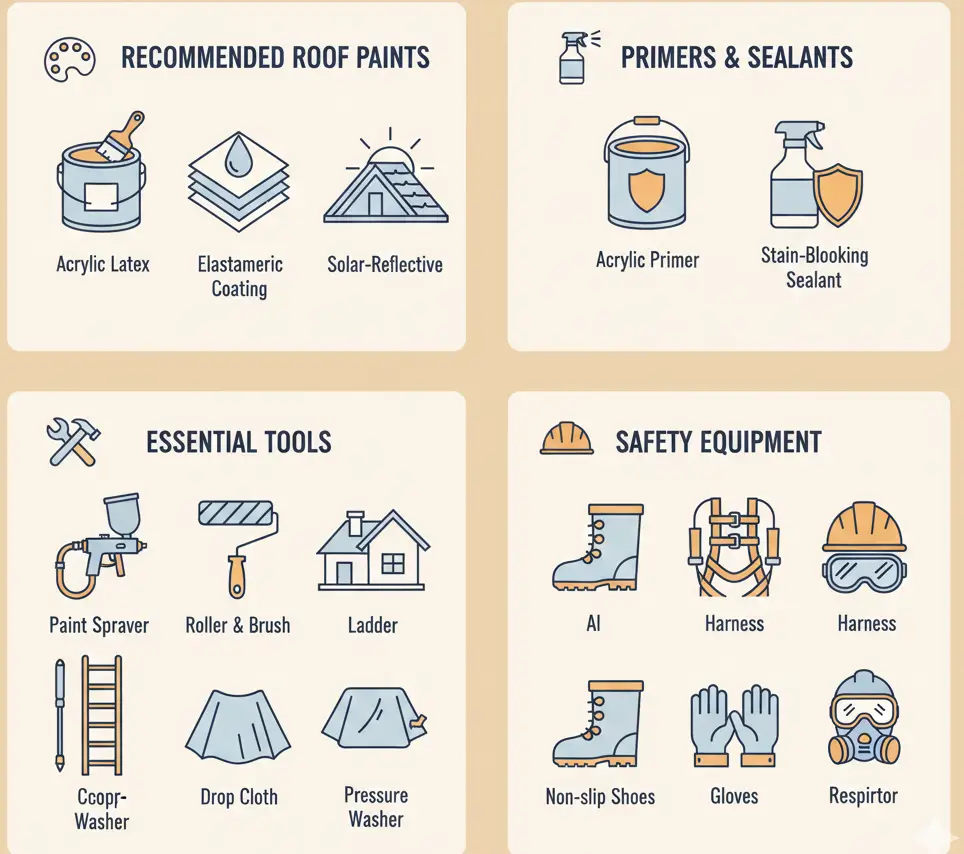
Painting roof shingles requires the right combination of materials and tools to ensure strong adhesion, long-lasting results, and proper safety. Using low-quality products can lead to peeling, moisture problems, and early repainting — so it’s important to gather everything you need before starting.
Recommended Roof Paints for Shingles
Choosing the correct paint is one of the most important parts of this project. Not all exterior paints are suitable for asphalt shingles, and using the wrong type can lead to cracking, blistering, or trapped moisture.
The best paints for roof shingles include:
- Acrylic latex roof paint: Designed for exterior use, excellent adhesion, flexible, and resistant to cracking in changing temperatures.
- Elastomeric roof coatings: Provide a thick, waterproof, reflective layer ideal for improving energy efficiency and resisting UV damage.
- Solar-reflective roof paint: Helps reduce heat absorption and lower indoor temperatures in warm climates.
When shopping, look for paints labeled “roof-safe,” “asphalt compatible,” or “mold/mildew resistant.” These formulas are specifically engineered to withstand outdoor weather, sun exposure, and moisture.
Primers and Sealants
A primer dramatically improves how well paint bonds to shingles and can help extend the life of both the paint and the shingles.
Recommended primers include:
- Acrylic exterior primer: Works well on clean asphalt shingles and helps seal porous surfaces.
- Stain-blocking primer: Useful if your roof has discoloration, light staining, or water marks.
- Primer + paint combos: A convenient option, but a separate primer usually delivers better long-term results.
Sealants or clear protective coatings can also be applied after painting to help guard against:
- Water absorption
- UV damage
- Algae growth
- Fading in harsh climates
For older roofs or roofs with minor wear, a good primer is essential to ensure even coverage and prevent peeling.
Essential Tools and Safety Equipment
Painting a roof is not like painting a wall — you’ll be working on an elevated, angled surface and dealing with weather exposure. Having the right equipment ensures both efficiency and safety.
Tools you’ll need:
- Paint sprayer (recommended): Provides fast, even coverage and uses less paint than rollers or brushes.
- Rollers or brushes: Useful for touch-ups or small areas the sprayer can’t reach.
- Extension ladder: Tall enough to reach the roof safely, with no gaps.
- Tarps or drop cloths: Protect gutters, siding, driveways, and landscaping from paint overspray.
- Roof-cleaning tools: Such as a broom, pressure washer (on low setting), or soft brush to remove debris before priming.
Safety equipment:
- Non-slip shoes: Crucial to prevent slipping on angled shingles.
- Safety harness or fall protection gear: Especially important for steep roofs.
- Goggles and a mask/respirator: Protects you from paint particles and fumes.
- Gloves and protective clothing: Keep skin safe from chemicals and overspray.
Skipping safety gear is never worth the risk — even confident DIYers should take full precautions when climbing and working at height.
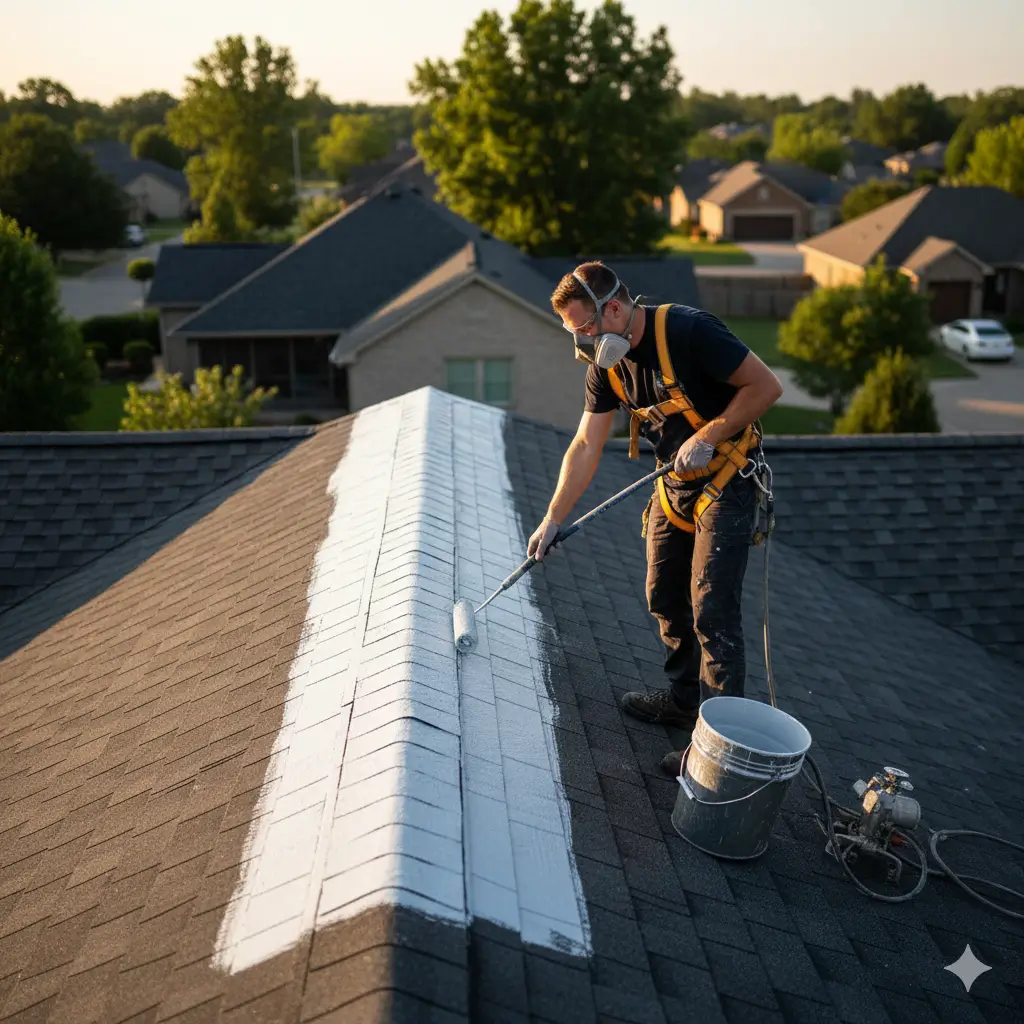
Step-by-Step Guide to Painting Roof Shingles
Painting roof shingles isn’t difficult, but it must be done carefully to avoid moisture problems, peeling, and premature wear. Following each step in the right order ensures your paint bonds properly and your roof looks great for years.
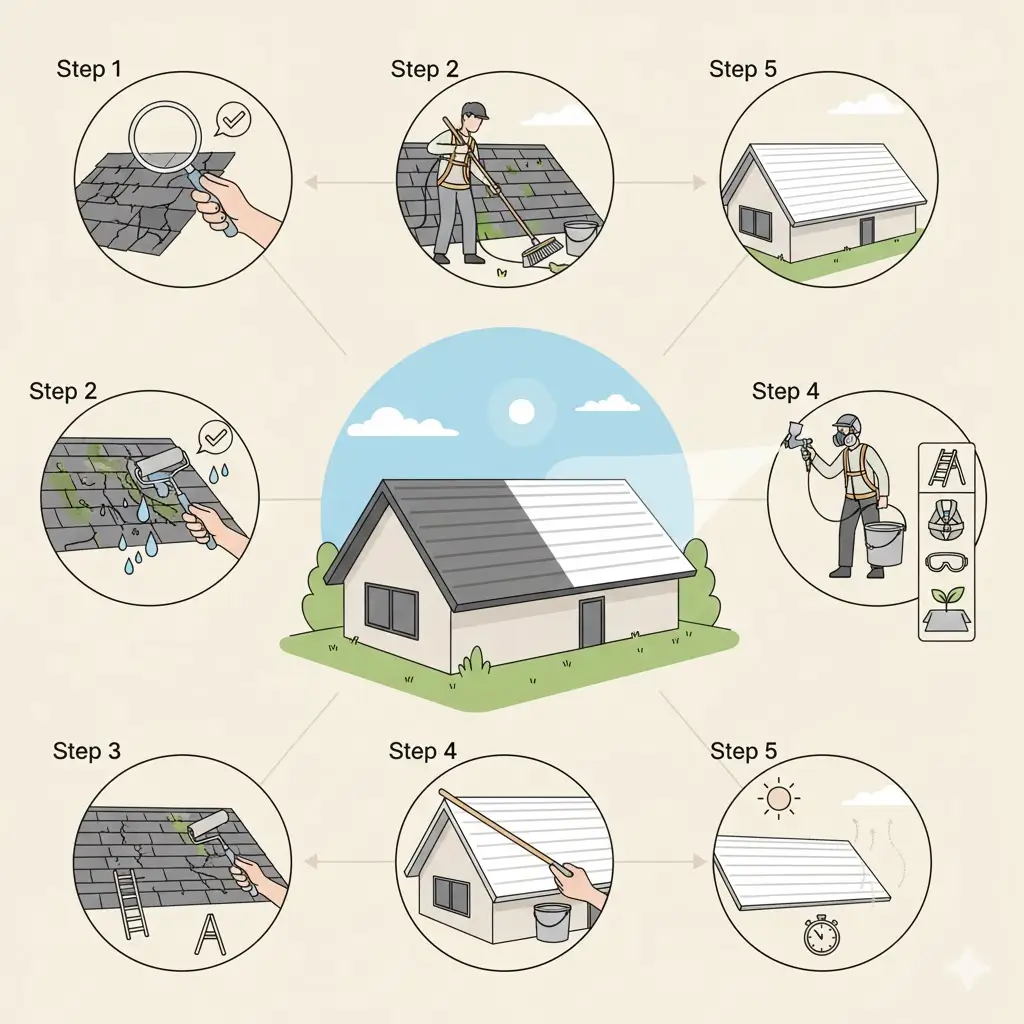
Step 1: Inspect Your Roof and Repair Damages
Before touching a paintbrush, have your roof inspected — either by a roofing professional or by conducting a careful DIY check. Painting over hidden issues will only trap moisture and make the damage worse.
During inspection, look for:
- Curling, cracked, or blistered shingles
- Missing or loose shingles
- Soft or sagging areas
- Leaks or water stains
- Moss, algae, or mold growth
- Structural damage or rotted plywood
If any damage is found:
Repair it before painting. Paint cannot fix structural issues.
For older roofs nearing the end of their lifespan, replacement is usually a better investment than painting.
Step 2: Clean the Roof Thoroughly
A clean surface is essential for proper paint adhesion. Dirt, moss, debris, and algae will prevent the paint from bonding and will lead to peeling.
How to clean your roof properly:
- Sweep or blow off loose debris with a broom or leaf blower
- Wash the shingles using a mild, non-corrosive roof cleaner.
- Scrub stubborn spots with a soft brush.
- Rinse with a garden hose (NOT high pressure unless done by a pro)
- Allow the roof to fully dry
To remove moss and algae:
Mix a 50/50 solution of bleach + water and apply to affected areas.
Protect nearby plants by watering them before and after cleaning so they don’t absorb bleach.
Let the roof dry completely — damp shingles can trap moisture and cause mold under the paint.
Step 3: Apply Primer for Better Adhesion
Once the shingles are clean and dry, the next step is priming. Primer creates a strong, uniform base that helps paint adhere and last longer.
Tips for priming your roof:
- Use an exterior-grade acrylic or bonding primer
- Choose a primer color that supports your final paint color (light primer for light colors)
- Apply using a paint sprayer for the smoothest fini.sh
- Lay down tarps or drop cloths to protect siding, windows, plants, and patios.
- Apply a thin, even coat to avoid clumps
Allow the primer to dry completely before painting. Dry times vary based on temperature and humidity.
Step 4: Paint Your Roof (Techniques & Tips)
After the primer is dry, you can begin painting your shingles. Sprayers are recommended for professional, even coverage.
Best painting methods:
- Use a high-quality acrylic latex or elastomeric roof paint
- Work in sections to stay organized and consistent.
- Apply thin, even layers — avoid heavy coats that pool between shingles
- Allow each coat to dry before adding the next
- Expect to apply 2 coats minimum, or 3+ for darker colors.
Painting tips:
- Never paint right before rain (paint needs at least 24 hours to cure)
- Avoid painting in high humidity or extreme heat.
- Use smooth, overlapping strokes with a sprayer.
- Keep safety first: non-slip boots, ladder stabilizers, and a harness on steep roofs
A roller or brush can work for touch-ups, but a sprayer provides faster and more uniform coverage.
Step 5: Allow Proper Drying and Curing
Drying and curing are not the same:
- Drying = paint is no longer wet to the touch
- Curing = paint has fully bonded and hardened
For roof paint, curing can take 24 hours to several days, depending on the brand and weather.
During curing:
- Avoid walking on the roof
- Keep gutters clear so water can flow away properly.
- Protect the surface from debris and moisture.
Good drying conditions ensure maximum durability and resistance to cracking or peeling.
Step 6: Routine Maintenance and Touch-Ups
Even the best roof paint will require periodic care. Proper maintenance extends the life of your painted shingles and helps your roof look fresh longer.
Inspect your roof at least once a year for:
- Peeling or fading paint
- Moss or algae growth
- Cracked or lifting shingles
- Water stains or potential leaks
If needed, apply touch-up paint in small problem areas. In high-sun or harsh-weather regions, you may need to apply a fresh coat every few years.
Professional inspections are recommended to catch issues early and ensure your roof continues performing properly.
Common Mistakes to Avoid When Painting Shingles
Painting a roof can dramatically improve curb appeal and energy efficiency — but only when done correctly. Many homeowners accidentally shorten the lifespan of their shingles by skipping essential steps or using the wrong materials. Avoiding the mistakes below ensures your paint bonds properly and protects your roof instead of harming it.
Painting Over Damaged or Old Shingles
One of the biggest mistakes is painting a roof that’s already nearing the end of its life. Paint cannot fix structural issues or stop leaks — it can only coat the surface.
Never paint shingles that show:
- Cracks, curls, or blistering
- Soft spots or sagging areas
- Missing, lifting, or broken shingles
- Signs of mold, algae, or moisture damage
- Water stains inside the home
Painting damaged shingles traps moisture, causing the roof to deteriorate even faster. If your roof is more than 15–20 years old or showing signs of wear, replacement is often the safer and more cost-effective choice.
The rule:
Only paint shingles that are clean, healthy, and structurally sound.
Using the Wrong Paint Type
Not all exterior paints are made for roofs. Many DIYers grab regular house paint, which leads to peeling, cracking, bubbling, and water absorption.
Wrong paints to avoid:
- Interior or general-purpose paints
- Oil-based paints (trap moisture under shingles)
- Low-quality exterior paints are not designed for asphalt.
- Paints lacking UV or weather protection
Correct paints to use:
- Acrylic latex roof paint (flexible, breathable, weather-resistant)
- Elastomeric coatings (great waterproofing and UV reflection)
- Solar-reflective roof paints (lower heat absorption)
Using the proper paint ensures durability, proper adhesion, and protection from moisture, UV rays, and extreme temperatures.
Ignoring Weather and Drying Times
Timing is everything when painting a roof. Weather conditions have a huge impact on how well the paint bonds with the shingles.
Mistakes to avoid include:
- Painting before rain (rain can wash off wet paint or cause streaking)
- Painting in direct, intense heat (paint dries too fast and cracks)
- Painting in cold temperatures (paint won’t cure properly)
- Painting in high humidity (slows drying and traps moisture)
- Not allowing enough time for each coat to fully dry
Most roof paints need 24 hours or more between coats and full drying conditions with no moisture.
Ideal painting weather:
- Mild temperatures (50°F–85°F / 10°C–29°C)
- Low humidity
- No rain forecast for 48 hours
- No strong winds
Proper drying and curing ensure a smooth finish that lasts for years.
Frequently Asked Questions
Yes. Roof shingles require specialized exterior paint designed to handle harsh weather, UV exposure, and the natural expansion and contraction of roofing materials.
Regular house paint will crack, peel, or trap moisture, leading to faster deterioration.
The best paint types for shingles include:
- Acrylic latex roof paint
- Elastomeric roof coatings
- Solar-reflective paints
These formulas are breathable, flexible, and resistant to mold, mildew, and UV damage — making them safe for asphalt and composite shingles.
Painting can extend the life of your roof if the shingles are already in good condition. A proper roof-coating job can:
- Add a protective barrier against UV rays
- Reduce heat absorption
- Help repel moisture
- Slow down wear from sun exposure.
However, paint does not repair structural damage or replace old, failing shingles. Think of painting as a short-term enhancement, not a long-term substitute for a full roof replacement.
Most painted roofs need refreshing every 2–5 years, depending on:
- Your climate
- Sun exposure
- Quality of paint used
- Roof slope and drainage
- Local weather conditions (snow, heavy rain, humidity, heat)
Homes in sunny or extreme climates may require touch-ups sooner.
Routine inspections once a year help you spot fading, peeling, or worn areas before they turn into larger problems.
No — painting a roof in bad condition is a major mistake.
If your shingles are cracked, curled, lifting, or leaking, paint will only hide the symptoms, not the cause. Worse, it can trap moisture, accelerating rot and water damage.
Replace or repair your roof first, then consider painting only if it’s structurally sound and moisture-free.
Paint overspray can damage plants, stain walkways, and clog gutters — so preparation is essential.
Protect your property by:
- Covering plants, shrubs, and flowerbeds with breathable tarps
- Using drop cloths along siding, patios, and driveways
- Installing temporary gutter guards or mesh screens
- Rinse plants before and after painting to prevent chemical absorption
- Keeping ladders and equipment clear of landscaping
A little prep work ensures your garden and gutters stay clean throughout the project.