
How to Remove Moss from the Roof: A Step-by-Step Guide for a Cleaner, Safer Roof
Table of Contents
If you’re noticing patches of green or fuzzy growth on your roof, it’s not just an aesthetic problem—it’s a sign that moss is slowly compromising your roof’s integrity. Moss holds moisture, which can lead to shingle deterioration, mold growth, and even leaks. Over time, this can cause significant damage, shortening the lifespan of your roof and leading to expensive repairs.
Moss typically thrives in cool, shady spots, where moisture doesn’t evaporate quickly. It attaches to your shingles with hairlike structures called rhizoids, which can lift and crack shingles as they grow. In winter, the moss can even expand and contract with the changing temperatures, worsening the damage. But removing moss from your roof doesn’t have to be a huge ordeal.
In this article, we’ll teach you how to safely and effectively remove moss, how to prevent it from coming back, and how to ensure your roof remains in top shape. We’ll cover simple tools, natural remedies, and expert tips to help you get the job done without damaging your roof or incurring excessive costs.
What is Moss and Why Does It Grow on Roofs?
What is Moss?
Moss is a type of small, non-vascular plant that belongs to the family Bryophyta. Unlike other plants, mosses don’t have true roots, stems, or leaves. Instead, they have tiny, hair-like structures called rhizoids that help them anchor to surfaces and absorb water. Mosses typically thrive in cool, moist environments where they can absorb water directly from the air or surfaces, making them ideal for shady, damp locations.
While moss may be seen as charming in some outdoor settings, such as on forest floors or in shaded gardens, it can become a serious problem when it grows on roofs.
Why Does Moss Grow on Roofs?
Moss growth on your roof is not just a cosmetic issue—it’s a sign of specific environmental conditions that favor its development. Several factors contribute to moss growth on roofs:
- Moisture
Moss thrives in damp conditions, and roofs with excess moisture are ideal breeding grounds for moss. The moisture may come from rain, humidity, or poor drainage, but it’s the consistent dampness that allows moss to grow and spread. Areas of the roof that don’t dry out quickly—such as those in the shade—are especially prone to moss buildup. - Shade
Moss prefers shaded environments, which is why you often see it growing on the north side of roofs, under trees, or around areas where sunlight is blocked for most of the day. Roofs with minimal sunlight exposure are the perfect habitat for moss to thrive and flourish. - Roof Type and Material
Different roofing materials may be more susceptible to moss growth. Wooden roofs or shingles provide an ideal surface for moss to attach itself, while slate, metal, and tile roofs are less likely to harbor moss. However, moss can still grow on these materials if the conditions are right, especially if the roof is poorly maintained. - Debris and Organic Matter
Moss often grows in areas where there is debris, such as leaves, twigs, and dirt. When these organic materials accumulate on your roof, they create a moist, nutrient-rich environment that encourages moss to grow. This debris can also trap moisture, further promoting moss development. - Poor Roof Drainage
Clogged gutters or poor drainage systems can contribute to excess water buildup on your roof, creating perfect conditions for moss to grow. Stagnant water pools around areas like valleys and eaves, giving moss the moisture it needs to spread. - Age of the Roof
Older roofs, especially those that are in poor condition, are more susceptible to moss growth. As the roof material ages, it can develop cracks, worn shingles, or loose tiles, which provide ideal spaces for moss to take root.
Signs of Moss Growth on Roofs
Moss on your roof doesn’t appear overnight. It grows gradually, and the earlier you spot it, the easier it will be to remove and prevent further damage. Identifying moss growth early is crucial to maintaining the integrity of your roof. Here are the key signs that moss may be taking root on your roof:
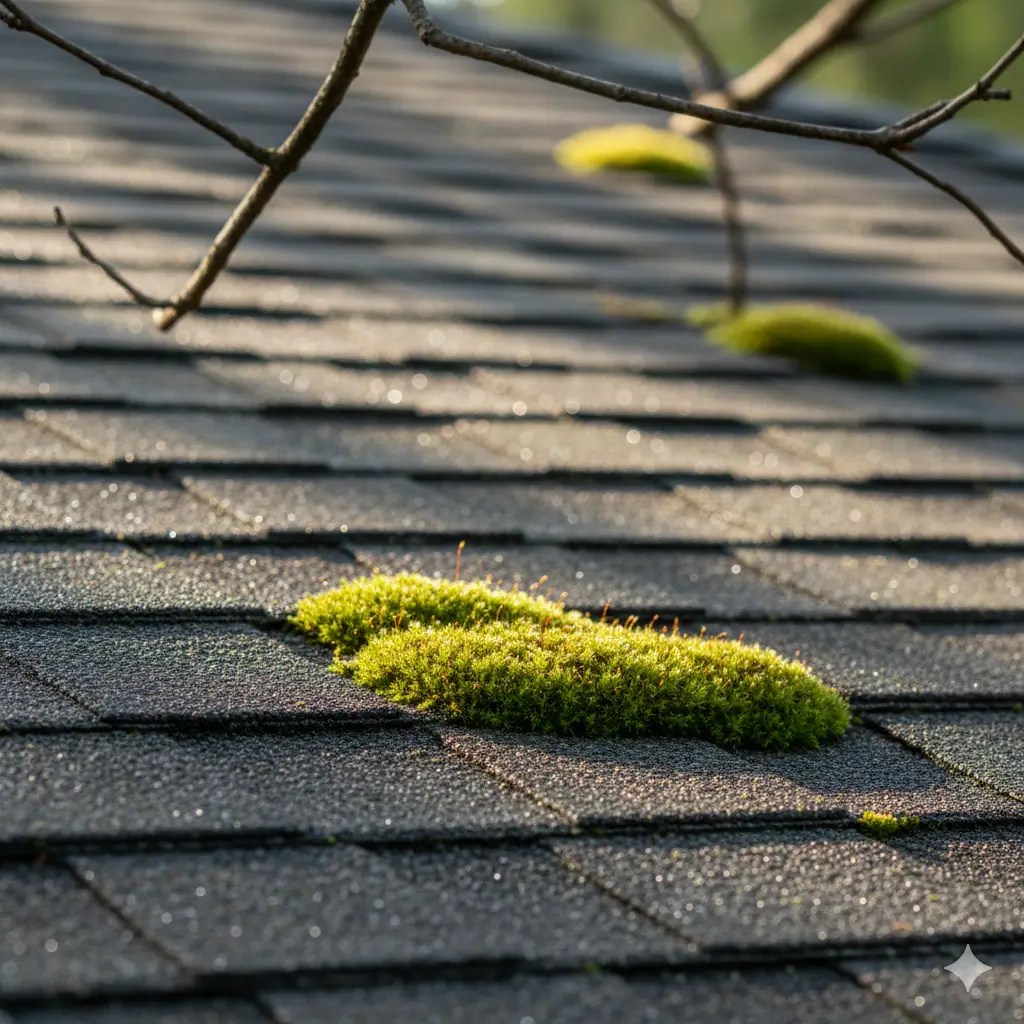
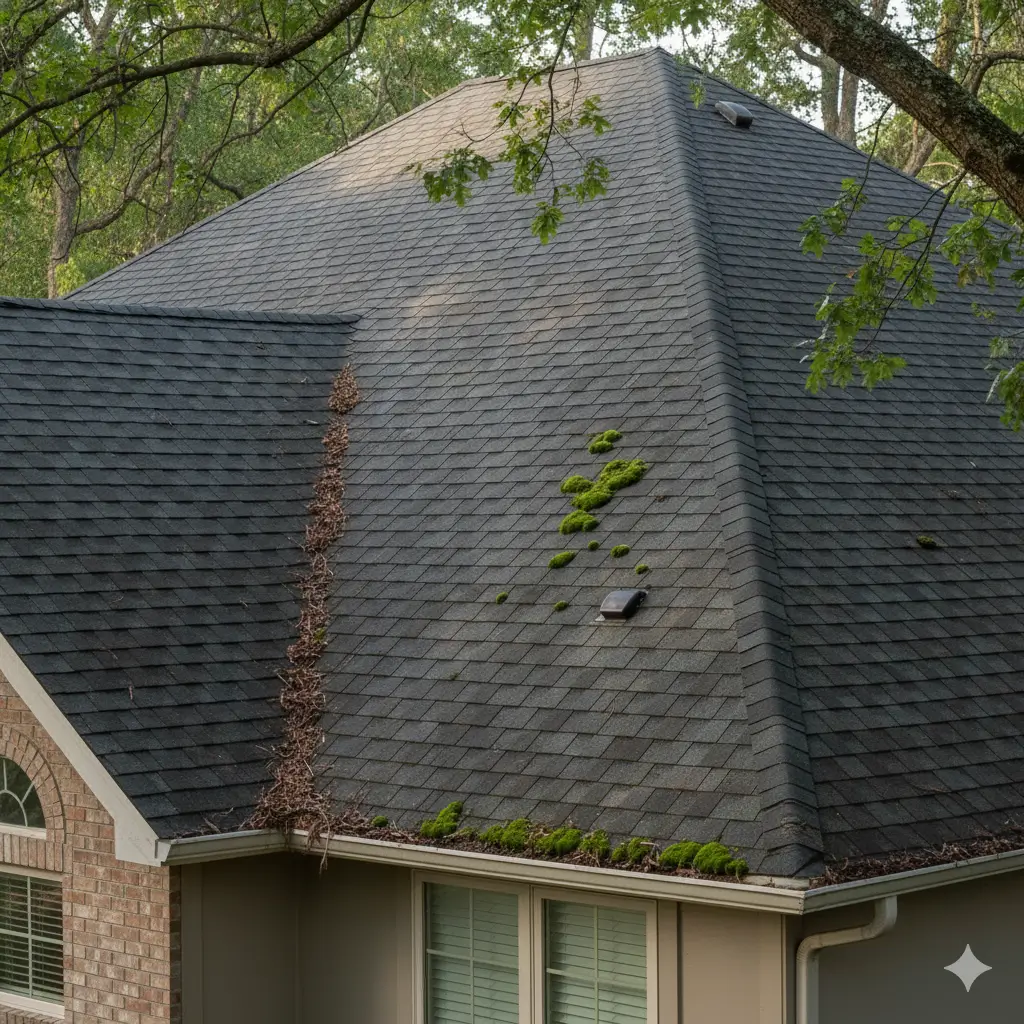
1. Visible Green Patches on the Roof
The most obvious sign of moss growth is the presence of green patches on the surface of your roof. Moss typically appears in clusters or patches and is often a vibrant green color. You might first notice it in areas that are shaded most of the day or where water tends to collect.
Where to Look:
- Shaded areas: Moss thrives in areas with limited sunlight.
- Roof valleys and corners: These spots trap moisture and organic material, creating ideal conditions for moss to grow.
2. Damp or Wet Roof Areas
Moss holds moisture, so if you notice that certain areas of your roof remain damp or wet longer than others, it could be an early indicator of moss growth. The moisture trapped by moss can prevent parts of the roof from drying out properly, leading to a moist, sponge-like surface.
Where to Look:
- North-facing slopes: These areas receive less sunlight and often remain damp for longer.
- Underneath debris: Leaves, branches, and other debris on your roof may trap moisture, promoting moss growth.
3. Discoloration of Roof Shingles
If you see dark spots or streaks on your roof, especially near areas where moss is beginning to grow, it’s a sign that the moss is taking hold. Over time, moss can stain your shingles and cause them to deteriorate. This discoloration could also be a sign of moisture buildup or water pooling, which are common issues where moss thrives.
Where to Look:
- Along the roof’s edges and ridges: These areas are more likely to accumulate moisture.
- Near roof valleys: These spots tend to collect rainwater and debris, which moss loves.
4. Gutter Clogs and Debris Buildup
Moss doesn’t only grow on the roof—it can also contribute to clogged gutters. As moss grows, it often sheds debris like dead moss fragments, leaves, and organic matter. This debris can accumulate in your gutters, leading to blockages that cause water to overflow. If you notice water pooling around your foundation or damaged gutters, it could be a sign that moss growth is occurring higher up on your roof.
Where to Look:
- Gutters and downspouts: Check for moss debris and buildup.
- Around your home’s foundation: Overflowing water from clogged gutters can lead to water damage around your home.
5. Lifting or Damaged Roof Shingles
Moss can lift shingles as it grows, which weakens the roofing material and can lead to leaks. If you notice shingles that appear loose or damaged, it might be due to moss growth beneath them. The lifting of shingles creates gaps where water can infiltrate and cause further damage to the roof deck.
Where to Look:
- Around moss patches: Gently inspect the areas where you notice moss for signs of lifting shingles.
- Underneath moss patches: Carefully check if the moss has worked its way under shingles or tiles.
6. The Presence of Other Organic Material
Moss often grows alongside other forms of organic material like leaves, twigs, or lichen. If you notice an accumulation of these materials on your roof, it’s an indicator that moss may be growing as well. These materials trap moisture, creating a perfect environment for moss to thrive. A combination of moss and other organic growth could be a clear warning sign.
Where to Look:
- Roof valleys and eaves: These areas collect debris and moisture.
- Around tree overhangs: Trees can deposit leaves and branches on your roof, which moss loves to use as a growing medium.
Why Early Detection Matters
Catching moss growth early is essential for preventing damage. If left unchecked, moss can:
- Shorten the lifespan of your roof by degrading shingles and other roofing materials.
- Promote water damage by trapping moisture against the roof, leading to leaks and rot.
- Increase repair costs as damage worsens over time.
If you notice any of these signs, it’s crucial to take action as soon as possible. The sooner you address the issue, the easier and cheaper it will be to remove the moss and restore your roof’s integrity.
Why It's Important to Remove Roof Moss

Moss might give your roof a natural, forest-like appearance, but its presence can signal much more serious underlying problems. While it may seem harmless at first, moss growth on your roof can accelerate damage, compromise structural integrity, and even affect your health. If left unchecked, moss can be one of the leading causes of roof leaks, rot, and pest infestations, all of which can be costly to fix and harmful to your home.
Why Removing Moss Is Crucial:
1. Moisture Retention and Roof Deterioration
Moss absorbs and retains moisture, creating a sponge-like effect that holds water against your shingles. This consistent exposure to moisture can cause roofing materials to deteriorate over time, leading to wood rot, mold growth, and even shingle deterioration. In colder months, the moisture trapped by the moss can freeze, causing cracks and damage to shingles as the water expands and contracts. This can lead to leaks and water damage inside your home, which may require expensive repairs.
2. Health Risks and Mold Growt
The moisture trapped by moss creates an ideal breeding ground for mold and fungi. As the moss grows, it creates a humid environment that can seep into your home, potentially leading to respiratory problems, especially for people with allergies or asthma. In addition, mold can spread quickly through the roof and attic, causing serious structural damage and posing health risks to your family.
3. Pest Infestation
Moss is a natural attractant for pests like insects, rodents, and even birds. These pests find the damp, shaded environment under the moss to be a perfect nesting area. Over time, this can lead to pest infestations that further weaken your roof structure and create safety hazards. A rodent infestation, for example, can chew through your insulation and wires, causing additional damage.
4. Reduced Roof Lifespan and Higher Maintenance Costs
As moss continues to grow on your roof, it can weaken your shingles, leading to faster wear and tear. The accumulation of moss can accelerate the degradation of roofing materials, resulting in more frequent repairs and, eventually, early roof replacement. By removing moss promptly, you can help extend the life of your roof and save on costly repairs or full replacements.
5. Aesthetic Appeal and Property Value
A roof covered in moss can give your home a neglected, weathered look. Not only does this detract from your home’s curb appeal, but it can also lower your property value. On the other hand, a clean, moss-free roof enhances the visual appeal of your home, signaling to potential buyers that the house is well-maintained. For homeowners looking to sell, a well-maintained roof can make all the difference in achieving a higher sale price.
Tools and Materials Needed for Moss Removal
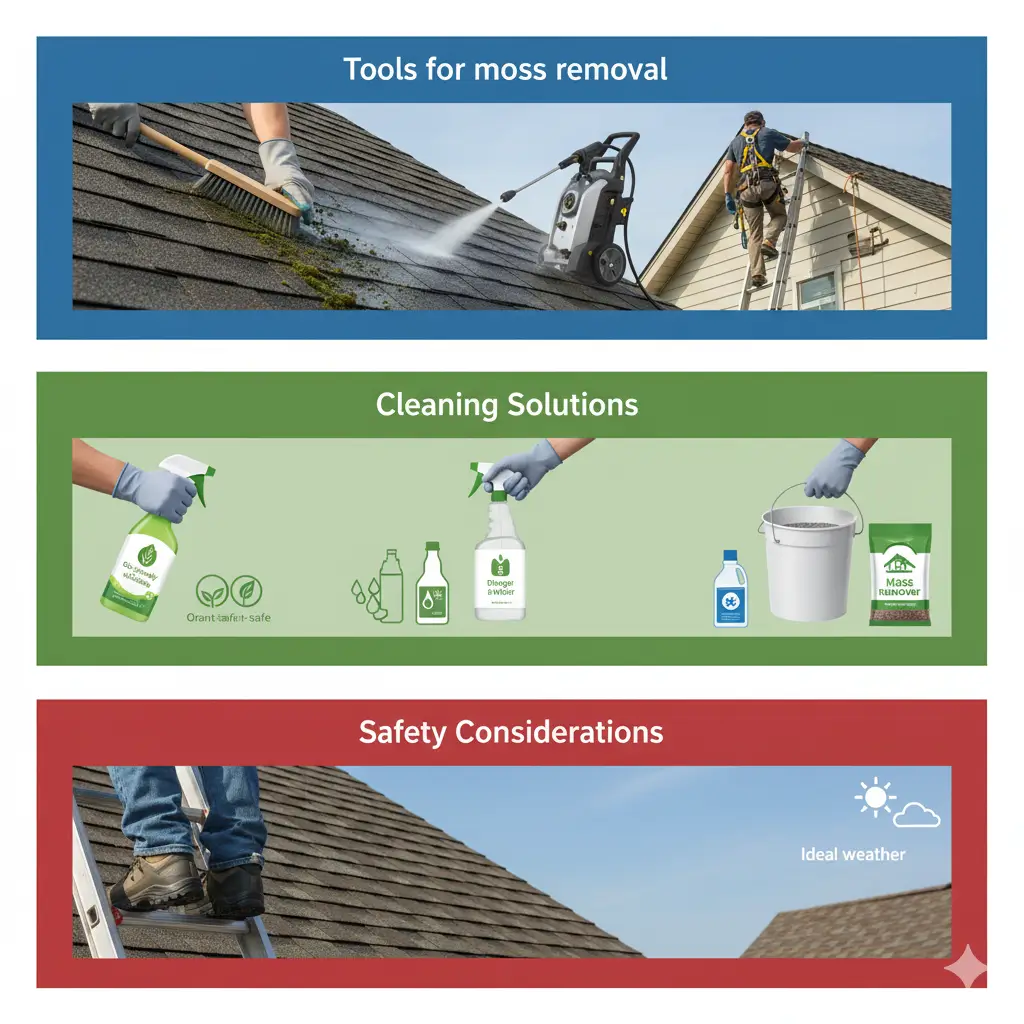
Before you start removing moss from your roof, it’s important to have the right tools and materials. Whether you’re tackling the job yourself or hiring a professional, having the correct equipment ensures the process is safe, efficient, and effective. Here’s a breakdown of what you’ll need for moss removal:
Basic Tools
Proper tools are essential to remove moss without damaging your roof. Here’s what you should gather before you begin:
- Soft-Bristle Brush
A soft-bristle brush is the most important tool when manually removing moss from your roof. It allows you to gently scrub away the moss without damaging your shingles. Avoid using hard-bristle brushes or metal scrapers, as these can scratch and damage the roof surface. - Pressure Washer (Optional)
A pressure washer can be a helpful tool for moss removal, especially for roofs with significant moss buildup. However, it’s important to use a low-pressure setting to avoid damaging shingles. High-pressure water streams can loosen the granules on asphalt shingles and lead to further damage. - Ladder
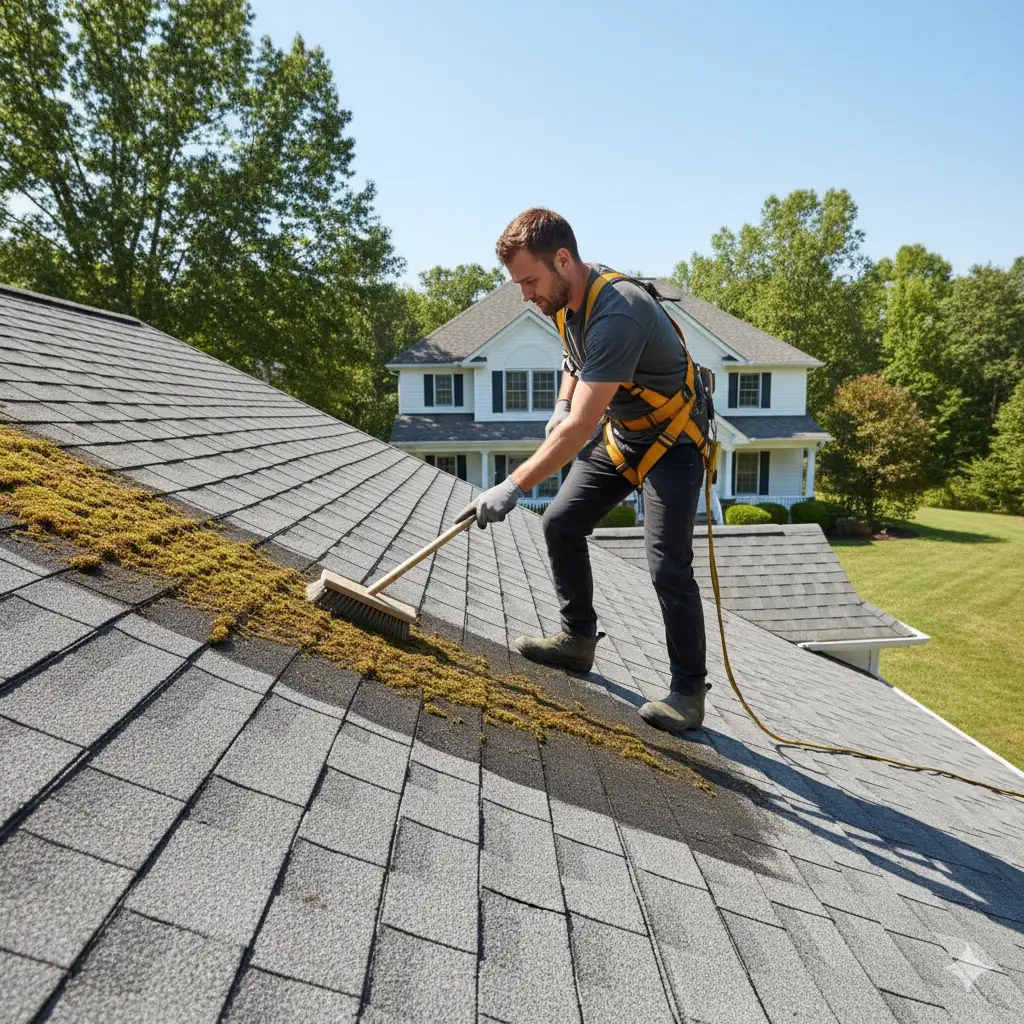
You’ll need a sturdy ladder to access the roof. The ladder must be tall enough to reach your roof safely. Never overreach when on the ladder—always maintain three points of contact for stability. - Gloves
Wear protective gloves to protect your hands from any sharp edges or debris on the roof. Additionally, gloves will shield your skin from any chemicals or cleaning solutions you may use during moss removal. - Safety Gear
Safety should be your top priority when working on a roof. Consider using fall protection gear, including a harness and rope, especially if your roof is steep. A non-slip roof ladder stabilizer can also be used to provide additional safety by ensuring the ladder stays securely in place.
Cleaning Products and Solutions
While a brush and pressure washer can help remove the moss, cleaning products or solutions will aid in killing the moss and preventing regrowth. Here are some options:
- Organic Moss Removal Solutions
For an eco-friendly and non-toxic option, consider using organic moss removal solutions that are safe for plants and animals. These products are designed specifically for moss removal and typically contain natural ingredients like citric acid, potassium salts, or fatty acids. - DIY Alternatives
If you prefer a DIY approach, you can make your own moss removal solution with common household ingredients:- Vinegar: Mix one part vinegar with one part water. The acidity of vinegar helps kill moss and prevent regrowth.
- Baking Soda: A mixture of baking soda and water can help dry out moss. Sprinkle it directly onto the moss and scrub it off after a few hours.
- Bleach Solution: For stubborn moss, a mild bleach solution (one part bleach to three parts water) can effectively kill moss. However, be cautious when using bleach, as it can damage plants and landscaping around the house.
- Vinegar: Mix one part vinegar with one part water. The acidity of vinegar helps kill moss and prevent regrowth.
- Store-Bought Moss Removers
There are many commercial moss removal products available at hardware or garden stores. Look for moss killers that are designed for use on roofs and are safe for shingles. Be sure to follow the instructions on the label to prevent damage to your roof or the surrounding environment.
Safety Precautions
Roof work can be dangerous, especially when using ladders, pressure washers, and chemicals. Always prioritize safety to avoid accidents and injuries. Here are some key safety precautions to keep in mind:
- Work at Height Safely
When working at height, always ensure the ladder is on solid, level ground. Never lean too far out or overreach from the ladder. Maintain three points of contact (two feet and one hand, or two hands and one foot) while on the ladder to keep your balance. - Wear Protective Gear
Roof work can expose you to various hazards, including sharp edges, falling debris, and harmful chemicals. Always wear appropriate safety gear, including:- Non-slip shoes with a good grip
- Protective gloves to shield your hands
- Eye protection if using a pressure washer or cleaning solutions
- Fall protection gear, such as a roof harness (if the roof is steep or high)
- Non-slip shoes with a good grip
- Check Weather Conditions
It’s best to perform moss removal on a dry day. Wet or slippery roofs can be hazardous. Avoid working in the rain or on windy days, as these conditions increase the risk of falls. - Use the Pressure Washer Correctly
If using a pressure washer, make sure to set it to a low-pressure setting to avoid damaging your shingles. Never point the nozzle directly at the roof from below, as this can force water under the shingles, causing further damage. Always spray downward in the same direction as the roof’s slope to avoid forcing water under the shingles. - Avoid Harmful Chemicals
If you’re using a chemical moss remover, follow the instructions carefully. Many chemical solutions can harm surrounding plants or stain gutters and siding. Cover landscaping and nearby plants with tarps to protect them from splashes. Always rinse the area thoroughly after application to minimize potential harm to the environment.
Step-by-Step Guide to Removing Moss from Your Roof
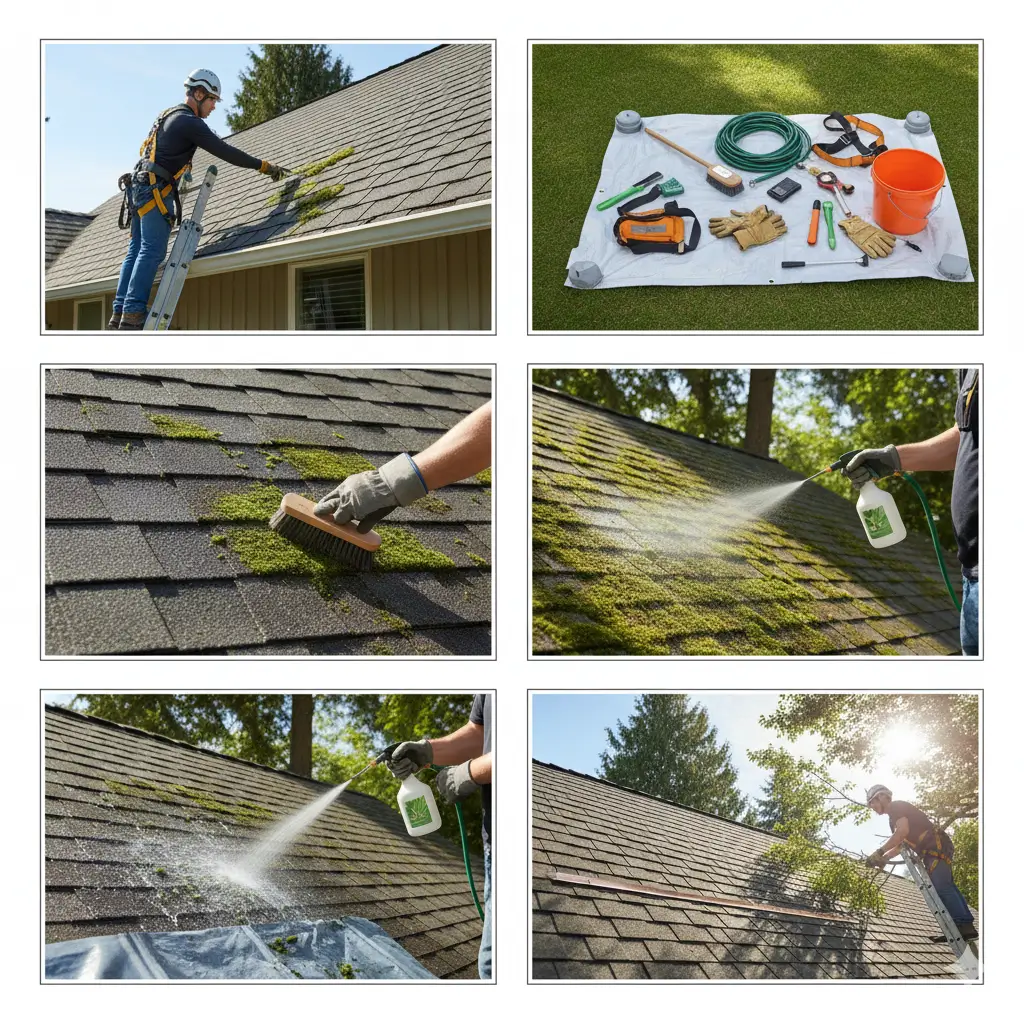
Moss on your roof can cause serious damage if left unchecked, but with the right tools and techniques, you can safely remove it and prevent future growth. Follow this step-by-step guide to get rid of roof moss and keep your roof looking clean and healthy.
Step 1: Inspect the Roof
Before you start removing moss, it’s essential to assess the extent of the growth. Here’s how to begin:
- Check for Damage: Examine the roof to see if moss has caused any visible damage, such as lifting shingles or cracks in the roofing material. If you notice significant damage, it may be best to consult a roofing professional.
- Assess Safety: Ensure that the roof is not too steep or high for you to safely access. If you’re uncomfortable with heights or unsure about the safety of your roof, it’s a good idea to hire a professional.
- Identify Moss Locations: Take note of where the moss is most concentrated—areas with poor sunlight and heavy moisture (such as the north side of the roof) are more likely to have moss growth.
Step 2: Gather Tools and Materials
Ensure you have all the necessary tools and materials for the job. Here’s a checklist to help you get prepared:
- Soft-bristle brush or broom for gentle scrubbing
- Pressure washer (optional) for stubborn moss (low-pressure setting recommended)
- A ladder to safely access the roof
- Gloves to protect your hands
- Safety gear (fall protection, harness, non-slip shoes)
- Moss removal solution (vinegar and water solution, or commercial moss remover)
- Garden hose or low-pressure washer for rinsing
- Tarp or plastic sheeting to protect landscaping from cleaning products.
Having everything ready before you begin will make the process smoother and more efficient.
Step 3: Remove Moss Manually
Now that you have all your tools in place, it’s time to begin the actual removal process:
- Start at the Bottom: Begin at the bottom of the roof and work your way up. This prevents any moss or debris from falling into areas that you’ve already cleaned.
- Use a Soft Brush: Gently scrub the moss off with a soft-bristle brush or broom. Avoid using harsh scrubbers or metal tools, as these can damage the roof shingles. Be careful not to scrape or gouge the surface of the shingles.
- Work in Sections: If there’s a large amount of moss, work in small sections to ensure that the roof is evenly cleaned.
- Don’t Force It: If moss is stuck or hard to remove, don’t use excessive force. Let the moss removal solution work its magic before scrubbing.
Step 4: Apply a Moss Removal Solution
Using a moss removal solution will help eliminate the moss and prevent regrowth. Here are a few options:
- Vinegar and Water Solution
Mix equal parts of vinegar and water in a spray bottle or garden sprayer. Vinegar’s acidity helps to kill the moss. Apply the solution generously to the affected areas and let it sit for about 15–20 minutes. - Commercial Moss Removers
If you prefer a ready-made solution, there are many commercial moss removers available. Look for ones that are designed for roofs and are safe for shingles. Follow the instructions on the product carefully. - Other DIY Alternatives
- Baking Soda: Mix 2 cups of baking soda with 2 gallons of water and apply it to the mossy areas. Baking soda is effective at drying out moss.
- Baking Soda: Mix 2 cups of baking soda with 2 gallons of water and apply it to the mossy areas. Baking soda is effective at drying out moss.
- Bleach Solution: If the moss is stubborn, mix 1 part bleach to 3 parts water. Be cautious with bleach, as it can harm plants or discolor surrounding surfaces.
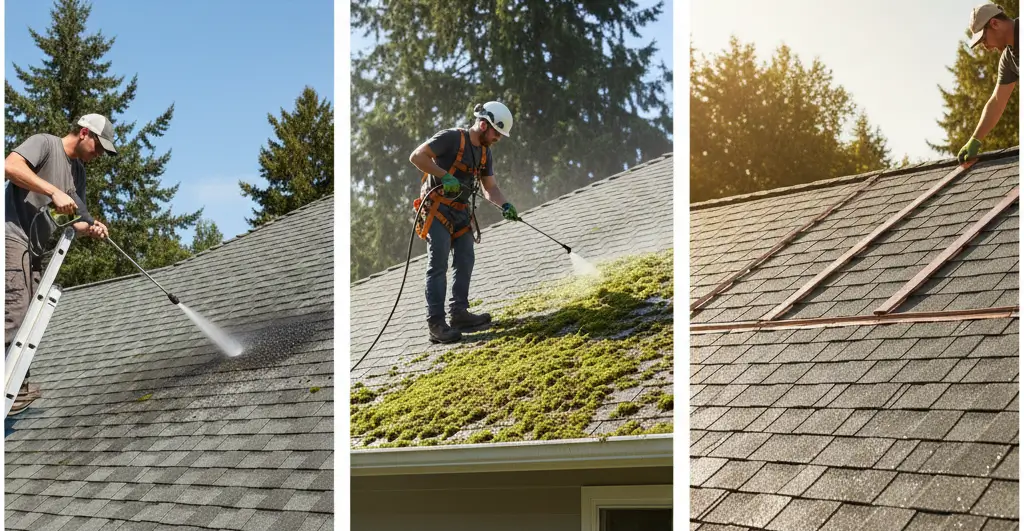
Step 5: Rinse the Roof
Once the moss removal solution has had time to work, it’s important to rinse off the moss and solution:
- Use a Garden Hose: Gently rinse the roof with a garden hose to remove moss and cleaning solution. Avoid using high-pressure settings, as this can force water under the shingles and cause further damage.
- Low-Pressure Washer: If you’re using a pressure washer, ensure the setting is low to avoid damaging the shingles. Always spray downward in the direction of the roof’s slope.
- Watch for Debris: As you rinse, you may notice debris (like moss, dirt, or leaves) coming off the roof. Use a broom to clear this away as it accumulates.
Step 6: Prevent Future Moss Growth
After removing the moss, take steps to prevent it from returning:
- Trim Tree Branches
Moss thrives in shaded, damp areas. By trimming overhanging tree branches, you can allow more sunlight to reach your roof, making it less hospitable to moss. - Improve Roof Ventilation
Good ventilation can help reduce moisture buildup on your roof. Ensure that your roof’s ventilation system is functioning properly by checking attic vents and ridge vents. - Install Zinc or Copper Strips
Installing zinc or copper strips along the roofline can help prevent moss growth. As rainwater runs over these metals, it releases small amounts of zinc or copper that inhibit moss growth. These strips can last for years. - Apply Moss-Preventative Treatment
After cleaning, consider applying a moss-preventative solution to your roof. These treatments are designed to prevent new moss from forming and can last for several months.
Alternative Moss Removal Methods
While manually removing moss and using moss removal solutions are effective ways to address moss on your roof, there are alternative methods that can also help you get the job done. These methods vary in terms of effectiveness, cost, and risk, so it’s important to weigh the pros and cons before deciding which approach is best for you.
Pressure Washing (With Caution)
Pressure washing can be an effective way to remove moss from your roof, especially for more stubborn growth. However, it’s important to approach this method with caution.
- Pros:
- Quick and Efficient: Pressure washers can cover large areas quickly, making moss removal faster than manual scrubbing.
- Effective for Stubborn Moss: High-pressure water can dislodge stubborn or thick layers of moss, saving time and effort compared to scrubbing alone.
- Quick and Efficient: Pressure washers can cover large areas quickly, making moss removal faster than manual scrubbing.
- Cons:
- Risk of Roof Damage: Using a pressure washer at too high a setting can damage shingles, lifting them or even causing cracks. The pressure can also force water underneath the shingles, leading to potential leaks or water damage inside the roof structure.
- Risk of Removing Granules: Roof shingles, particularly asphalt shingles, often have protective granules that can be stripped away by the force of the pressure washer, reducing the shingles’ lifespan.
- Safety Concerns: High-pressure washers require careful handling, especially when working at height. The strong force of the water can be dangerous if not properly managed.
- Risk of Roof Damage: Using a pressure washer at too high a setting can damage shingles, lifting them or even causing cracks. The pressure can also force water underneath the shingles, leading to potential leaks or water damage inside the roof structure.
- Best Practices:
- Always use a low-pressure setting (under 1500 PSI) when using a pressure washer on your roof.
- Use a wide-angle nozzle to disperse the water more evenly and reduce the risk of damaging the shingles.
- Keep the spray angled downwards, following the slope of the roof to avoid forcing water under the shingles.
- Always use a low-pressure setting (under 1500 PSI) when using a pressure washer on your roof.
Hiring a Professional Roof Cleaner
If the moss on your roof is extensive or you’re not comfortable working at height, hiring a professional roof cleaner is a good option. Roof cleaning professionals have the right equipment, knowledge, and experience to safely remove moss and prevent damage.
- Why Hire a Professional?:
- Expertise: Professional roof cleaners understand the various roof materials (e.g., asphalt, slate, tile) and know how to clean them without causing damage.
- Safety: Roof cleaning is a hazardous job, especially if you have a steep roof. Professionals are equipped with the right tools, safety equipment, and fall protection to safely clean your roof.
- Thoroughness: Roof cleaners have access to more powerful equipment, like soft-wash systems, that are effective at removing moss without causing damage. They also have experience identifying underlying issues, such as damaged shingles or signs of rot, that you might miss.
- Expertise: Professional roof cleaners understand the various roof materials (e.g., asphalt, slate, tile) and know how to clean them without causing damage.
- Benefits of Professional Cleaning:
- Longer Roof Lifespan: A professional cleaning can help maintain the integrity of your roof, ensuring that moss doesn’t cause further damage that could shorten the lifespan of your roof.
- Time-Saving: Professionals can complete the job much faster than you might be able to on your own, which is especially helpful for larger homes or roofs with significant moss growth.
- Longer Roof Lifespan: A professional cleaning can help maintain the integrity of your roof, ensuring that moss doesn’t cause further damage that could shorten the lifespan of your roof.
- When to Hire a Professional:
- When the moss is widespread or severe, manual removal isn’t sufficient.
- If your roof has structural damage or if you’re unsure about the condition of your roof.
- When you’re concerned about safety or lack the necessary equipment.
- When the moss is widespread or severe, manual removal isn’t sufficient.
Using Copper or Zinc Strips
Installing copper or zinc strips along the ridge of your roof can be an effective long-term solution for preventing moss growth. This method works by leveraging the natural properties of these metals to inhibit the growth of moss over time.
- How Copper or Zinc Strips Work:
- Copper and zinc are toxic to moss. As rainwater runs down the roof, it gradually washes off tiny amounts of metal, which prevents moss from growing. This can significantly reduce the likelihood of moss regrowth and is an effective long-term solution.
- Copper and zinc are toxic to moss. As rainwater runs down the roof, it gradually washes off tiny amounts of metal, which prevents moss from growing. This can significantly reduce the likelihood of moss regrowth and is an effective long-term solution.
- Pros:
- Long-Lasting: Copper and zinc strips are a long-term solution that can last for several years once installed. This reduces the need for frequent moss removal.
- Low Maintenance: After installation, copper or zinc strips require very little maintenance. You won’t need to worry about the moss regrowing as long as the strips remain intact.
- Non-Damaging: Unlike pressure washing, copper and zinc strips don’t cause any damage to your roof. They’re safe for all types of roofing materials.
- Long-Lasting: Copper and zinc strips are a long-term solution that can last for several years once installed. This reduces the need for frequent moss removal.
- Cons:
- Initial Cost: Copper and zinc strips can be more expensive upfront compared to other methods, especially if you hire a professional to install them.
- Installation: Installing the strips requires some basic roofing knowledge and tools. While it’s possible to install them yourself, it’s recommended to hire a professional if you’re not comfortable working on your roof.
- Initial Cost: Copper and zinc strips can be more expensive upfront compared to other methods, especially if you hire a professional to install them.
- Installation Tips:
- Place Strips Along the Ridge: Copper or zinc strips are usually installed along the roof’s ridge (the highest point) so that water flows down over the metal as it rains.
- Spacing: The strips should be spaced about 2–3 feet apart, depending on the size of your roof and the level of moss growth.
- Use a Roofing Contractor: If you’re unsure how to install the strips yourself, hiring a professional roofer can ensure the strips are properly placed and securely attached.
- Place Strips Along the Ridge: Copper or zinc strips are usually installed along the roof’s ridge (the highest point) so that water flows down over the metal as it rains.
How to Prevent Moss from Growing on Your Roof Again
Once you’ve removed moss from your roof, you’ll want to take steps to ensure it doesn’t come back. Moss thrives in damp, shaded environments, so by addressing these factors, you can significantly reduce the chances of moss regrowth. Here are effective strategies to keep your roof clean and moss-free.
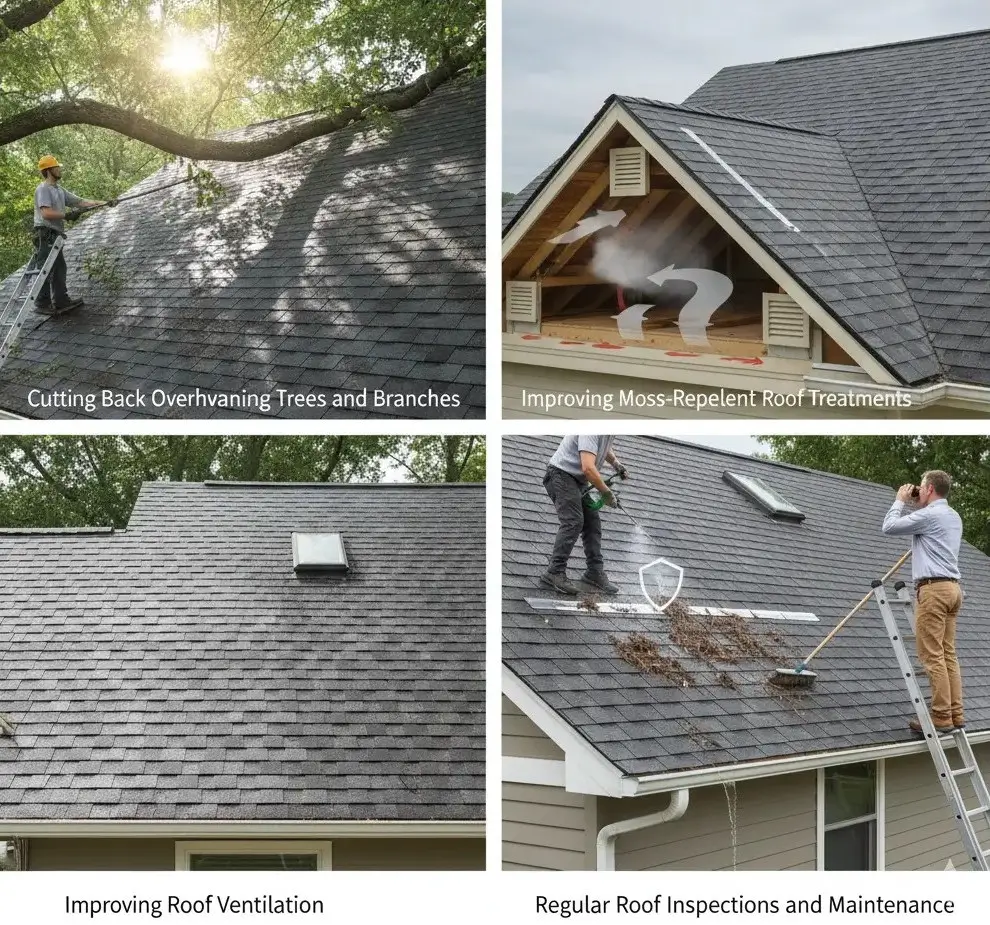
Cut Back Overhanging Trees and Branches
Moss loves shaded areas, and if your roof is constantly shaded by overhanging trees, it creates the perfect environment for moss growth. By trimming back tree branches, you can let more sunlight reach your roof, which will help to dry out the surface and inhibit moss from taking root.
- Why It Helps: Trees create a cool, shaded area on your roof, providing moss with the moisture it needs to thrive. Sunlight is one of the most effective natural moss deterrents, as it dries out damp areas, making it harder for moss to grow.
- How to Do It:
- Trim branches that hang directly over your roof, especially in areas where moss tends to grow. This allows more sunlight to hit the roof surface, drying it out.
- Remove any dead or decaying branches that may be contributing to excess moisture.
- Trim branches that hang directly over your roof, especially in areas where moss tends to grow. This allows more sunlight to hit the roof surface, drying it out.
- Additional Tip: Make sure trees are not too close to the roof in the first place. Overhanging branches can also damage your shingles or create debris buildup.
Improve Roof Ventilation
Proper roof ventilation is essential for maintaining a dry, healthy roof. If your attic is poorly ventilated, moisture can build up and create the perfect conditions for moss, mold, and mildew. By improving ventilation, you reduce the risk of moisture accumulation, making your roof less inviting to moss.
- Why It Helps: Adequate airflow in your attic ensures that moisture doesn’t become trapped. Without proper ventilation, excess moisture can seep into the roof structure, contributing to moss growth and other problems like rot.
- How to Improve Ventilation:
- Install or upgrade soffit vents to ensure airflow beneath the eaves.
- Consider installing a ridge vent at the peak of the roof to allow hot, moist air to escape.
- Regularly inspect your attic for signs of moisture buildup or poor airflow. If needed, consult a professional roofer to assess your roof’s ventilation system.
- Install or upgrade soffit vents to ensure airflow beneath the eaves.
- Additional Tip: Maintaining a dry roof is key to preventing moss, so ensure that gutters and downspouts are clear to allow proper drainage.
Use Moss-Repellent Roof Treatments
Another proactive measure to prevent moss from regrowing is the use of moss-repellent treatments. There are several moss-repellent products available that can be applied to your roof to create a barrier against moss growth. These treatments work by either killing existing moss or by providing a surface that moss cannot easily adhere to.
- Why It Helps: Many moss-repellent treatments contain active ingredients such as zinc, copper, or other chemicals that inhibit moss growth. These treatments are designed to work over time, providing long-lasting protection for your roof.
- How to Apply:
- Choose a moss-repellent solution: Some options are commercial products available at hardware stores, while others are DIY solutions like a diluted vinegar-water mixture.
- Apply according to instructions: Be sure to follow the manufacturer’s instructions for application. Moss-repellent solutions are usually sprayed on the roof in the same way you would apply a cleaning solution.
- Reapply as needed: Some treatments may need to be reapplied every 1–2 years, depending on environmental conditions.
- Choose a moss-repellent solution: Some options are commercial products available at hardware stores, while others are DIY solutions like a diluted vinegar-water mixture.
- Popular Products: Look for products that contain zinc strips, copper sulfate, or potassium salts for effective moss control. These are often marketed specifically as roof moss preventatives.
Regular Roof Inspections and Maintenance
The key to preventing moss from taking root again is regular maintenance. Regularly inspecting your roof and cleaning off debris can help you spot early signs of moss growth before it becomes a serious problem. Keeping your roof clear of organic material like leaves and pine needles is essential for reducing the conditions that moss thrives in.
- Why It Helps: Moss often begins as small patches that can easily be overlooked. Regular inspections ensure that you catch these early signs before they become widespread, preventing the need for more intensive treatments later.
- How to Do It:
- Inspect your roof at least twice a year, particularly after heavy storms or in the spring and fall when leaves are most likely to accumulate.
- Remove leaves, branches, and other debris from the roof’s surface and from gutters to ensure proper drainage. Debris can trap moisture and create a perfect breeding ground for moss.
- Clean gutters regularly to avoid water buildup. Standing water in gutters can contribute to moss growth on your roof and other structural issues.
- Inspect your roof at least twice a year, particularly after heavy storms or in the spring and fall when leaves are most likely to accumulate.
- Additional Tip: If you notice moss or algae starting to form, act quickly by cleaning the affected area and applying a moss treatment to prevent it from spreading.
Common Mistakes to Avoid When Removing Roof Moss
Removing moss from your roof can be a simple DIY task if done correctly, but there are common mistakes that can lead to long-term damage or a less-than-effective cleaning job. Here are the most frequent errors to avoid when tackling roof moss removal, along with tips to help you do it right.
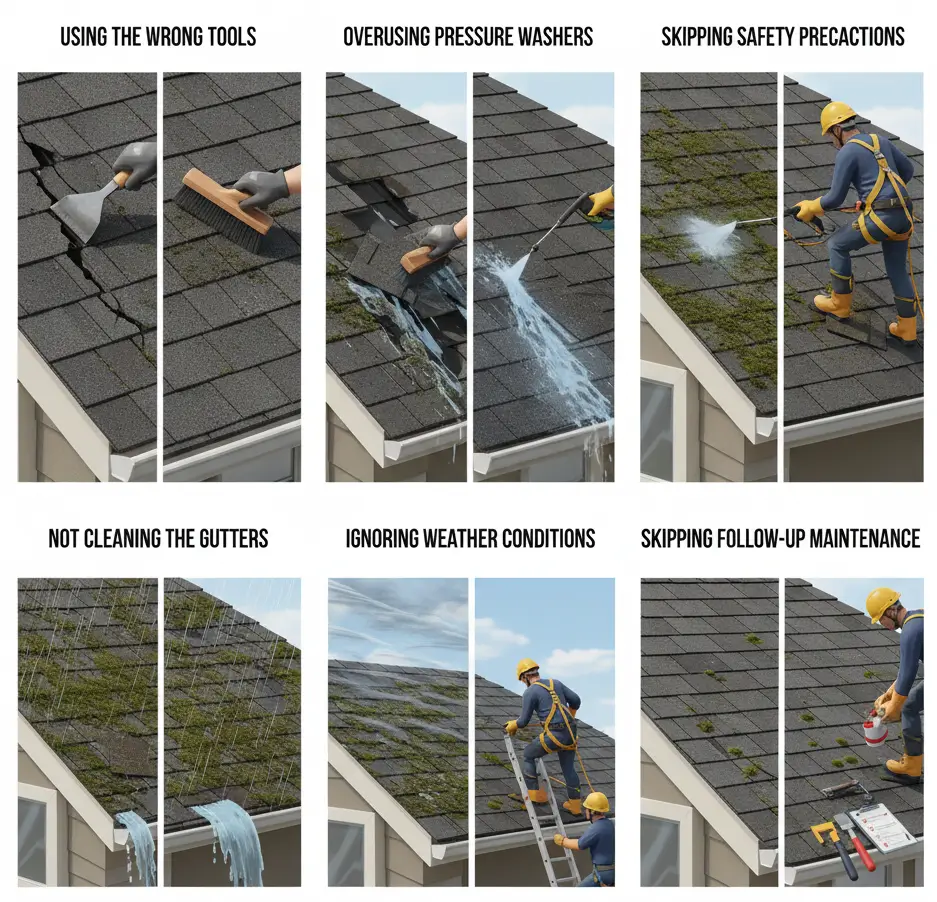
Using the Wrong Tools
Choosing the wrong tools for moss removal can lead to permanent damage to your roof. Using hard, abrasive brushes or sharp tools can scratch or even break your roof shingles, causing them to wear down over time. It’s important to use tools that are gentle yet effective.
- Why It’s Important: Hard tools can strip away granules from asphalt shingles or even crack tiles, leading to accelerated wear and the potential for leaks.
- What to Do Instead:
- Use a soft-bristle brush or broom to gently scrub moss off the roof. This will remove the moss without damaging the shingles.
- Avoid using any metal tools that can scratch or gouge the roof surface. Opt for non-abrasive materials designed for roof cleaning.
- For hard-to-reach areas, consider using a long-handled brush or soft roof rake that allows you to work from the safety of the ground.
- Pro Tip: If you decide to use a pressure washer, make sure to use the lowest possible pressure setting to avoid damaging the shingles.
Overusing Pressure Washers
Pressure washers are tempting tools because of their speed and effectiveness. However, using them incorrectly or too forcefully can cause significant damage to your roof. High-pressure water can dislodge roofing materials, damage the protective layer of shingles, and even force water underneath the roofing layers, leading to leaks.
- Why It’s Important: Roofs are delicate structures that need to be handled with care. High-pressure water can harm the integrity of shingles or tiles, especially if they’re already weathered or compromised.
- What to Do Instead:
- If using a pressure washer, keep the pressure low (under 1,000 psi) and maintain a distance of at least 12 inches from the surface of the shingles.
- Use a wide spray nozzle and avoid concentrating the water on one spot for too long to prevent damage.
- Focus on rinsing away the cleaning solution rather than using the pressure washer as your primary tool for moss removal. Consider using it only for the final rinse.
- If using a pressure washer, keep the pressure low (under 1,000 psi) and maintain a distance of at least 12 inches from the surface of the shingles.
- Pro Tip: If you’re unsure about using a pressure washer, it might be better to skip it entirely or hire a professional who has experience working with this equipment on roofs.
Skipping Safety Precautions
Roof cleaning, especially moss removal, often requires working at height, which can be dangerous if proper safety measures aren’t followed. It’s essential to be aware of the risks and take steps to protect yourself while working on your roof.
- Why It’s Important: Falling from a roof or ladder can cause serious injury, and exposure to chemical cleaning products can be harmful to your health.
- What to Do Instead:
- Use a sturdy ladder that is placed on a flat, level surface. Make sure someone is present to hold the ladder steady while you work.
- Wear non-slip shoes and safety gear (e.g., a harness, if needed) to prevent falls.
- Always work during dry weather to reduce the risk of slipping on wet surfaces.
- Wear gloves, safety glasses, and appropriate protective clothing when using chemical cleaners to protect your skin and eyes from irritation.
- Use a sturdy ladder that is placed on a flat, level surface. Make sure someone is present to hold the ladder steady while you work.
- Pro Tip: If you are not comfortable working at heights, consider hiring a professional roofing contractor who has the expertise and safety equipment to safely remove moss.
Additional Mistakes to Avoid
- Not Cleaning the Gutters: Moss debris and dead moss can accumulate in gutters, blocking water flow and causing moisture buildup. Regularly clean your gutters to prevent this.
- Ignoring Weather Conditions: Avoid cleaning your roof in wet, rainy conditions or when it’s too windy. Working in such conditions can make the task more dangerous and ineffective.
- Skipping Follow-up Maintenance: Once you’ve removed the moss, regular inspections and preventive measures (like applying moss treatments) are key to keeping your roof moss-free. Don’t skip regular maintenance to keep your roof in top condition.
FAQs About Removing Moss from Roofs
Yes, it’s safe to remove moss from your roof yourself as long as you take the proper safety precautions. Ensure you use the right tools (like a soft-bristle brush or a roof rake) to avoid damaging the shingles. It’s crucial to wear protective gear, such as non-slip shoes, gloves, and safety goggles, especially when working at heights. If your roof is steep, high, or you feel uncomfortable working at height, it’s best to hire a professional to avoid accidents.
Tip: Always work on a dry day and use a stable ladder or scaffolding for stability.
Moss can build up gradually, so it’s recommended to inspect your roof for moss at least twice a year—once in the spring and again in the fall. If you live in a particularly damp or shaded area, you may need to check more frequently. Early moss detection helps you address the problem before it causes extensive damage to your roof.
Pro Tip: Check your roof after storms to ensure debris doesn’t promote moss growth. Regular inspections can prevent larger issues in the future.
While bleach is sometimes used in DIY cleaning solutions, it’s not the most recommended option for roof moss removal. Bleach can damage your shingles over time, and it can also harm your landscaping, as it’s toxic to plants. Instead, consider using a vinegar-water solution (which is effective and safe for your roof) or commercial moss removers that are specifically designed for roofing materials.
Alternative: For natural moss removal, use a vinegar and water mixture (1:1 ratio) or opt for bio-based moss killers.
The time it takes to remove moss from your roof depends on the extent of the growth and the method you choose. For a typical DIY moss removal process using a brush or broom, it may take anywhere from 2 to 4 hours. If you’re applying moss removal solutions and waiting for them to take effect, you should plan for additional time—anywhere from 24 to 48 hours—for the solution to kill off the moss before you rinse it off.
Time-Saving Tip: You can speed up the process by using a pressure washer with low pressure to remove the moss after it’s been softened by your chosen solution.
The cost of hiring a professional to remove moss from your roof varies depending on the size of the roof, the extent of moss growth, and the company you choose. On average, professional moss removal services can cost anywhere from $300 to $1,000. If your roof is large or has significant moss buildup, expect the higher end of that range. While it might be more expensive, professionals can ensure a thorough job, including safe removal and preventive treatments to stop moss from returning.
Cost Tip: Get a few quotes from different companies to ensure you're getting the best deal and service for your needs.
The most effective roof moss killers are those specifically designed for use on roofing materials. These products are formulated to kill moss at the roots and prevent regrowth without damaging your shingles. Common active ingredients in these moss removers include zinc sulfate and copper sulfate, which are both effective and safe when used as directed.
DIY Option: A vinegar-water solution (1:1 ratio) is a natural alternative that can be used to treat minor moss problems.
To prevent moss from growing back on your roof, consider these long-term solutions:
- Trim overhanging trees: Moss thrives in shaded areas, so cutting back tree branches will allow more sunlight to reach your roof, reducing moss growth.
- Improve ventilation: Proper ventilation in the attic and on the roof helps reduce moisture buildup, which is a key factor in moss growth.
- Install zinc or copper strips: Copper or zinc strips placed along the roof ridge will release particles that inhibit moss growth when it rains.
- Apply moss-repellent treatments: You can apply moss-resistant treatments or solutions to your roof every 1-2 years to keep moss at bay.
Natural remedies for preventing moss growth on your roof include:
- Vinegar solution: Mix equal parts white vinegar and water to create a spray solution that kills existing moss and prevents regrowth.
- Baking soda: You can apply baking soda directly to moss to help dry it out and discourage future growth.
- Rinsing with water: Regularly rinsing your roof with water can help wash away debris and moisture that promotes moss growth.
- Tip: Always test any homemade solution on a small, inconspicuous area of your roof first to ensure it doesn't cause damage.
Yes, moss can damage roof shingles over time. As moss grows, it traps moisture, which can cause shingles to lift, crack, or rot. The accumulated moisture weakens the shingles and can lead to leaks, mold, and structural damage. In severe cases, moss growth can significantly reduce the lifespan of your roof, leading to costly repairs or even the need for roof replacement.
Pro Tip: Regular moss removal and maintenance will help preserve the integrity of your roof and extend its lifespan.
Anti-moss strips, typically made from copper or zinc, are an effective long-term solution for preventing moss growth. These strips release metal particles that inhibit moss development when water runs over them during rainfall. The metal ions disrupt the conditions that moss needs to thrive, providing a proactive measure against future growth.
- Pro Tip: Install these strips along the ridge of your roof, where rainwater flows down, to ensure maximum effectiveness.