
What is a Drip Edge on a Roof?
Your roof is more than just shingles, tiles, or panels—it’s a carefully designed system of components that work together to protect your home from rain, snow, wind, and other elements. One of the most important, yet often overlooked, parts of this system is the drip edge.
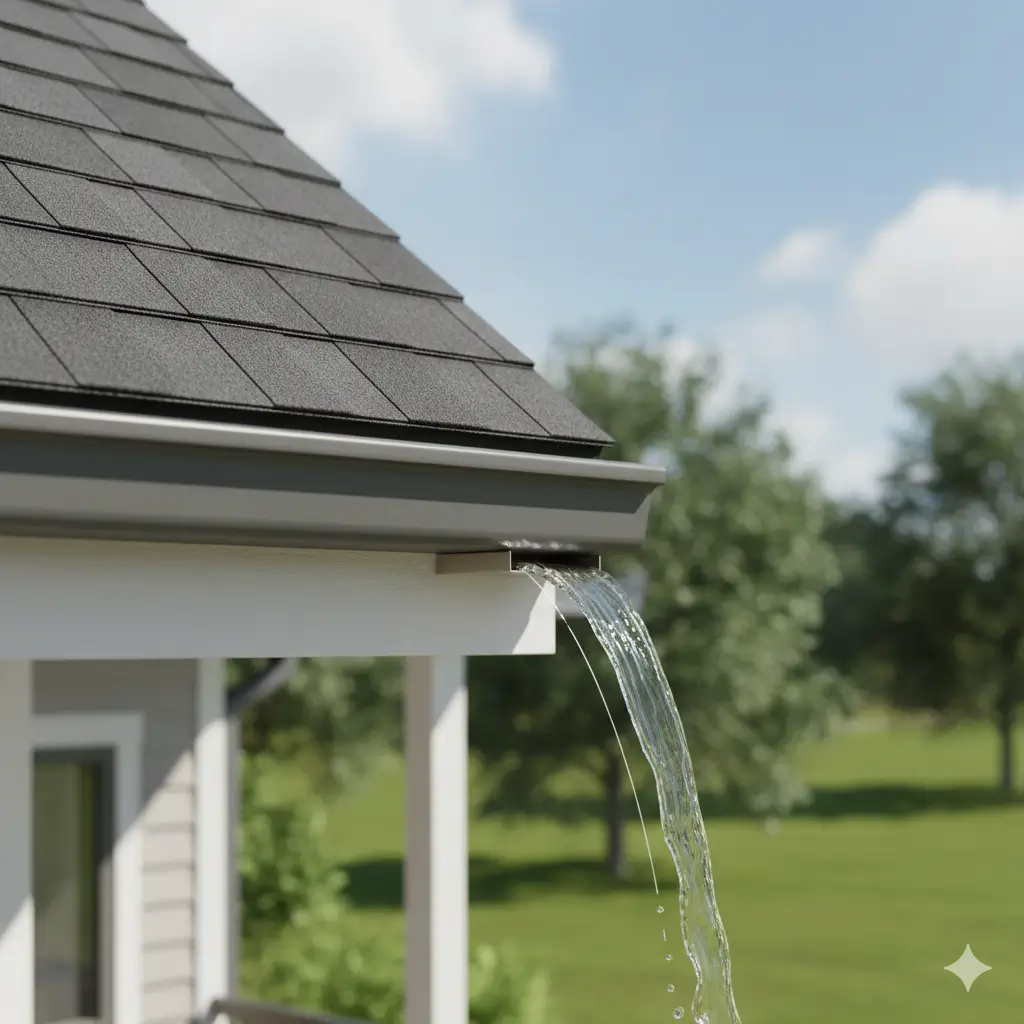
A drip edge is a metal flashing, usually shaped like an “L” or similar profile, installed along the edges of your roof. Its main function is to direct water away from the fascia and into the gutters, preventing water from seeping under shingles, damaging the roof deck, or causing rot and mould along the eaves.
While some older homes may not have had drip edges installed, they are now required by building codes across North America for most roofing projects. Even if your roof looks perfectly fine from the ground, a missing or improperly installed drip edge can lead to costly repairs, leaks, and reduced roof lifespan.
In this guide, we’ll cover everything you need to know about drip edges, including:
- What a drip edge is and why it’s essential
- The different materials and profiles available
- Installation and replacement tips for both new and existing roofs
- Maintenance advice and cost considerations
By the end of this article, you’ll understand why a drip edge is a small component with a huge impact, and how to make sure your roof is properly protected.
What is a drip edge?
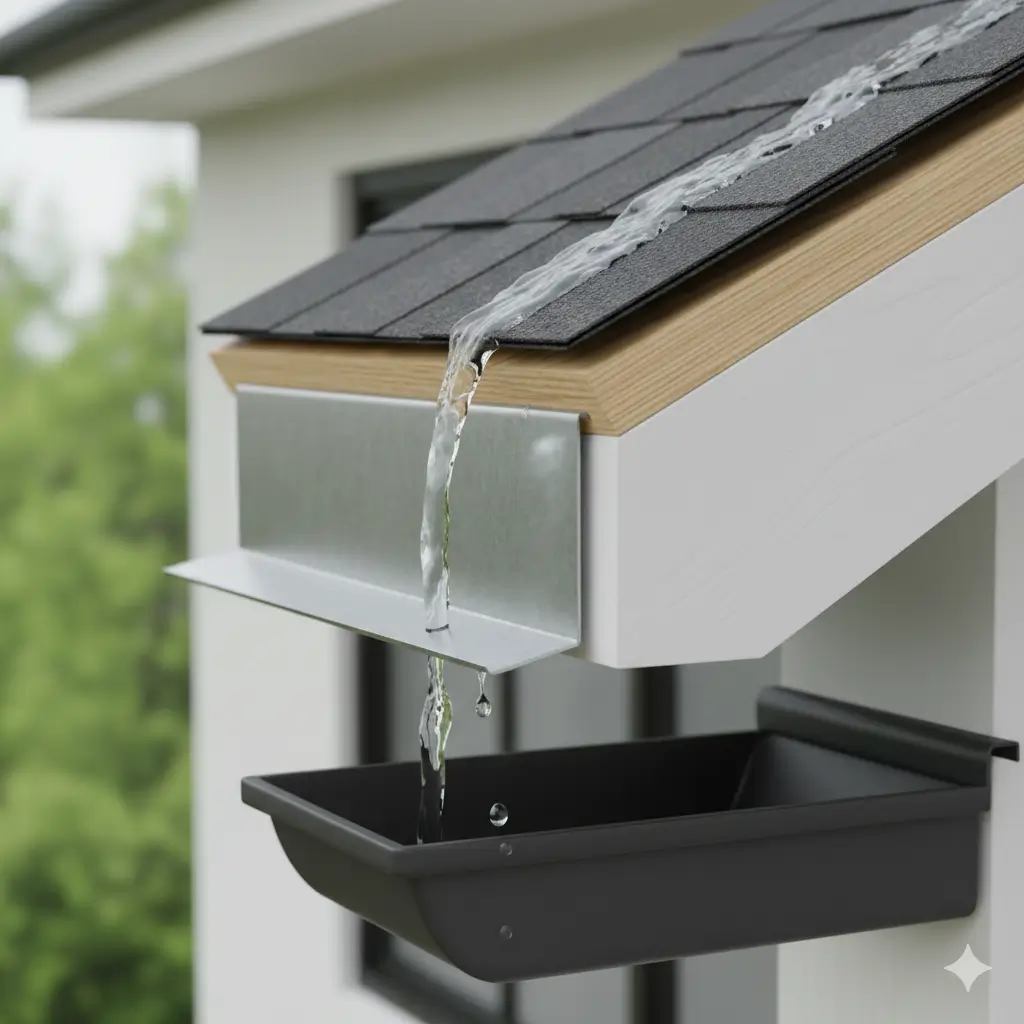
A drip edge is a specially designed piece of metal flashing installed along the edges of a roof. Typically shaped like an “L” or similar profile, it attaches directly to the roof deck and extends slightly beyond the fascia boards—the horizontal boards located under the roof’s eaves. Its primary function is to direct water away from the roof and into the gutters, ensuring that rainwater does not seep beneath shingles, damage the roof deck, or rot the fascia.
Drip edges are usually installed before underlayment and shingles during new roof construction. However, they can also be retrofitted onto existing roofs if your home didn’t originally have them. Modern building codes in North America often require drip edge installation as part of a complete roofing system, reflecting its essential role in protecting your home.
Why Drip Edges Are Important:
- Prevents Water Damage: By channelling water away from the fascia and roof deck, drip edges reduce the risk of leaks and water infiltration.
- Protects Fascia Boards: Fascia boards are vulnerable to rot when exposed to water. A properly installed drip edge shields them from prolonged moisture exposure.
- Prevents Mould and Structural Issues: Slower water drainage can lead to mould growth and wood damage; drip edges minimise these risks.
- Enhances Roof Longevity: By keeping water away from sensitive areas, drip edges contribute to a longer-lasting and more durable roofing system.
Even homes with pre-bent aluminium fascia or rake moulding may have some protection, but a dedicated drip edge provides a more reliable barrier, ensuring water is consistently directed off the roof and into the gutters.
In short, the drip edge may seem like a small component, but it is critical for maintaining a strong, water-resistant, and long-lasting roof.
Why Drip Edges Are Essential
A drip edge may seem like a small component, but it plays a critical role in protecting your home from water damage, wood rot, and other roofing issues. Properly installed drip edges help your roof perform at its best, extending its lifespan and preventing costly repairs.
Benefits of Installing Drip Edges
- Directs Water Away from Fascia and Roof Deck:
The primary function of a drip edge is to channel rainwater safely into the gutters instead of allowing it to cling to shingles, fascia boards, or the roof deck. This helps prevent water from seeping under shingles, which could lead to leaks and structural damage. - Protects Against Wind-Driven Rain:
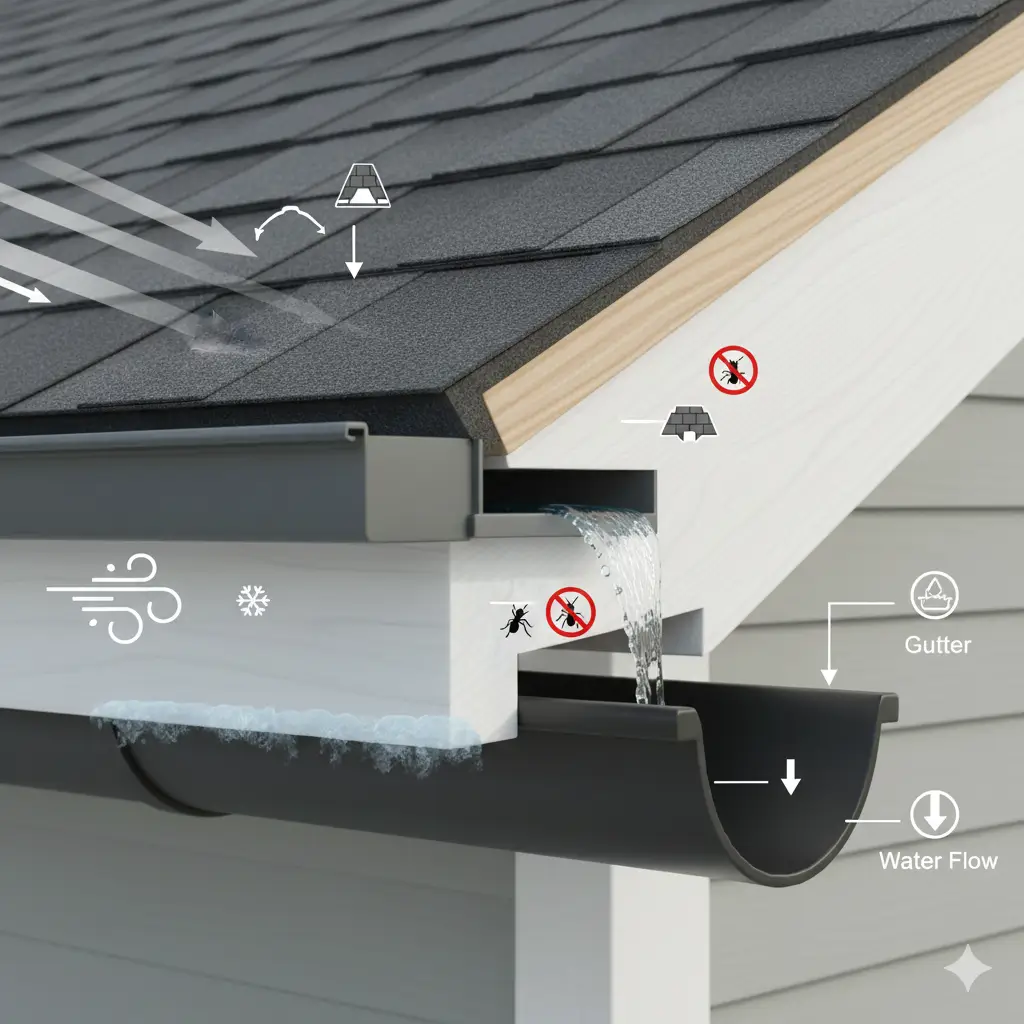
Strong winds can push rain upward beneath the lowest row of shingles. A properly installed drip edge extends beyond the roof’s edge with a lower flange, acting as a barrier to wind-driven water and ensuring it flows into the gutter. - Prevents Ice Dams and Moisture Build-Up:
In colder climates, slow water drainage can lead to ice dams along roof edges. Drip edges promote proper water flow, reducing the risk of ice formation and the stress it can place on your roof. - Guards Against Pests:
By sealing the gap between the roof edge and fascia boards, drip edges help keep insects, birds, and other pests from nesting in these vulnerable areas. - Complies with Building Codes:
Most modern building codes, including the International Residential Code (IRC), require drip edges at eaves and gables for shingle roofs. Proper installation ensures your roof passes inspections and meets safety standards.
Risks of Not Having a Drip Edge
- Water Damage and Wood Rot: Rainwater can drip behind gutters and soak fascia boards or the roof deck, causing rot and mould.
- Shingle Deterioration: Water running under shingles can loosen them and reduce the roof’s lifespan.
- Leaks and Interior Damage: Without a drip edge, water can eventually find its way into the attic, walls, or ceilings, leading to costly repairs.
Failed Home Inspections: Homes without drip edges may not pass building code inspections, potentially delaying construction or resale.
When Roofers Might Skip Drip Edges
While building codes generally require drip edges, some roofers may skip them under certain circumstances:
- Older homes with pre-bent aluminium fascia or rakemoulding already provide similar water protection.
- Budget roofing projects where the homeowner is unaware of the importance of drip edges.
- DIY roof replacements where the installer lacks knowledge of code requirements.
Even in these cases, skipping a drip edge can compromise the roof’s performance and longevity, so professional installation is always recommended.
Drip Edge Material Types
Choosing the right material for your roof’s drip edge is crucial for durability, performance, and aesthetics. Drip edges are available in several materials, each with its strengths and limitations:
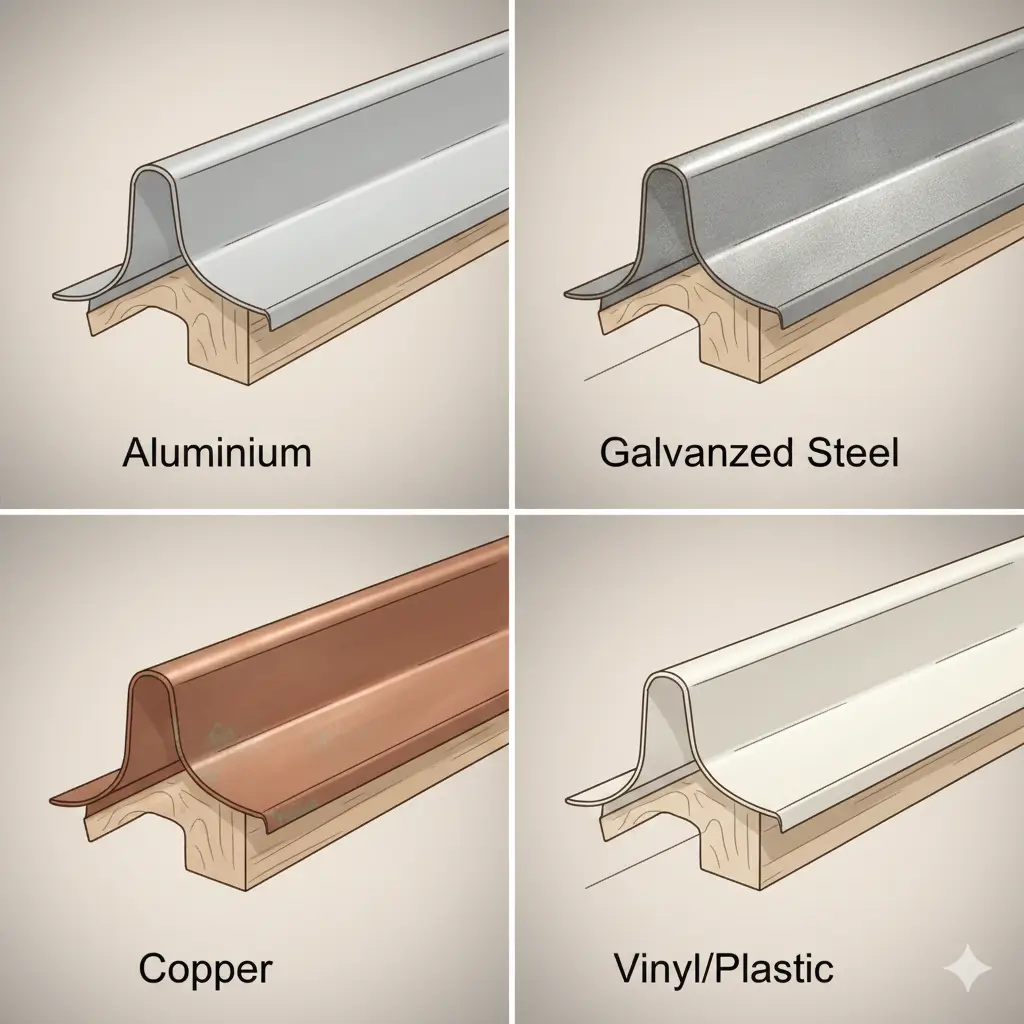
1. Aluminium
- Pros: Lightweight, corrosion-resistant, and often comes in pre-painted colours to match your roof.
- Cons: Not as strong as steel; can bend under extreme wind or hail.
- Best Use: Ideal for residential roofs in mild climates where rust resistance and easy handling are important.
2. Galvanised Steel
- Pros: Strong, durable, and withstands high winds. Galvanisation prevents rust, extending lifespan.
- Cons: Slightly heavier than aluminium; may be prone to corrosion if the coating is scratched.
- Best Use: Perfect for areas prone to strong storms or high winds. Minimum 24-gauge steel is recommended for longevity.
3. Copper
- Pros: Extremely durable and visually striking; develops a natural patina over time.
- Cons: Expensive compared to other metals; requires professional installation.
- Best Use: High-end residential or historic homes, where aesthetics and longevity outweigh cost.
4. Vinyl or Plastic
- Pros: Lightweight and inexpensive.
- Cons: Not suitable for roofs; prone to cracking and fading under UV exposure.
- Best Use: Limited to non-roofing applications like window or door trim.
✅ Tip: For most residential roofs, aluminium or galvanised steel strikes the best balance between cost, durability, and compliance with building codes.
Drip Edge Profile Types
Drip edges come in several profile types, which determine how effectively they channel water and fit with your roof design. Understanding these profiles ensures proper installation and optimal performance.
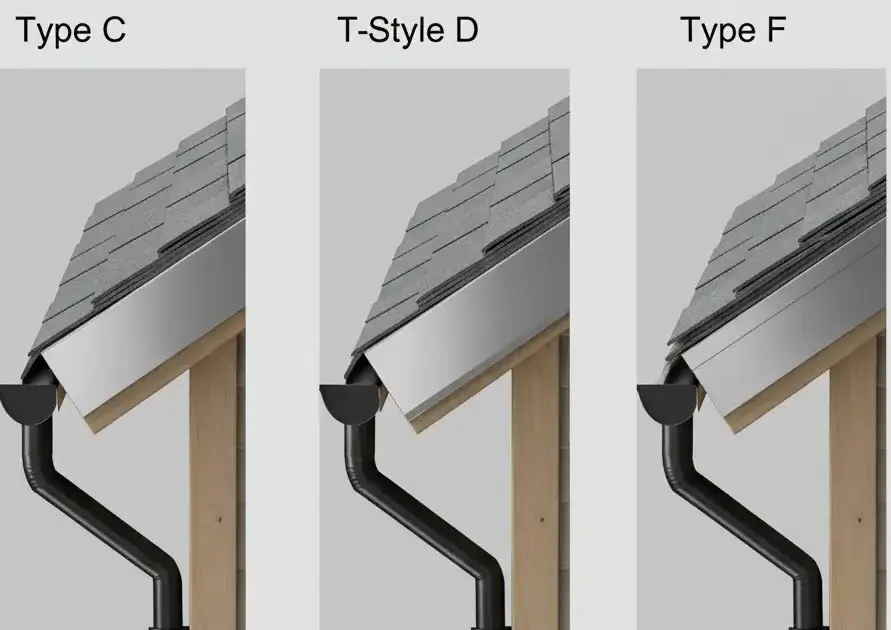
1. L-Style (Type C)
- Shaped like a classic “L” with a 90-degree angle.
- Commonly used for low-profile roofs and eaves.
- Simple and cost-effective, generally sufficient for most residential installations.
2. T-Style (Type D)
- Resembles a “T” with an extended top flange.
- Directs water further away from the fascia, providing better protection in areas prone to heavy rainfall or wind-driven rain.
- Slightly more expensive than Type C but often recommended by roofing associations for most homes.
3. Type F
- Extended leading edge, ideal for retrofitting over existing shingles or for rake edges.
- Combines the protection of Type D with added coverage where needed.
Other Variations & Alternatives
- Gutter Apron: Wider flange over the gutter for added water control.
- Rake Edge: Installed on gabled roof edges to prevent water from damaging side frieze boards.
- Vented Drip Edge: Sometimes sold, but not recommended for standard roofing by professional associations.
✅ Tip: Selecting the right profile depends on roof pitch, climate, and whether you are installing on a new or existing roof. For most residential roofs, Type D or Type F offers the best water-shedding performance.
How to Install a Drip Edge
Proper installation of a drip edge is crucial for protecting your roof, fascia, and home interior from water damage. Here’s a detailed guide to ensure your drip edge is installed correctly.
Tools & Materials Needed
- Drip edge flashing (Type C, D, or F as chosen)
- Roofing nails or screws
- Tin snips or metal shears
- Hammer or pneumatic nailer
- Tape measure and chalk line
- Ladder and safety harness
- Roofing underlayment
✅ Tip: Always wear gloves when handling metal flashing to prevent cuts, and check your local building codes before starting.
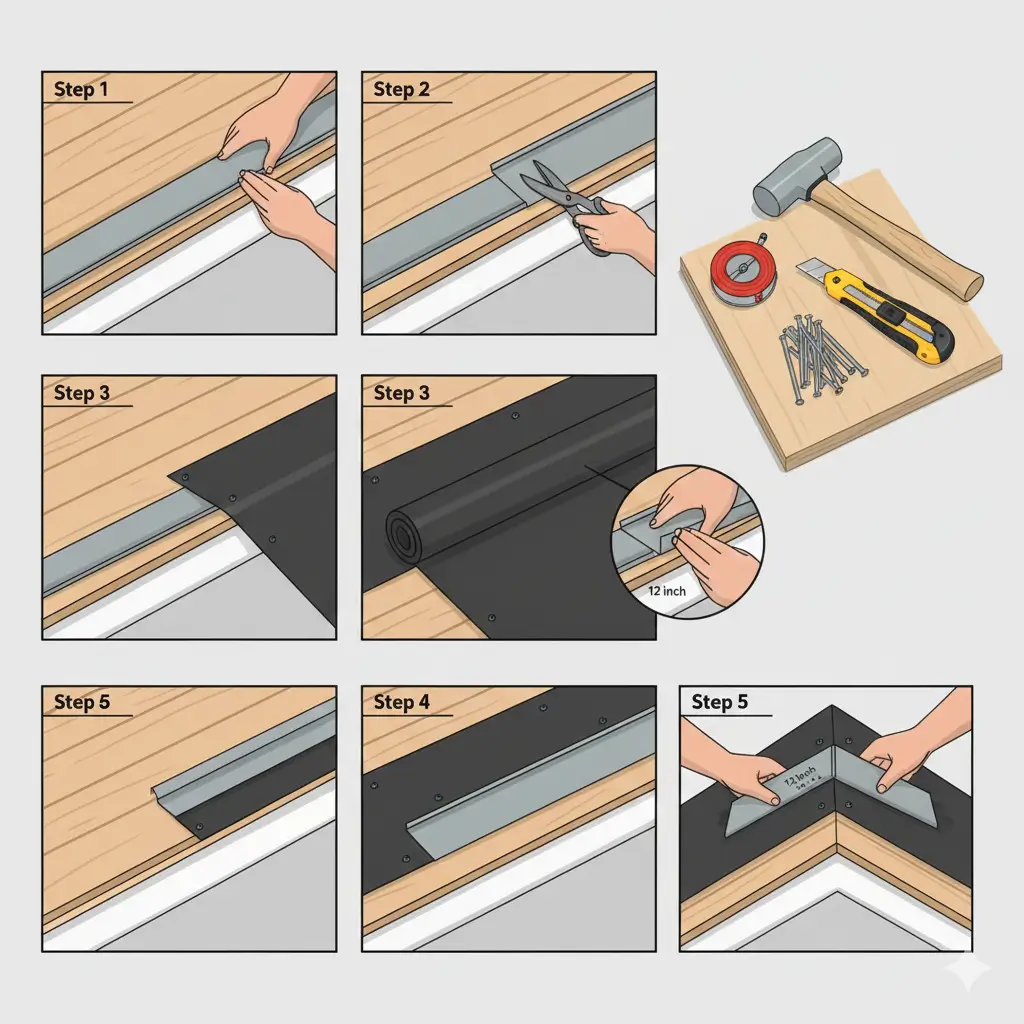
Step-by-Step Installation Guide
1. Install on Eaves First
- Begin with the eaves (the horizontal edges of the roof).
- Place the drip edge so the lower flange extends over the fascia and directs water into the gutters.
- Nail the drip edge approximately every 12 inches along the roof deck. Make sure nails are positioned high so shingles will cover them.
- Overlap adjacent drip edge pieces by at least 1 inch to prevent leaks.
2. Prepare Corners
- At eave corners, measure and cut the drip edge so it fits snugly without gaps.
- Trim a small square at the corner, fold the metal, and secure it in place for a clean, continuous edge.
3. Install Underlayment
- Lay roofing underlayment over the eave drip edge. This ensures that water cannot penetrate beneath the shingles while maintaining proper drainage.
4. Install on Rakes
- Rakes are the sloped edges along gables. Install the drip edge over the underlayment, unlike the eaves.
- Nail the drip edge every 12 inches, overlapping pieces as before.
5. Finish at Roof Ridge
- At the ridge or peak, cut the drip edge to fit properly, fold as needed, and secure with a single nail or screw.
- Ensure a smooth transition between the eaves and rakes for a continuous protective edge.
Installing Drip Edge on Existing Roofs
- Retroactive installation is trickier but possible:
- Carefully lift the bottom row of shingles.
- Slide the drip edge under the shingles so that the lower edge extends 1.25–2 inches beyond the fascia.
- Secure with nails high enough to be covered by shingles.
- Seal any small gaps with roofing cement.
- Carefully lift the bottom row of shingles.
✅ Tip: Consider professional help if retrofitting on steep or slippery roofs for safety.
Key Tips
- Always check that your drip edge is straight and level along the eaves and rakes.
- Use corrosion-resistant materials for your climate.
- Proper overlap and high-quality nailing prevent leaks and wind damage.
- Follow manufacturer guidelines and local building codes for spacing, overhang, and attachment.
Replacing or Maintaining a Drip Edge
Even the best drip edges can wear out over time, or your home may have never had one installed. Proper maintenance and timely replacement are essential to prevent water damage, wood rot, and mould.
Signs You Need Replacement
Watch for these warning signs that your drip edge may need attention:
- Rust or corrosion on metal drip edges
- Warping, bending, or detachment from the roof deck
- Water damage, staining, or rot on fascia boards
- Shingles lifting near the roof edges
- Gaps that allow wind-driven rain or pests to enter
Ignoring these signs can compromise your roof’s protection and lead to costly repairs.
DIY vs. Professional Replacement
Replacing a drip edge is possible as a DIY project if you have the right tools and some roofing experience. Here’s a brief overview:
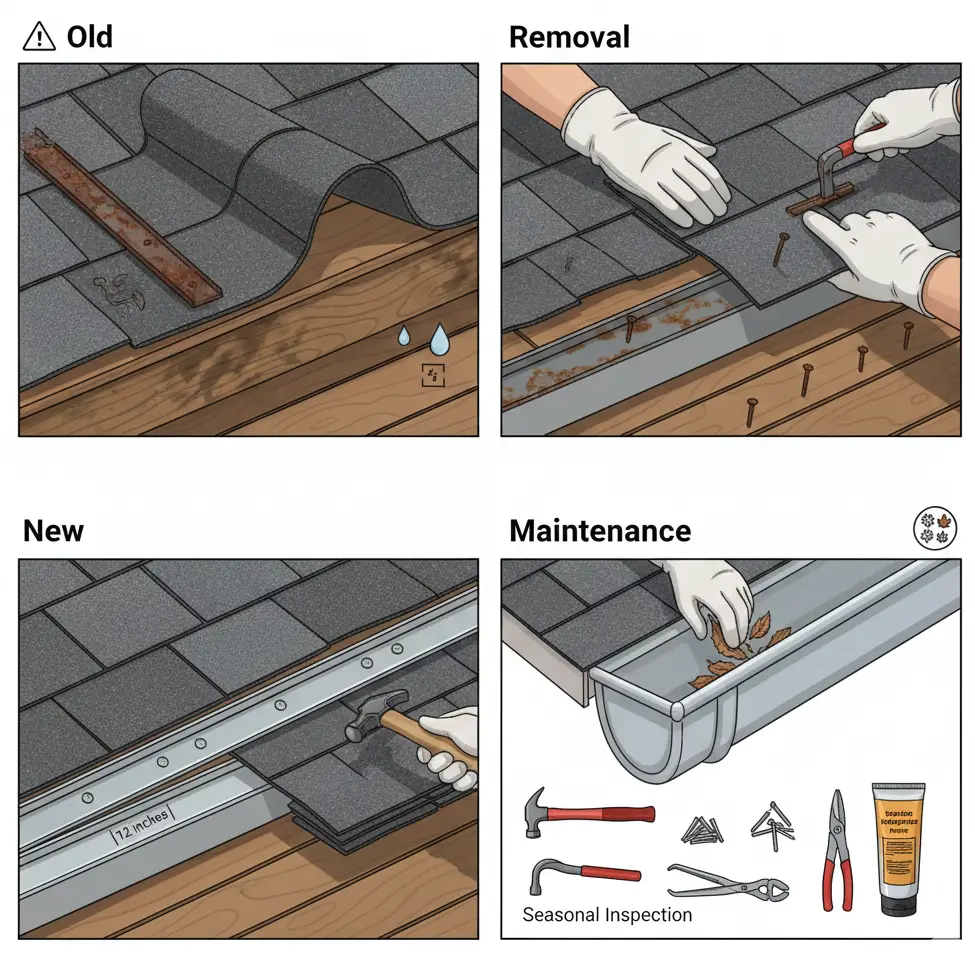
DIY Replacement Steps:
- Gently lift the edge shingles and locate nails securing the old drip edge.
- Use a pry bar and hammer to remove nails carefully.
- Slide out the old drip edge and discard it.
- Install the new drip edge following proper installation techniques: overlap joints, nail every 12 inches, and ensure proper alignment with gutters and underlayment.
- Seal any small gaps with roofing cement to prevent leaks.
✅ Tip: Have a helper hold the shingles while you work to avoid damage or accidents.
Professional Replacement:
- Recommended for steep roofs, large areas, or retrofitting on older roofs.
- Roofers can ensure proper alignment, secure fastening, and compliance with local building codes.
- Professionals also inspect for underlying damage that may need repair before new drip edges are installed.
Maintenance Tips to Prolong Lifespan
Keeping your drip edge in top condition reduces the need for early replacement:
- Inspect your drip edge at least twice a year and after severe weather.
- Keep gutters and downspouts clear to prevent water backup.
- Remove debris and ensure water flows freely off the roof edge.
- Touch up minor rust spots or paint exposed metal edges to prevent corrosion.
- Check for loose nails or shifted flashing and secure them promptly.
Regular maintenance combined with proper installation ensures your drip edge continues to protect your home for decades.
Drip Edge Costs and Budget Considerations
Installing a drip edge is a relatively small investment that can prevent major roofing problems down the line. Understanding the costs and factors that influence pricing will help you plan your budget effectively.
Average Cost by Material and Roof Size
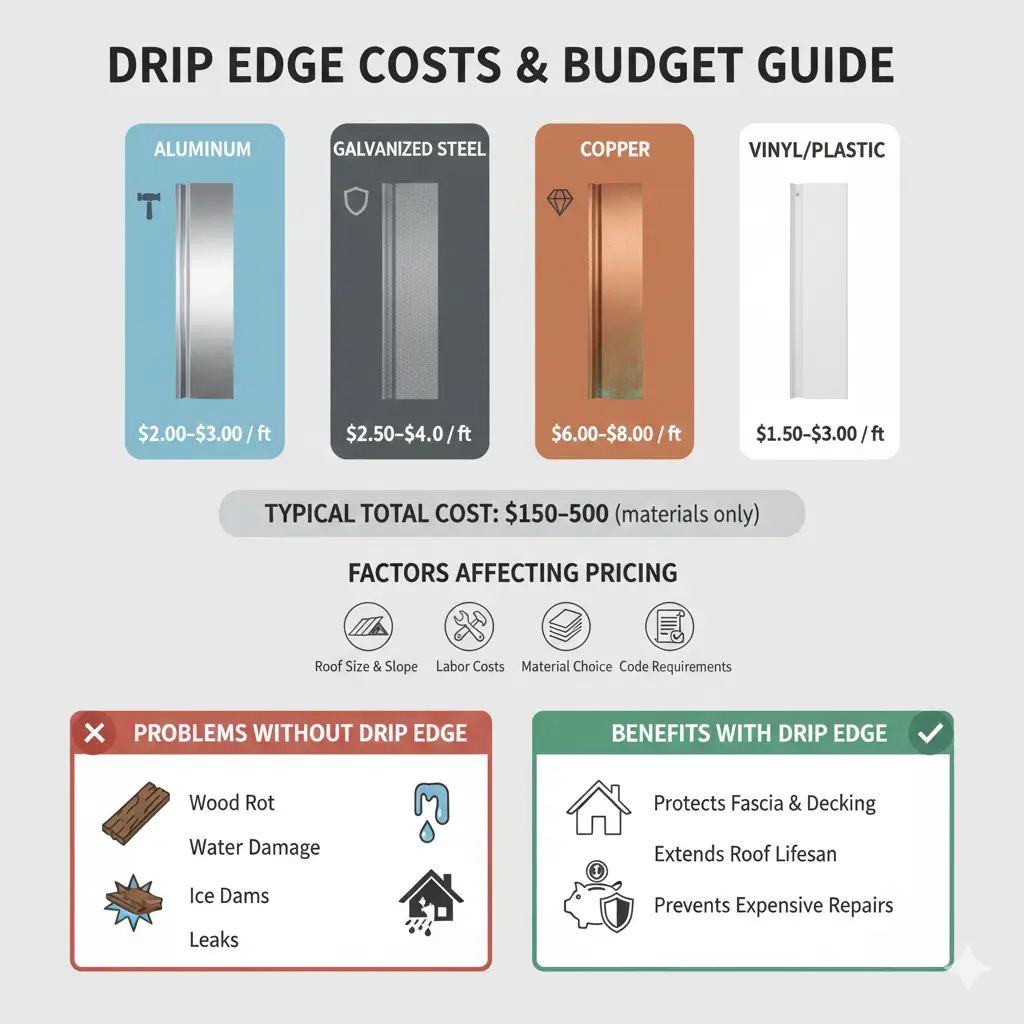
The cost of a drip edge varies primarily based on material choice and the total length needed:
- Aluminium: $2.00–$3.00 per linear foot. Lightweight, corrosion-resistant, and often available in matching colours.Galvanised Steel: $2.50–$4.00 per linear foot. More durable than aluminium and better for high-wind areas.
- Copper: $6.00–$8.00 per linear foot. Extremely durable, aesthetically appealing, but higher upfront cost.
- Vinyl or Plastic: $1.50–$3.00 per linear foot. Suitable for non-roof applications or temporary solutions, but not recommended for long-term roofing protection.
For most residential roofs, total material costs for a full roof replacement range from $150 to $500, depending on roof size and material type.
Factors Affecting Price
Several elements can increase or decrease the final cost of drip edge installation:
- Roof Size & Slope: Larger or steeper roofs require more material and labour.
- Existing Roof Condition: Retrofitting a drip edge on an older roof is more labour-intensive than installing it on a new roof deck. Costs can rise from $500 up to $3,000 for complex or high-pitch roofs.
- Labour Costs: Hiring a professional ensures proper installation and code compliance. Rates vary by region and roofing contractor.
- Material Choice: Premium metals like copper significantly increase the total cost.
- Code Requirements: Local building codes may specify certain drip edge profiles or materials, affecting price.
Cost-Benefit Analysis
While drip edge installation may feel like an extra expense, the long-term benefits far outweigh the initial cost:
- Prevents Wood Rot & Water Damage: Protects fascia boards, soffits, and roof decking.
- Extends Roof Lifespan: Proper edge protection reduces leaks, ice dam formation, and wind damage.
- Protects Your Investment: Small upfront costs prevent expensive repairs, potentially saving thousands over the roof’s lifetime.
In short, investing in a drip edge is cost-effective and ensures your roofing system performs as intended.
Alternatives and Supplementary Roof Protection

While drip edges are highly recommended for nearly every roofing system, there are alternative or supplementary components that can enhance edge protection and water management. Understanding these options helps homeowners make informed choices when designing or maintaining a roof.
Other Roofing Components That Provide Edge Protection
- Fascia Boards:
- Fascia boards support gutters and protect roof edges from wind and moisture.
- When installed properly with corrosion-resistant materials, fascia can provide some protection against water damage, though it doesn’t redirect water as effectively as a drip edge.
- Fascia boards support gutters and protect roof edges from wind and moisture.
- Gutters:
- Gutters collect and channel water away from the roof and foundation.
- While essential for overall water management, gutters alone cannot prevent water from seeping under shingles or damaging the fascia; a drip edge complements their function.
- Gutters collect and channel water away from the roof and foundation.
- Roof Flashing:
- Flashing seals roof joints and edges around chimneys, vents, and valleys.
- In some low-slope or custom roof designs, extended flashing or specialised gutter aprons can supplement or partially substitute a drip edge.
- Flashing seals roof joints and edges around chimneys, vents, and valleys.
- Properly installed flashing prevents leaks, ice dams, and wind-driven rain from entering vulnerable areas.
- Properly installed flashing prevents leaks, ice dams, and wind-driven rain from entering vulnerable areas.
Situations Where Alternatives May Be Used
- Existing Roofs Without Drip Edge:
Older roofs may rely on pre-bent aluminium fascia or gutter aprons as edge protection. While not as effective as a full drip edge, these can reduce immediate water damage until a proper drip edge can be installed.
Specialised Roofing Systems:
Flat roofs or membrane roofs often use gravel stops, roof edges, or custom flashing systems to protect edges. In these cases, drip edges may not be required, but edge sealing and waterproofing are still critical. - Aesthetic Considerations:
Some homeowners choose copper or decorative fascia that doubles as water protection. These designs can supplement standard drip edges, combining visual appeal with functional benefits.
Key Takeaway
Drip edges remain the most reliable method to protect roof edges from water intrusion, wind-driven rain, and ice dams. Alternatives or supplementary components can help in specific cases, but should never fully replace a properly installed drip edge on modern shingle roofs.
Common Questions About Drip Edges (FAQ)
Most modern building codes require drip edges on shingle roofs, especially at eaves and gable edges. Even if not mandated in your area, installing a drip edge is strongly recommended. It protects your roof deck, fascia, and home interior from water damage, ice dams, and pests. Skipping this step can lead to leaks, wood rot, and costly repairs over time.
Yes, drip edges can be retrofitted to an existing roof. This typically involves gently lifting the lower row of shingles, positioning the new drip edge along the roof edge, and securing it with roofing nails. For safety and precision, having a second person assist is recommended. Always check local building codes to ensure compliance during retrofitting.
- Drip Edge: Runs along horizontal eaves, directing water into gutters and away from fascia boards.
- Rake Edge: Runs along the angled sides (gables) of the roof without gutters, guiding water away from siding.
While both prevent water damage, drip edges handle eaves specifically, whereas rake edges protect the sloped gable edges.
Roofing nails are the preferred fasteners for drip edges. Use nails with large heads and barbed shanks, spacing them about 12 inches apart. Screws are generally unnecessary unless specified by the manufacturer, as nails provide sufficient holding strength and allow for thermal expansion of the metal.
Inspect drip edges during regular roof maintenance—ideally once or twice a year and after major storms. Signs that replacement may be needed include:
- Rust or corrosion on metal edges
- Loose or bent flashing
- Water is seeping behind the fascia or shingles.
- Missing or damaged sections
Replacing worn drip edges promptly ensures continued protection against leaks, ice dams, and wind-driven rain.
The ideal drip edge depends on your roof type, climate, and budget. Common recommendations include:
- Type D (T-Style): Excellent for most residential roofs, keeps water away from fascia.
Galvanised Steel: Durable and corrosion-resistant for harsh climates. - Copper: Long-lasting and visually appealing, but higher cost.
For specific guidance, consult a qualified roofing professional to match the drip edge type to your roof’s slope and local weather conditions.
Also Read: