
Step-by-Step Metal Roof Installation Guide (How to Install Metal Roofing Like a Pro)
Table of Contents

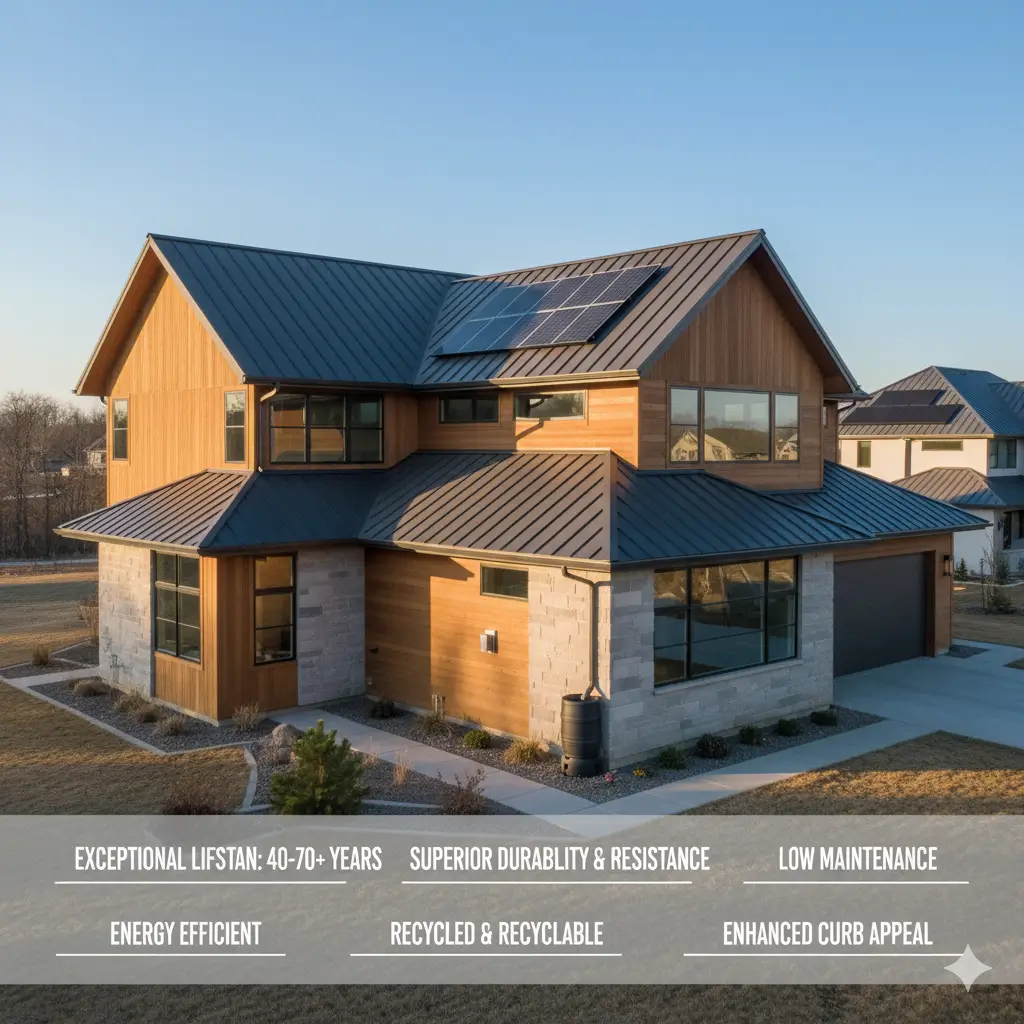
Metal roofs have become one of the most reliable and modern roofing options for homeowners and contractors alike — and for good reason. A properly installed metal roof can last 40–70 years, reflect heat to reduce cooling costs, resist moss and algae, and require little to no maintenance. Whether you’re planning to install it yourself or want to understand the process before hiring a contractor, knowing how the system works is essential for long-lasting performance.
This step-by-step guide walks you through everything you need to know — from preparing the roof deck and installing underlayment to fastening panels and sealing edges. We’ll also cover safety tips, essential tools, and common mistakes that lead to leaks or premature damage. With the right materials, planning, and technique, installing a metal roof can be done efficiently and correctly — and we’ll show you exactly how.
Pro Tip: A metal roof is all about proper layering. Each layer — from the decking and moisture barrier to the flashing and panels — works together to shed water and protect your home. When installed in the right order, it keeps your roof dry and damage-free for decades.
The Benefits of Metal Roofing
When choosing a roofing material, homeowners should weigh long-term performance, cost, durability, energy savings, and visual appeal. Metal roofing stands out from traditional asphalt shingles in nearly every category — making it a smart investment for both residential and commercial properties.
Here are the top benefits of installing a metal roof:
1. Exceptional Lifespan
- Metal roofs can last 40 to 70+ years, depending on the material and maintenance.
- Traditional asphalt shingles, in comparison, typically last only 15 to 20 years.
- This means fewer replacements and long-term cost savings for homeowners planning to stay in their home for decades.
2. Superior Durability & Weather Resistance
- Designed to withstand harsh weather — including heavy rain, snow, hail, and strong winds.
- Unlike shingles, metal panels won’t crack, warp, or deteriorate easily.
They are also fire-resistant, providing added protection in wildfire-prone or lightning-prone regions.
3. Low Maintenance Requirements
- Asphalt shingles can curl, blow off, or grow moss and algae.
- Metal roofing requires minimal upkeep — no shingle replacements, no frequent sealant touch-ups, and it naturally sheds snow, ice, leaves, and debris.
- Occasional inspections and cleaning are usually enough to keep it performing like new.
4. Energy Efficiency & Cost Savings
- Metal roofs reflect solar heat instead of absorbing it — reducing indoor temperatures in summer.
- This can help lower energy bills by 10–25% on cooling costs, especially in warmer climates.
Many systems can be paired with cool roofing coatings or insulation layers for even better performance.
5. Environmentally Friendly Choice
- Most metal roofing materials are made from recycled content and are 100% recyclable at the end of their lifespan.
- Unlike asphalt shingles, which often end up in landfills, metal is a more sustainable and eco-conscious roofing option.
6. Enhances Curb Appeal & Property Value
- Available in a wide range of colors, finishes, and styles — including panels that mimic shingles, tiles, or slate.
- Gives homes a modern, sleek, or architectural appearance depending on the design you choose.
- Metal roofs can also increase resale value, as buyers appreciate long-lasting, low-maintenance roofing.
Tools Needed for Metal Roof Installation
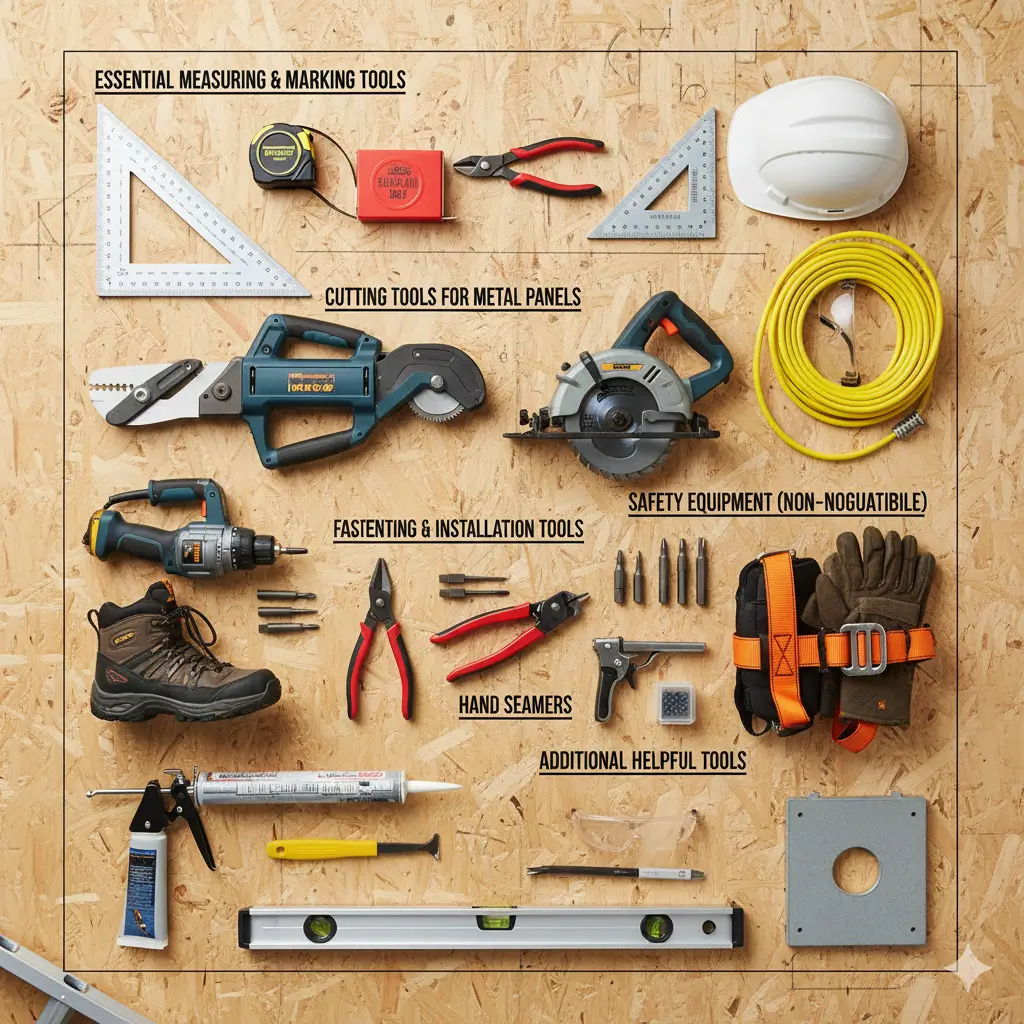
Before you begin installing a metal roof, make sure you have the right tools on hand. The right equipment not only speeds up the process but also ensures accuracy, safety, and a leak-free finish. Here’s a comprehensive tool list based on industry best practices.
Essential Measuring & Marking Tools
- Measuring Tape – For accurate panel and flashing measurements.
- Chalk Line – Helps snap straight, clean layout lines for fastener alignment.
Carpenter’s Square or Speed Square – Ensures correct panel angles and cuts.
Cutting Tools for Metal Panels
- Aviation Snips / Tin Snips – Ideal for cutting small sections and trimming edges.
- Metal Shears (Electric or Manual) – For cutting long, straight lines on panels.
- Circular Saw with Metal-Cutting Blade – Useful for thicker panels and faster cuts (optional but helpful).
- Nibblers (optional) – Provide clean cuts with minimal metal distortion.
Fastening & Installation Tools
- Drill/Driver or Screw Gun – For driving roofing screws and fastening panels securely.
- Magnetic Hex Driver Bits – Hold screws in place and prevent slipping.
- Hand Seamer / Metal Bender – For bending and forming panel edges and flashing.
Rivet Gun (optional) – For securing trim and flashing pieces if needed.
Safety Equipment (Non-Negotiable)
- Safety Harness & Lifeline – Protects against falls when working on sloped roofs.
- Ladder or Roof Access System – Stable access to the roof surface.
- Non-Slip Roofing Boots – Improve grip and reduce the risk of slipping.
- Gloves – Protect hands from sharp metal edges.
- Safety Glasses or Goggles – Shield eyes from metal shards and flying debris.
- Hard Hat (if required by site or local regulations)
Additional Helpful Tools
- Caulk Gun & Sealant – For sealing joints, screws, and flashing connections.
- Utility Knife – Cutting underlayment or synthetic roofing materials.
- Pry Bar or Flat Bar – For removing old roofing materials.
- Measuring Level – Ensures panels are aligned and leveled correctly.
Roofing Square – Helps maintain straight panel placement.
Pro Tip:
Invest in good-quality metal snips and a reliable drill/driver with adjustable torque. These two tools will be used more than any others during installation and can dramatically affect the speed and finish of your work.
Materials Needed for Metal Roof Installation
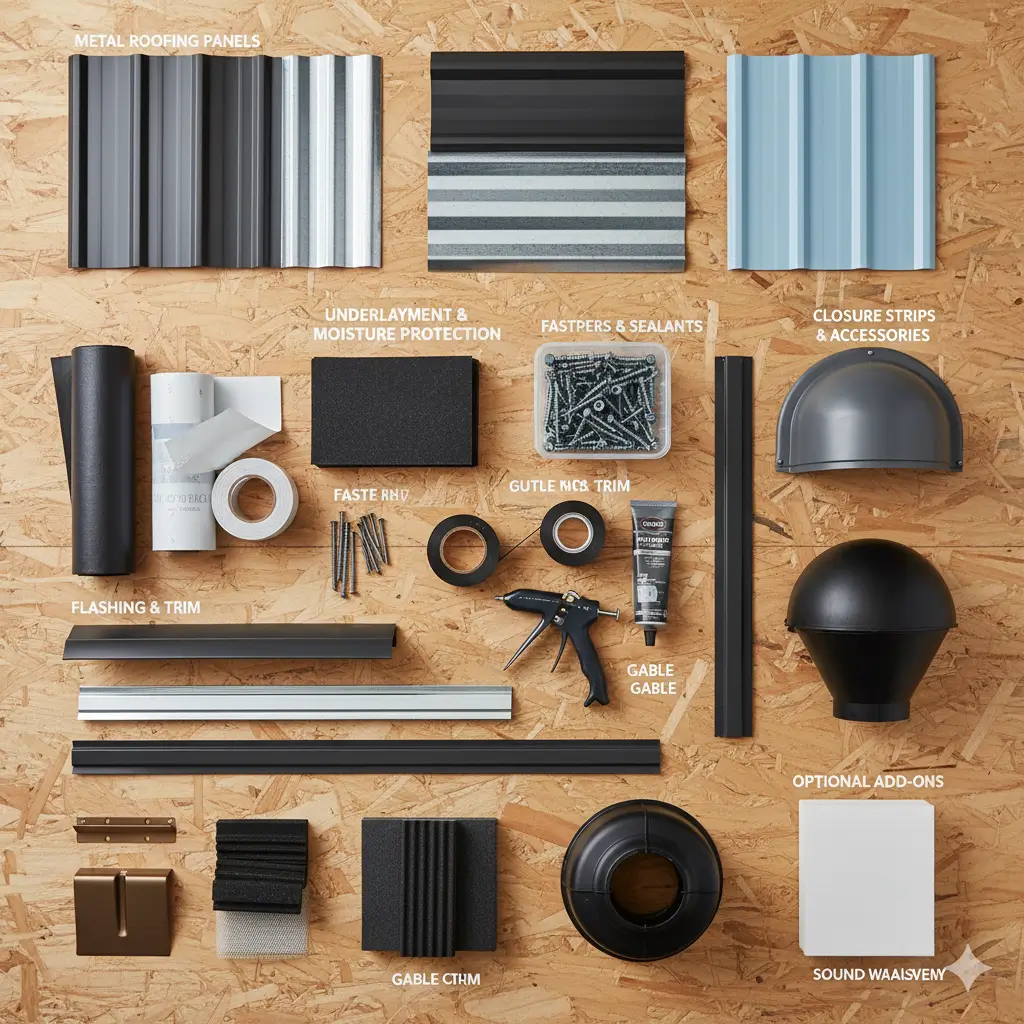
Having the right materials is just as important as proper installation techniques. The list below combines all essential components used in professional metal roofing installations to ensure durability, waterproofing, and long-term performance.
1. Metal Roofing Panels
- Steel, aluminum, or galvanized metal panels (standing seam, corrugated, or ribbed)
- Pre-cut or custom-cut to roof length
2. Underlayment & Moisture Protection
- Synthetic or Felt Roofing Underlayment – First moisture barrier over the roof deck
- Ice and Water Shield – Self-adhesive membrane used in valleys, eaves, and roof edges for extra leak protection
- Roofing Felt (optional) – Traditional alternative to synthetic underlayment
3. Fasteners & Sealants
- Self-Tapping Roofing Screws with Rubber Washers – Prevent leaks and secure panels firmly
- Roofing Nails (for underlayment or drip edge if required)
- Butyl Tape – For sealing overlaps between panels and flashing
- Metal Roofing Sealant / Silicone or Polyurethane Caulk – Provides waterproof sealing around edges and screws
4. Flashing & Trim
These components protect roof joints and exposed edges from water infiltration:
- Drip Edge / Eave Trim – Guides water away from fascia and roof edges
- Gable Trim / Rake Trim – Protects the sloping edges of the roof
- Sidewall Flashing & Endwall Flashing – Used where the roof meets walls or chimneys
- Valley Flashing – Installed where two roof slopes meet
- Ridge Cap – Covers the peak of the roof for ventilation and protection
- Roof Vent Boots / Pipe Flashing – Seals around vent pipes or exhausts
5. Closure Strips & Insulation Accessories
- Inside Foam Closure Strips – Fit under panel ribs at eaves to block insects, wind, and moisture
- Outside Foam Closure Strips – Installed at the ridge cap or panel top for a tight seal
Ventilation Materials (optional) – Ridge vent, furring strips, or spacer systems if added ventilation is needed
6. Optional Add-Ons (Based on Project Needs)
- Furring Strips / Purlins – Used when installing over existing shingles or for ventilation layouts
- Snow Guards (for colder regions) – Prevent snow from sliding off metal roofs
- Sound-Deadening Insulation – Reduces rain noise and improves energy efficiency
Pro Tip:
Make sure all metal trims, panels, screws, and flashing are compatible materials to avoid galvanic corrosion. For example, mixing copper and galvanized steel can cause premature rusting.
Approaches to Metal Roof Installation
When installing a metal roof, the method you choose can depend on whether you’re working on a new build or upgrading an existing structure. Each approach has unique steps, benefits, and considerations for cost, performance, and long-term durability.
New Construction Metal Roof Installation
In new construction projects, metal roofing is installed on a freshly built structure, which allows for more control over the process and materials. Here’s how it typically works:
- Roof Decking Preparation:
Depending on the type of metal panel used, roofing panels may require a solid surface like plywood or OSB sheathing. Some structural panels are designed to span rafters or trusses directly, but residential systems often require a solid deck for support and a smoother finish. - Underlayment Application:
After decking, a roofing underlayment—such as synthetic felt or an ice and water shield—is installed to provide temporary moisture protection and an added layer of defense against leaks. - Panel Installation:
Once the underlayment is in place, metal roofing panels, flashing, trim, and fasteners are installed according to manufacturer specifications to create a watertight system. - Timing Consideration:
Since the roof is essential to weatherproofing the building, interior finishing work like drywall installation usually doesn’t begin until the roof is fully installed.
Ideal For: New homes, additions, garages, or any structure being built from the ground up, where complete system design and placement can be controlled from the start.
Recover/Overlay (Re-Roofing Over Existing Roof)
A recover or overlay installation involves placing a new metal roof on top of an existing roofing system, typically asphalt shingles. This option can be cost-effective and faster than a full tear-off.
Benefits of the Recover Method:
- Cost & Time Savings:
Eliminates the labor and disposal costs of removing old shingles. - Eco-Friendly:
Leaving existing shingles reduces landfill waste—important given that shingles can take centuries to decompose. - Less Disruption:
Quicker installation and less mess on-site.
Important Considerations:
- Roof Condition Matters:
This method is only suitable if the existing roof is structurally sound, free of leaks, and meets local building codes. - Surface Irregularities:
Metal panels can show uneven surfaces. Curled shingles, warped decking, or soft spots can “telegraph” through the metal and affect appearance and performance. - Code Compliance:
Many local codes only allow overlays if there is one or two existing layers of shingles. More than that usually requires a full tear-off.
Ideal For: Homeowners with a stable, non-leaking roof seeking a budget-friendly upgrade to metal roofing.
Remove and Replace (Full Tear-Off)
If the existing roof is severely damaged, holds too many shingle layers, or shows signs of trapped moisture or rot, a full removal is the safest approach.
- Old Roofing Removed:
All materials—shingles, underlayment, flashing—are stripped down to the original roof deck. - Deck Inspection & Repair:
Damaged or rotten plywood or sheathing is replaced to ensure a solid base for the new metal roof. - Full System Installation:
Underlayment, metal panels, flashing, ridge caps, closure strips, and sealants are installed to form a complete, durable roofing system.
Trade-Off: More cost and labor upfront, but it ensures long-term reliability, better energy efficiency, and full compliance with building standards.
Choosing Metal Roofing Materials
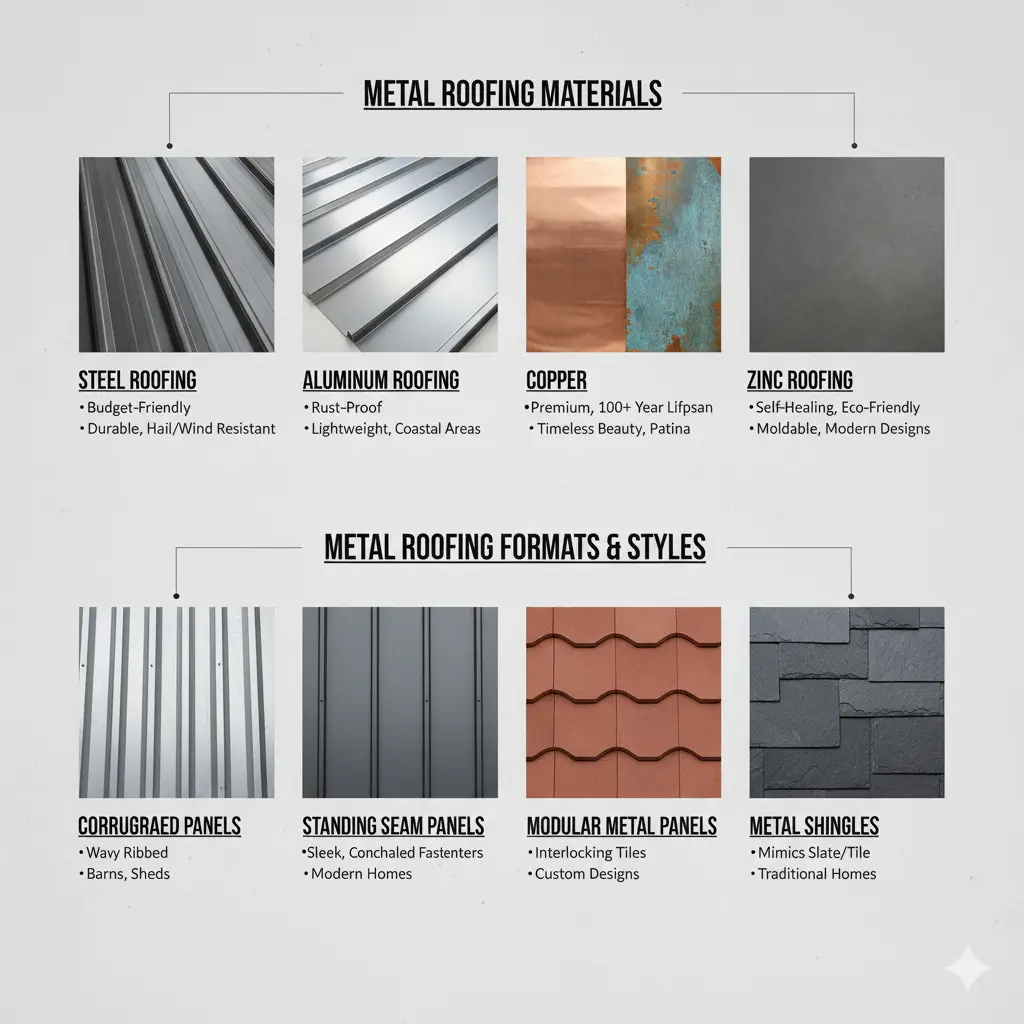
Selecting the right metal roofing material is a major decision that affects your roof’s durability, appearance, cost, and performance in different weather conditions. From budget-friendly steel panels to high-end copper finishes, each material offers unique benefits suited for specific environments, architectural styles, and homeowner preferences.
1. Steel Roofing
Steel is one of the most popular metal roofing options due to its balance of affordability and strength.
- Pros: Durable, budget-friendly, and available in various painted or galvanized finishes.
- Best For: Residential homes, commercial buildings, and areas with high wind or hail exposure.
Note: Requires protective coatings like galvanized (zinc) or Galvalume (zinc-aluminum) to prevent rust and improve lifespan.
2. Aluminum Roofing
Aluminum is prized for its corrosion resistance, especially in coastal and humid environments.
- Pros: Lightweight, rust-proof, and energy-efficient.
- Best For: Coastal regions or areas exposed to saltwater or heavy moisture.
Note: Slightly more expensive than steel, but offers longer resistance to corrosion without heavy maintenance.
3. Copper Roofing
Copper is a premium roofing material known for its timeless beauty and natural aging effect.
- Pros: Extremely long-lasting (up to 100+ years), naturally resistant to corrosion, and develops a green patina that enhances aesthetics over time.
- Best For: Historic homes, luxury properties, and architectural accents like turrets, domes, and bay windows.
Note: The most expensive metal roofing option may be prone to denting if not properly supported.
4. Zinc Roofing
Zinc is highly versatile and eco-friendly, with the ability to self-heal minor scratches over time.
- Pros: Naturally weather-resistant, moldable for custom designs, low maintenance, and 100% recyclable.
- Best For: Modern architecture, curved or complex roofing designs, and sustainable construction projects.
Note: More expensive than steel and aluminum but cheaper than copper.
Metal Roofing Formats & Styles
Metal roofing materials are manufactured in different styles to suit various structures and design preferences:
| Format | Description | Common Uses |
|---|---|---|
|
Corrugated Panels |
Wavy, ribbed sheets; lightweight and easy to install |
Barns, sheds, agricultural & industrial buildings |
|
Standing Seam Panels |
Vertical panels with concealed fasteners; extremely weather-tight and sleek |
Residential homes, commercial roofs, and modern architecture |
|
Modular Metal Panels |
Factory-formed pieces that interlock; available in different designs and colors |
Homes, offices, custom roofing projects |
|
Metal Shingles |
Designed to mimic asphalt, slate, or tile but made from metal |
Traditional homes seeking a classic look with added durability |
How to Choose the Best Metal Roofing Material
Consider the following factors before making your decision:
- Climate & Environment: Aluminum or zinc for coastal areas; steel for storm-prone regions; copper for longevity.
- Budget: Steel is most affordable, zinc and aluminum are mid-range, and copper is premium.
- Style Preferences: Copper and zinc for luxury or custom designs; shingles for a classic appearance; standing seam for modern aesthetics.
Maintenance & Lifespan: Copper and zinc require minimal maintenance; steel may need repainting after decades; aluminum is low-maintenance in salty climates.
Your Step-by-Step Roadmap to Installing a Metal Roof

Installing a metal roof demands accuracy, patience, and attention to detail. Follow this well-structured roadmap based on proven techniques from expert installers.
Step 1 – Prepare the Roof Dec
Before installing anything, ensure your base is safe and solid.
- Inspect the roof deck (plywood or OSB) for rot, warping, or loose boards. Replace damaged areas.
- Remove old shingles, nails, debris, and sweep the deck clean.
- Check roof pitch—most metal roofs require a minimum of 3:12.
- If needed, install furring strips or battens to improve ventilation and prevent moisture buildup.
Step 2 – Apply the Underlayment
- Install ice and water shield or synthetic underlayment starting at the eaves.
- Unroll it horizontally, keep it flat and wrinkle-free, and overlap each row by 4–8 inches.
- Secure with cap nails or staples.
- Install drip edge flashing at the eaves before underlayment in warm regions and over the underlayment in colder climates to prevent ice damming.
Step 3 – Order and Prepare Metal Panels
- Measure the roof and order panels to match the full roof length when possible to avoid seams.
- If full-length panels aren’t manageable, order in shorter segments and plan overlaps strategically.
- Store panels in a dry, flat area and handle with care to avoid bending or scratching.
Step 4 – Bend and Prepare Trim Ends
- Before installing trims (eave, gable, or rake trim), cut and bend the ends to wrap neatly around corners.
- Use aviation snips to make 1-inch relief cuts and a hand seamer to bend tabs securely.
- This prevents open gaps and ensures a clean, watertight finish.
Step 5 – Install Eave Trim
- Position the eave trim tightly against the fascia.
- Fasten using roofing nails or screws along the roof deck.
- In cold climates, install eave trim over the underlayment; in warm areas, under it for better drainage.
Step 6 – Splice and Overlap Trim Sections
- Where two trims meet, splice them together with a minimum 1-inch overlap.
- Cut the bottom hem of the underlapping trim and apply sealant.
- Slide the overlapping trim over and press firmly for a watertight connection.
Step 7 – Snap a Square Reference Line
- Use the 3-4-5 method (or multiples like 21-28-35 feet) to establish a perfectly square reference line.
- Snap the chalk line along the roof to ensure all panels are installed straight and parallel.
Step 8 – Install Closure Strips and Set Panels
- Place inside foam closure strips along the eave, 1 inch from the edge.
- Secure them using butyl tape and add a bead of sealant.
- Set the first metal panel, allowing a 1-inch overhang beyond the eave.
- Make sure it aligns with the reference line both at the top and bottom.
Step 9 – Drive Screws the Right Way
- Fasten panels starting from the bottom and working upward.
- At the eave, place screws on both sides of every rib, penetrating the closure strips.
- Space screw rows no more than 18–24 inches apart.
- Tighten until the rubber washer compresses slightly—never overtighten or leave loose.
- Clean up any metal shavings immediately to prevent rust.
Step 10 – Overlap and Secure Panels
- Each panel should overlap the rib of the previous one—match the anti-siphon channel to the flat side.
- Apply butyl tape or metal roof sealant along overlapping seams for added waterproofing.
- Continue aligning and fastening panels evenly across the roof.
Step 11 – Install Gable/Rake Edge Trim
- After all panels are fixed, attach the gable or rake trim to protect the side edges.
- Bend ends to meet eave corners, apply butyl tape under the trim, and fasten every 12 inches.
Step 12 – Secure the Ridge Cap
- Place outside foam closure strips 3–4 inches below the ridge on both sides.
- Apply a bead of sealant and position the ridge cap over the peak.
- Fasten using 2-inch screws through every rib into the roof deck.
- Ensure airflow if using a vented ridge cap system.
Pro Tip:
Take your time setting the first panel perfectly straight—this determines the accuracy of the entire roof.
Key Job Site Requirements for a Smooth Metal Roof Installation
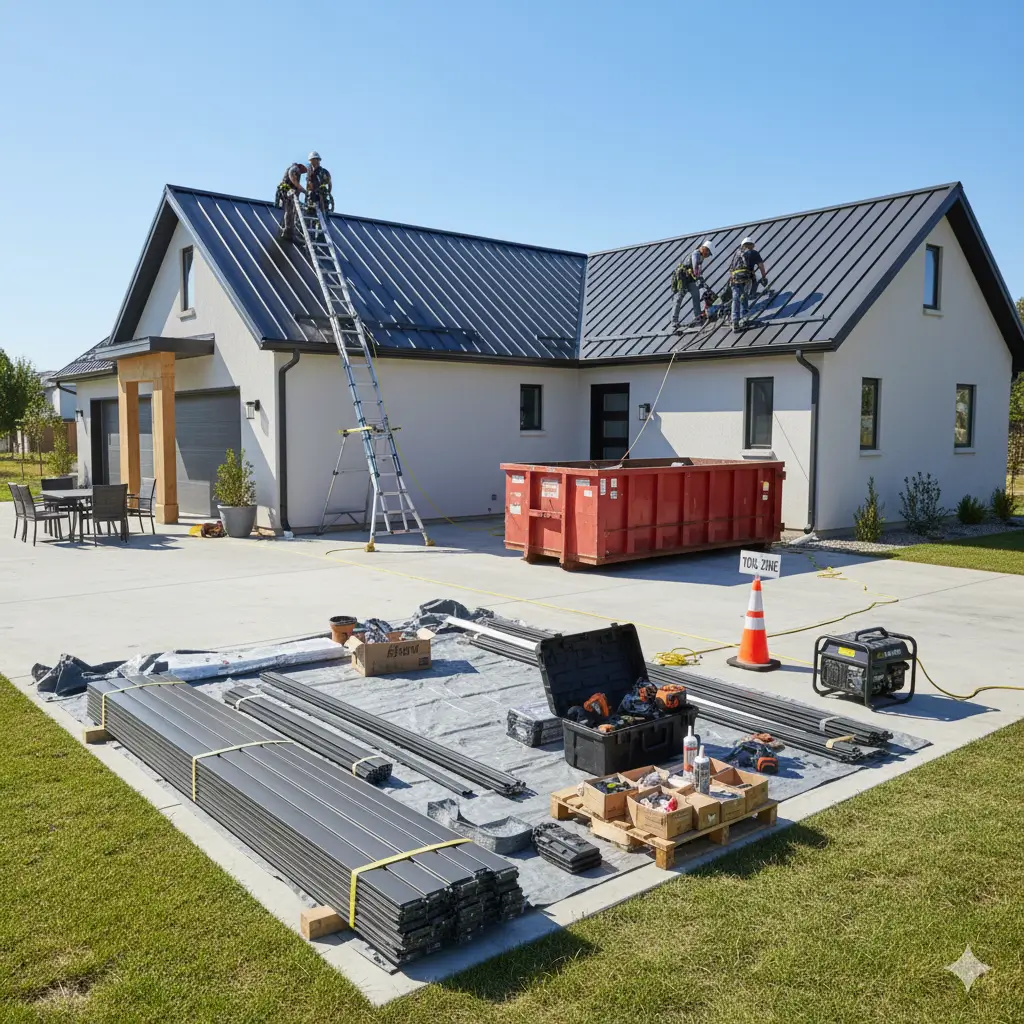
Proper planning at the job site is essential to ensure your metal roof installation is efficient, safe, and problem-free. Whether it’s a residential or commercial project, the following site requirements will help contractors work smoothly and reduce unnecessary delays.
1. Site Accessibility & Workspace Setup
- Ensure there is a clear and flat area for storing metal panels, trim, fasteners, and tools.
- Provide designated space for vehicle parking, delivery trucks, and dumpsters for debris disposal.
- Workers should have unobstructed access around the entire building, especially near eaves, gables, and roof edges, for panel installation.
- Remove any obstacles like patio furniture, landscaping items, or overhanging tree branches that can delay work or cause hazards.
2. Reliable Power Supply
- Most roofing tools—such as drills, metal cutters, and fastening equipment—require continuous electrical power.
- Ensure access to multiple outdoor electrical outlets to prevent frequent tripped breakers.
If the power supply is limited or unavailable, a portable generator should be arranged before installation begins.
3. Safety Measures & On-Site Awareness
Safety is critical when working with metal roofing due to sharp edges, heavy panels, and work at elevated heights.
- Only trained installers should handle metal panels, flashing, and trim to avoid cuts or injuries.
- Installers should be equipped with personal protective equipment (PPE) like safety harnesses, gloves, protective eyewear, and non-slip roofing boots.
- Keep homeowners, children, and pets away from the work zone during active installation hours.
Ensure ladders, scaffolding, and fall protection systems are secured and placed on stable ground.
4. Weather Considerations
- Metal roofing should ideally be installed in dry weather conditions to avoid slipping hazards and improper sealing.
Strong winds can make panel handling difficult, so monitor weather forecasts and plan accordingly.
5. Debris Management & Clean-Up Plan
- Allocate space for a dumpster or disposal trailer for old roofing materials, packaging, and construction waste.
Sharp metal scraps and fasteners should be cleaned daily to prevent injuries or damage to vehicles and landscaping.
Why Job Site Preparation Matters
Taking the time to prepare the job site properly:
- Speeds up installation
- Improves worker safety
- Protects your property from damage
- Ensures a clean and organized workflow
Top Metal Roofing Mistakes to Avoid
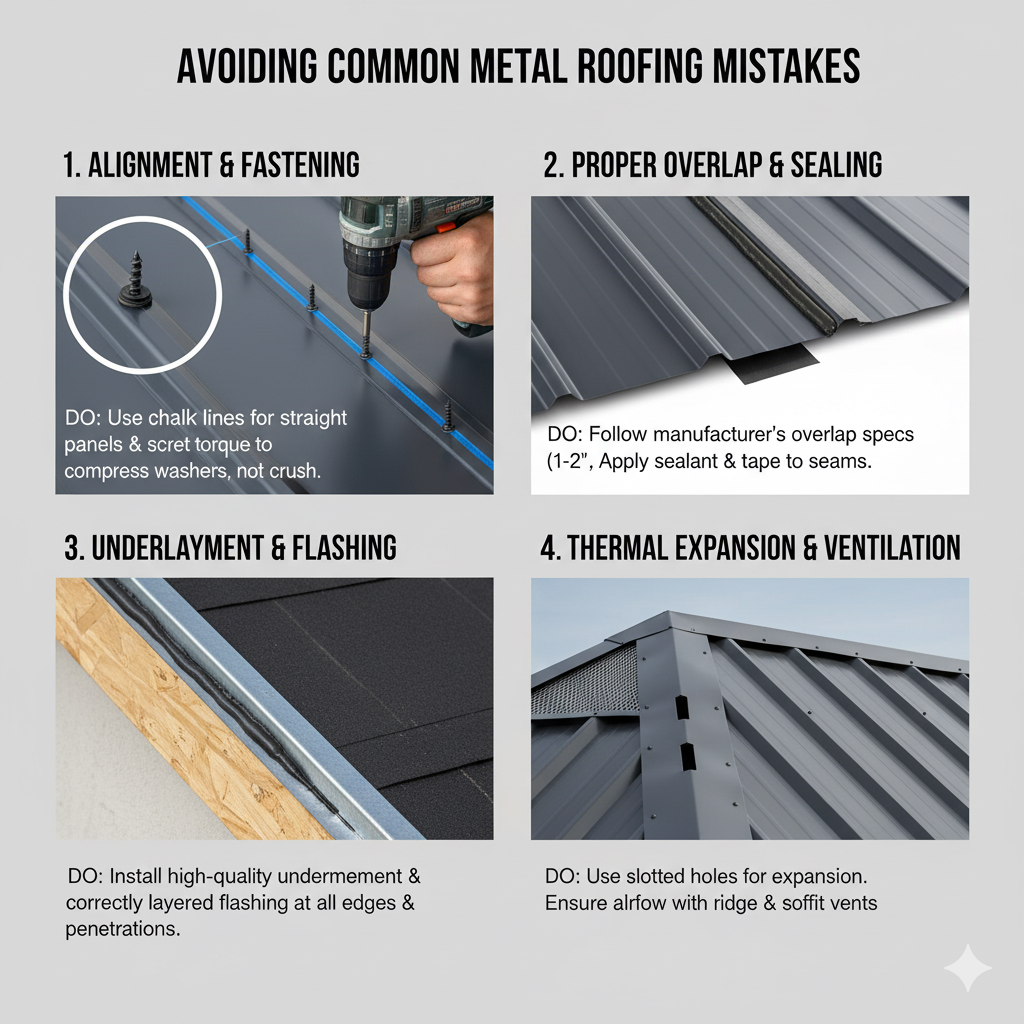
Installing a metal roof requires precision and attention to detail. Even small mistakes during installation can lead to leaks, poor performance, reduced lifespan, or costly repairs. To ensure a durable and long-lasting roof, avoid these common mistakes:
1. Misaligned Panels or Screw Lines
- Uneven screw rows make the roof look unprofessional and can compromise structural integrity.
- Misaligned panels can cause improper fit, leading to gaps where wind and moisture can penetrate.
Tip: Use a chalk line and measuring tools to ensure straight, consistent screw placement and panel alignment.
2. Overdriving or Underdriving Fasteners
- Overdriven screws can damage the rubber washer, causing cracks and leaks.
- Underdriven screws don’t seal properly, leaving gaps that allow water infiltration.
Tip: Use a drill with torque control and stop when the washer slightly compresses—no more, no less.
3. Skipping or Improperly Installing Underlayment
- Some DIY installers skip underlayment to save time or money, but this reduces moisture protection and can void warranties.
- Underlayment acts as a secondary waterproof barrier and helps with insulation and condensation control.
Tip: Always use high-quality underlayment (synthetic or self-adhering ice and water shield) and install it over a clean, dry roof deck.
4. Insufficient or Incorrect Panel Overlap
- Without proper overlap, wind-driven rain and snow can seep through panel seams.
- Overlapping too little or too much may cause uneven surfaces and aesthetic issues.
Tip: Follow manufacturer guidelines for minimum overlap requirements (typically 1″ to 2″ depending on the panel profile).
5. Ignoring Thermal Expansion and Contraction
- Metal expands in heat and contracts in cold. If panels are installed too tightly, they may buckle or warp over time.
Tip: Use slotted fastener holes where needed and don’t overtighten panels—allow room for natural movement.
6. Poor Flashing Installation
- Incorrectly installed flashing around chimneys, vents, and skylights is a major cause of leaks.
Tip: Make sure flashing is properly fitted, sealed with butyl tape or sealant, and installed beneath the upper roofing layers.
7. Not Allowing for Proper Ventilation
- Lack of ventilation can cause trapped heat and moisture, leading to mold growth and shortened roof lifespan.
Tip: Incorporate ridge vents, soffit vents, and breathable underlayment to maintain airflow and prevent condensation.
8. Using the Wrong Fasteners or Sealants
- Regular screws or low-quality sealants corrode over time and can compromise the roof’s integrity.
Tip: Use self-tapping roofing screws with neoprene washers and high-quality, UV-resistant sealants designed for metal roofing.
Polycarbonate vs. Metal Roof Panels: Key Differences
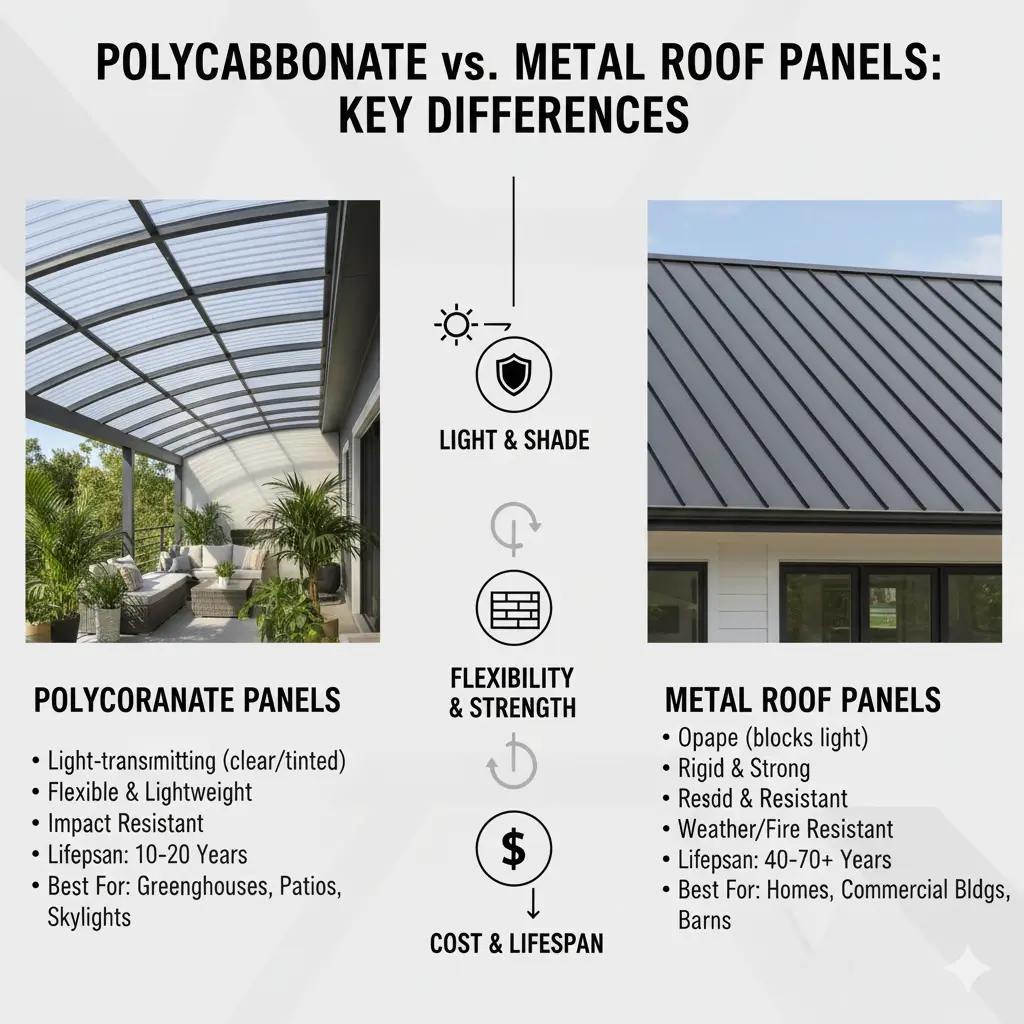
When choosing roofing materials, understanding the differences between polycarbonate and metal panels can help you make an informed decision based on durability, appearance, cost, and intended use. Both offer unique advantages, but they are ideal for very different applications.
1. Material & Composition
Feature | Polycarbonate Panels | Metal Roof Panels |
Material Type | Thermoplastic polymer | Steel, aluminum, copper, or zinc |
Flexibility | Highly flexible and lightweight | Rigid and strong |
Appearance | Available in clear, tinted, or opaque sheets | Panels, shingles, or standing seam forms in various colors and finishes |
2. Durability & Lifespan
- Polycarbonate: Resistant to impact and UV rays, but can scratch or discolor over time. Typically lasts 10–20 years, depending on environmental exposure and thickness.
- Metal Roofing: Extremely durable with a lifespan of 40–70+ years, resistant to fire, wind, and harsh weather conditions.
Best for: Long-term roofing solutions and structures needing maximum protection.
3. Light Transmission & UV Protection
- Polycarbonate Panels: Allow natural light to pass through while blocking harmful UV radiation. Ideal for areas like patios, greenhouses, sunrooms, pergolas, skylights, and carports.
- Metal Panels: Opaque and fully block light, providing better insulation and shade.
Best for: Skylights or spaces where light is desirable without direct heat.
4. Weather Resistance
- Polycarbonate: Can handle hailstorms and moderate weather, but extreme heat may cause expansion or warping over time.
- Metal Roofing: Highly weather-resistant—handles heavy snow, strong winds, rain, and fire exceptionally well.
5. Installation & Flexibility
- Polycarbonate Panels: Lightweight, easy to cut, and can be curved for arched roofs, awnings, and walkways.
- Metal Panels: Require more precise installation and tools but offer stronger long-term performance.
6. Cost Comparison
- Polycarbonate: More economical upfront but may require replacement sooner.
- Metal Roofing: Higher initial cost but long-lasting with minimal maintenance—often more cost-effective over time.
7. Common Uses
Material | Preferred For |
Polycarbonate | Greenhouses, skylights, pergolas, sunrooms, patios, pool enclosures, carports |
Metal Roofing | Residential homes, commercial buildings, barns, industrial facilities, garages, and long-term roofing |
Which One Should You Choose?
- Choose Polycarbonate if you need: natural sunlight, UV protection, flexibility, or a lightweight covering for semi-open structures.
- Choose Metal Roofing if you want: long-term durability, weather resistance, energy efficiency, and a fully protected roof system for your home or building.
Frequently Asked Questions (FAQs)
Metal roofing offers numerous benefits, including:
- Long Lifespan: Typically lasts 40–70 years, far longer than asphalt shingles.
- Low Maintenance: Requires minimal upkeep—usually just routine inspections and occasional tightening of fasteners.
- Weather & Fire Resistance: Highly resistant to wind, fire, snow, moss, mold, and pests.
- Energy Efficiency: Reflects solar heat, helping reduce cooling costs by 10–25% in warmer months.
Eco-Friendly: Most metal roofing materials are recyclable and often made from recycled steel or aluminum.
- Higher Upfront Cost: Metal roofing can cost 2–3 times more than traditional asphalt shingles.
- Noise During Rain or Hail: Without proper insulation or underlayment, it can be noisier during storms or falling debris.
- Potential for Denting: Large hail, falling branches, or debris can dent softer metals like aluminum or copper.
Requires Skilled Installation: Poor installation can lead to leaks, misaligned panels, or reduced lifespan.
It can be, but with proper installation—using solid decking, insulation, and underlayment—the noise level is significantly reduced and often similar to traditional roofing.
No. In fact, metal roofs reflect sunlight rather than absorbing it. This helps keep your home cooler and reduces air conditioning costs, especially when using cool roof coatings or reflective finishes.
Yes, in many cases. Metal roofing is lightweight, which allows it to be installed over one or two layers of existing shingles (depending on local building codes). However:
- The roof deck must be in good condition.
- Adding underlayment or battens is recommended for better ventilation and moisture protection.
No. Metal roofing does not increase the likelihood of a lightning strike. If lightning does strike, metal is non-combustible and can help safely dissipate the energy, making it safer than many other materials.
With proper installation and minimal maintenance, most metal roofs last 40–70 years. Premium materials like copper or zinc can last 80–100+ years.
Yes. Metal roofing can reflect up to 70% of solar heat, helping lower indoor temperatures and reduce energy costs. Many roofs also meet Energy Star® efficiency standards.
Modern metal roofing is designed to resist rust. Materials like galvanized steel, aluminum, and coated panels have protective layers that prevent corrosion. Regular inspection of scratches and sealant areas helps prolong protection.